< Sidux 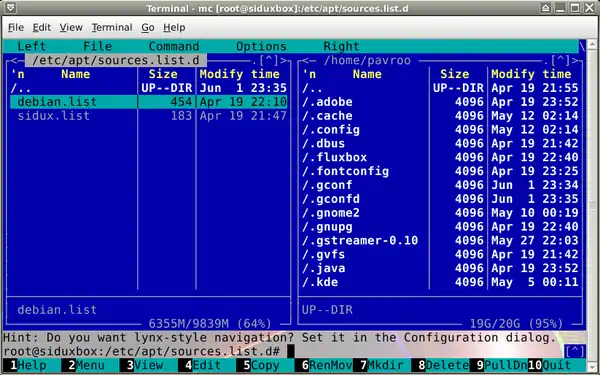

Repositories
- If you want to have an access to non-free, contrib and multimedia repositories just change
- "sources.list" file adding new server addresses.
- There are two ways to do so:
- 1. Midnight Commander's built-in text editor: Menu-> Accessories-> Terminal:
- 1. Midnight Commander's built-in text editor: Menu-> Accessories-> Terminal:
su
admin/root password
mc
- a. Tab "Options" -> Configuration-> use internal edit-> make sure it is marked and Save it.
- b. Go to: /etc/apt/sources.list.d/debian.list -> edit it with F4 key.
- a. Tab "Options" -> Configuration-> use internal edit-> make sure it is marked and Save it.
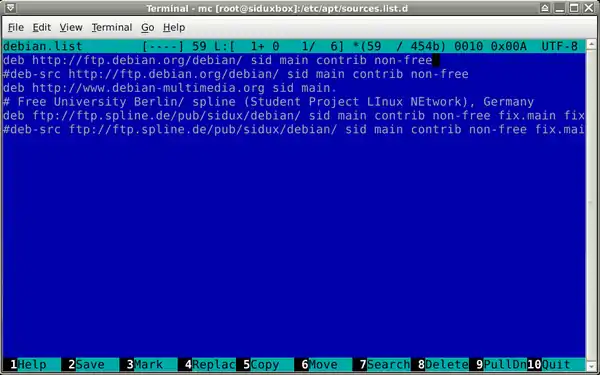
- c. Change a line:
deb http://ftp.debian.org/debian/ sid main
- d. For new one you can see below:
deb http://ftp.debian.org/debian/ sid main contrib non-free
- e. Add new line of multimedia repo:
- e. Add new line of multimedia repo:
deb http://www.debian-multimedia.org sid main non-free
- f. Save the file with F2 bottom and escape using F10 key.
- g. Enter file: /etc/apt/sources.list.d/sidux.list and change the line for:
- f. Save the file with F2 bottom and escape using F10 key.
deb http://sidux.com/debian/ sid main contrib non-free fix.main fix.contrib fix.non-free
- or:
http://sidux.office-vienna.at/sidux/debian/ sid main contrib non-free fix.main fix.contrib fix.non-free
- h. Save it and quit Midnight Commander.
- h. Save it and quit Midnight Commander.
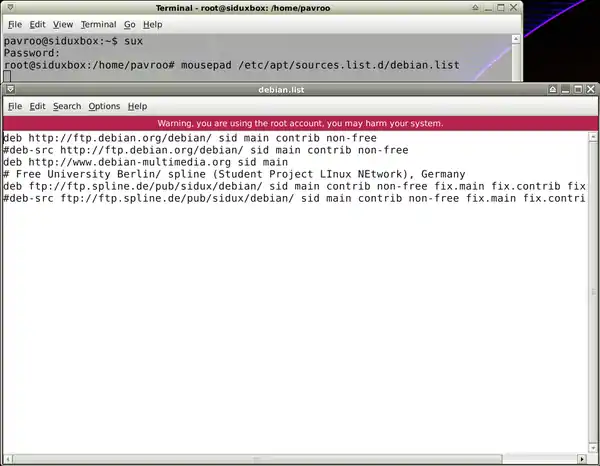
- 2. Mousepad text editor -> Terminal
sux
 root password
mousepad /apt/etc/sources.list.d/debian.list
 and
mousepad /apt/etc/sources.list.d/sidux.list
- (sux command lets run softwares in graphic environment straight from a text console as root)
- a. Change first line and add other repositories addresses as you did using "mc".
- (sux command lets run softwares in graphic environment straight from a text console as root)
- b. Tab File-> Save it and close editor.
- 3. Download "debian-multimedia-keyring" package (public key) from: http://debian-multimedia.org/
- Go to Terminal and (as a root) install it:
dpkg -i debian-multimedia-keyring_2008.10.16_all.deb
- b. Refresh packages list:
apt-get update
- c. And install updates:
apt-get dist-upgrade
Language packages
- If you have chosen different language than English you may install missing language packages.
- Just check what's available to get, I used to install additional polish packages:
apt-get install wpolish myspell-pl aspell-pl iceweasel-l10n-pl
- For KDE I install package:
kde-i18n-pl
Firewall
- The firewall "iptables" is pre-installed with the system, what you have to do is activate it.
- 1. The simplies way to do that is use "ufw" (Uncomplicated Firewall) so create two rules for firewall:
- all outgoing connection are allowed and all incoming connections are blocked:
apt-get install ufw
ufw enable
- You should get confirmation:
Firewall is active and enabled on system startup
- You can always check the firewall status:
ufw status
Status: active
- Or deactive it (I suggest not):
ufw disable
- 2. There is an another way to activate firewall using GUI software like Firestarter or Gufw
- or Guarddog for KDE.
Mounting partitions
- After system installations all partitions should be detected and mounted automatically
- in "/media" folder.
- In a case if anyone missing you can mount it manually.
- Run terminal and type:
sux
 root password
fdisk -l
- You will get a list of all partitions on your computer drive including not mounted.
Pernament mounting
- All partitions will be mounted pernamently editing "fstab" file, type it in Termial as root:
mousepad /etc/fstab
- 1. "ntfs" file system partition (for example /dev/sda1) read only: add the line on the end of the list:
/dev/sda1 /media/sda1 ntfs-3g ro,users,auto 0 1
- a. Do not use "Space" button but "Tab" only.
- b. Create "sda1" subfolder in "/media":
mkdir /media/sda1
- c. And install "ntfs" package if needed:
apt-get install ntfs-3g
- 2. "fat32/vfat" file system partition (for examle /dev/sda5), read and write - add the line:
/dev/sda5 /media/sda5 vfat rw,users,auto 0 1
- or
/dev/sda5 /media/sda5 vfat defaults,umask=007,gid=46,utf8,auto 0 1
- Create "sda5' subfolder in "/media":
mkdir /media/sda5
- 3. "ext3" or "ext4" (for examle /dev/sda6) - add the line:
/dev/sda6 /media/sda6 ext4 defaults,users,auto 0 1
- Create "sda6" subfolder in "/media:
mkdir /media/sda6
- 4. "swap" partition (for example /dev/sda7) - add the line:
/dev/sda7 none swap sw 0 0
- Any "fstab" file changes will be working after system rebooting.
Temporary mounting
- Partitions can be temporary mounted for a session time.
- 1. Create "new" subfolder (for example) in "/home" directory and mount a "vfat" (sda5) partition:
mkdir /home/your_user_name/new
mount /dev/sda5 /home/your_user_name/new -t vfat
- 2. The mounted partition will be unmounted automatically after system reboot or having command:
umount /dev/sda5
- Next to System and packages management
- Back to Main page
This article is issued from Wikibooks. The text is licensed under Creative Commons - Attribution - Sharealike. Additional terms may apply for the media files.