I figured out how to do this, including bcache. I've only tried this in a VirtualBox VM so far, but I assume it will work similarly on real hardware.
According to the comments above on my original question, this is not a sensible configuration. I've been using a setup like this (but without encryption) for years and it's been fine for me. Maybe I'm just not that demanding, or bcache is doing its job and speeding up access to things on /home behind the scenes, without me needing to manually decide which things go on a small, fast /home on the SSD and which things go on a big, slow partition on the hard drive. Anyway, I'm stubborn and I wanted to see if I could make it work, and I think I have - but please consider the comments above before you choose to set things up like this.
I've written this out in perhaps excessive detail, but I was going to do it anyway for my own reference so I thought I might as well post it here. You'll probably need to make some manual tweaks to drive names and partition sizes if you do try to follow this, of course.
I'm going to explain this as a set of steps to follow with VirtualBox, but this is just as a practice run before trying on real hardware. Because I will be using old hardware (i5-2500K CPU, Intel DQ670W motherboard) with an NVMe SSD on a PCI-e card which the BIOS probably won't be able to boot from, I am putting all the boot related partitions on the hard drive and using that as the boot drive. There'd probably be no reason to do this on more modern hardware, or if you were actually trying to set this up in VirtualBox "for real".
These instructions include bcache support, but I assume just missing the bcache-specific steps out will successfully result in a system with full disk encryption on two drives, just with no caching. I haven't tried this though.
Create a new VM with (say) 4GB RAM
Create and attach a virtual hard disk called "HDD" of (say) 64GB to SATA port 0
Create and attach a virtual hard disk called "SSD" of (say) 32GB to SATA port 1
- Tick the "Solid-state drive" box just for neatness, but it probably doesn't affect anything
Insert the Ubuntu 22.04 Desktop installer image into the optical drive.
Start the VM and boot as far as the "Welcome" screen
Press Ctrl-Alt-F2 to get a virtual console, log in as "ubuntu" and do "sudo bash" to get a root shell
Use "gdisk" to set up the partitions so they look like this: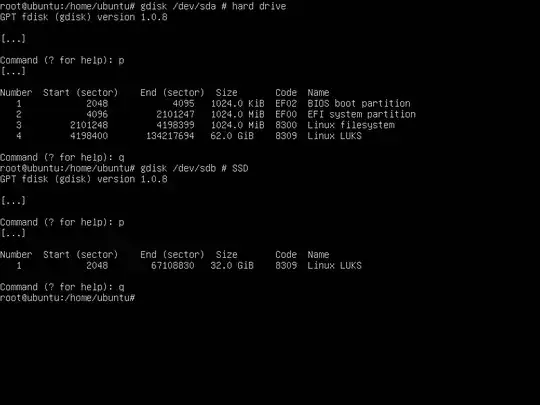
I'm not going to try to provide step-by-step instructions for operating "gdisk" here, but I will note that when it asks for the first sector, just press Enter, and when it asks for the last sector type "+" (very important) followed by the size, e.g. "+1M" or "+1024M", or just press Enter to use the rest of the disk.
This might not be necessary, but I was paranoid: type "sync" and "reboot" and follow the above steps again to get back to a root shell.
Format the EFI partition as FAT32:
mkfs.fat -F 32 /dev/sda2
Set a password (I strongly suggest the same password) for the two LUKS partitions:
cryptsetup luksFormat /dev/sda4 # LUKS partition on hard drive
cryptsetup luksFormat /dev/sdb1 # LUKS partition on SSD
Open those two LUKS partitions:
cryptsetup luksOpen /dev/sda4 sda4_crypt
cryptsetup luksOpen /dev/sdb1 sdb1_crypt
Create LVM physical volumes on those two partitions:
pvcreate /dev/mapper/sda4_crypt
pvcreate /dev/mapper/sdb1_crypt
Create LVM volume groups - I've included the hostname in the names here, as I understand it's painful if you subsequently move the drives to another machine and end up with clashing volume group names. I'd suggest avoiding hyphens in the volume group names, as LVM seems to like to double them up sometimes and it gets slightly confusing.
vgcreate medusahdd /dev/mapper/sda4_crypt
vgcreate medusassd /dev/mapper/sdb1_crypt
Create LVM logical volumes. Here I'm creating a swap partition, a root partition and a bcache cache partition on the SSD, and a bcache backing partition on the HDD. If you're not interested in using bcache, you obviously don't need the bcache cache partition, and the bcache backing partition here will just be an ext4 filesystem or similar.
lvcreate -n swap medusassd -L 4G
lvcreate -n root medusassd -L 16G
lvcreate -n cache medusassd -l 100%FREE
lvcreate -n homebacking medusahdd -l 100%FREE
Install "bcache-tools":
apt install bcache-tools
Set up bcache so the cache LV is used as a caching device for the home-backing LV backing device:
make-bcache -B /dev/mapper/medusahdd-homebacking -C /dev/mapper/medusassd-cache
Make a filesystem on the new /dev/bcache0; this may not be essential, but the installer seems to regard /dev/bcache0 as a device rather than a partition if you don't do this, and I did:
mkfs.ext4 /dev/bcache0
Press Ctrl-Alt-F1 to return to the graphical installer. Choose the "Install" option and proceed normally until you get to "Installation type", where you should choose "Something else".
Make sure the "device for boot loader installation" is the hard drive, /dev/sda. (Probably only important if you're trying to practice for a hardware installation on the specific old hardware I described earlier.)
Set /dev/bcache0 as an ext4 file system with mount point /home and (probably not necessary) tick the box so the installer will format it.
Set /dev/mapper/medusassd-root as an ext4 file system mounted at "/" and tick the box to format it.
Set /dev/mapper/medusassd-swap as a swap area.
Set /dev/sda3 as an ext4 file system mounted at "/boot" and tick the box to format it.
Check /dev/sda1 and /dev/sda2 have been automatically recognised as biosgrub and efi respectively.
Click "Install Now"; in my case the confirmation screen looked like this: 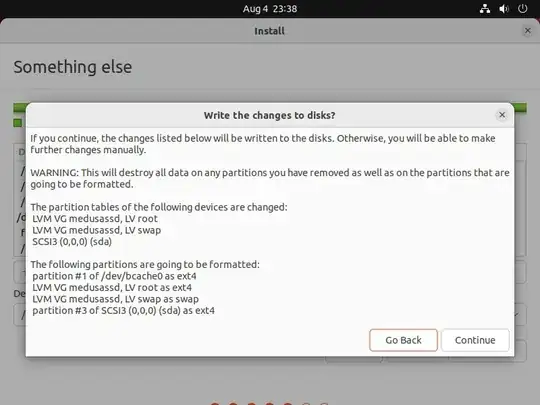
Continue with the rest of the installation as normal.
Restart when prompted. This will show the graphical boot splash screen for a bit, then eventually drop to a text mode BusyBox shell. Manually decrypt the encrypted partitions and mount the root partition:
cryptsetup luksOpen /dev/sdb1 sdb1_crypt
cryptsetup luksOpen /dev/sda4 sda4_crypt
mkdir /mnt
mount /dev/mapper/medusassd-root /mnt
Set up some bind mounts ready to chroot later on:
mount --bind /dev /mnt/dev
mount --bind /sys /mnt/sys
mount --bind /proc /mnt/proc
Mount the /boot partition ready to chroot:
mount /dev/sda3 /mnt/boot
chroot, so we can work on the installation on our drives:
chroot /mnt
Edit /etc/fstab (e.g. "vi /etc/fstab") and add a "#" at the start of the line for /home to comment it out. This may not be essential, but I have limited patience for experimenting. :-) Until we install bcache-tools we can't successfully mount a bcache-backed /home, and we want to avoid the system failing to boot so the network will come up and we can install bcache-tools.
Get the UUIDs for the encrypted partitions:
ls -l /dev/disk/by-uuid | egrep '(sda4|sdb1)' > /tmp/uuid
Create /etc/crypttab with those UUIDs in; because I don't think there's copy and paste available in this shell, we can use the /tmp/uuid file to avoid typing out the long UUIDs by hand, but you can obviously do this however you like:
vi /etc/crypttab
:r /tmp/uuid
Edit /etc/crypttab to look like this screenshot, but with your UUIDs:
Update the initramfs and grub:
update-initramfs -u -k all
update-grub
Reboot the system:
sync
exit # leave chroot
sync
reboot # seems to have no effect for me...
sync
sync
halt # machine hangs - reboot it manually (e.g. via Machine->Reset in VirtualBox)
You should be prompted for the password at the graphical login screen. Enter it. The system should boot to the regular login screen, where you can log in as the user you set up during installation. The /home directory on the bcache partition is not currently accessible as the system doesn't know how to mount it, but this doesn't break things too badly and we're about to fix that. (The main effect I noticed is that the system thinks I have a US keyboard, despite what I set up during installation.)
Bring up a terminal and do:
sudo bash # get a root shell
apt install bcache-tools keyutils
bcache-tools will allow the system to mount our /home directory properly, so now edit /etc/fstab and remove the "#" at the start of the /home line which we added earlier.
Edit /etc/crypttab and change "luks" to "luks,keyscript=decrypt_keyctl". This tells the system to cache the password we enter during boot and use it for decrypting the other LUKS partition. If you don't do this it will probably work, but you'll be prompted for the password for the LUKS partition containing /home during boot.
Update initramfs and grub:
update-initramfs -u -k all
update-grub
Cross your fingers and reboot:
shutdown -rf now
You should get a graphical prompt for the encryption password and the system should then boot to the login prompt. Log in as the user you set up during installation. Everything should be fine: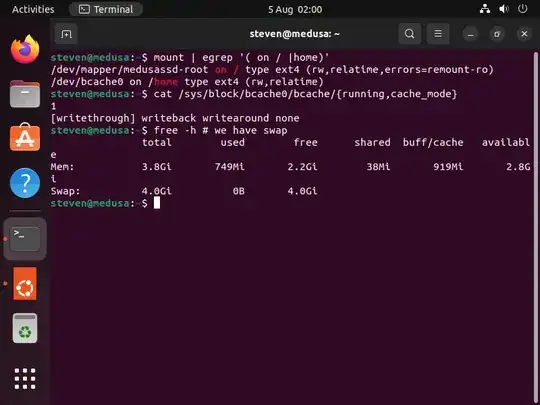
Note that this installation does not have any recovery password/data set up on the encrypted partitions, unlike the standard Ubuntu 22.04 full disk encryption. I haven't yet looked into this properly.
I did a lot of web searching and hair-pulling while trying to figure this out. Useful websites I found included:
Is this all a bit of a faff? Undeniably. It is only a one-off for installation though; once you get the installation working, it should "just work". For me personally, this also gives me a little more confidence I know what's going on behind the scenes - I want to start using full disk encryption in case I get burgled, but it's always seemed a little scary in case I somehow get locked out of my own machine, and it feels a little more tractable having been through the above process. YMMV, of course. :-)


