Your installed Ubuntu/Kubuntu system resides in /dev/sda1. That is to say that its root partition (/) is on /dev/sda1, and you don't have separate /boot, /home, or other partitions for that system.
It does use the swap partition from the old EasyPeasy system.
To get rid of the old EasyPeasy system:
Make sure there really are no valuable data in it. If you're sure none of your documents or other important files remain there (without being offloaded elsewhere), proceed.
Make sure all your documents and important files in the [K]Ubuntu system are backed up. Besides that you should have a backup of all important files (that wouldn't be easily replaceable) anyway, dynamic partition resizing carries a risk of data loss. There are two reasons for this--problems sometimes occur and are occasionally not fully recoverable, and you might yourself make a mistake during the process.
Boot from an Ubuntu live CD/DVD or USB flash drive. If you don't have one; create one. (This is the same thing you used to install Ubuntu.) It is not safe to edit a physical disk's partition table from a utility running in an OS installation that resides on the same physical disk.
Select Try Ubuntu without installing (not Install Ubuntu).
When a usable desktop comes up, run the GParted Partition Editor. To do this, press the Super key (also called the Windows key) or click the "dash home" icon on the upper left of the screen. Startityping gparted into the text box. When you see GParted come up, click it.
Alternatively, if this is a Kubuntu live environment, you'll find GParted in your menus, or you can use the Run... dialog box to run kdesudo gparted.
I will refer to /dev/sda5 and /dev/sda6 (as well as other partitions) in the following instructions. However, the following instructions are only correct as written if /dev/sda5 is much smaller than /dev/sda6. If /dev/sda5 is instead much larger than /dev/sda6, then assuming they are both still contained within the extended partition (see below), in that that situation (and that situation only) you should take every instance of /dev/sda5 to mean /dev/sda6 and every instance of /dev/sda6 to mean /dev/sda5.
(Somewhat annoyingly, occasionally partitions are numbered differently from the perspective of different systems. I don't believe that's the case here, but if it is, I don't want to have you accidentally remove the swap partition. That would not cause data loss, but it would require extra work to be done to fix it.)
Because of that possible complication--but even without it, assuming you are not already familiar/comfortable with dynamic partition resizing (in which case you would probably not have asked how to do this)--I recommend reading these instructions all the way through before starting to follow them.
In GParted, you'll see the /dev/sda1 partition at the left side of the horizontal bar representing all the partitions on the drive. To the right of that you'll see an extended partition, which is a kind of container for other partitions. The extended partition here is called /dev/sda2. Inside the extended partition is your swap partition, /dev/sda5 (on the right side), and /dev/sda6 (to the left of it). Unless they are switched, as described above. /dev/sda6 is the only partition you want to delete--it is the partition for the old EasyPeasy system. It is much larger than /dev/sda5.
Delete /dev/sda6 in GParted. Now shrink /dev/sda2 (the extended partition container) by clicking Resize/Move and dragging its left side as far to the right as possible, so it's just big enough to contain /dev/sda5 (the swap partition). When you do this, the value of free space preceding will increase (and free space following will remain the same).
By removing /dev/sda6 (the partition for the old EasyPeasy system) and shrinking down /dev/sda2, you created free space to the right of /dev/sda1. You probably recall /dev/sda1 as the partition that stores all the files associated with your new [K]Ubuntu system.
So now, using Resize/Move on /dev/sda1, expand /dev/sda1 to the right, causing a decrease in free space following. Drag its right border as far to the right as you can, so that it is as close as possible to the left border of /dev/sda2,the extended partition. Don't worry if a small amount of unpartitioned space remains between them. (That is, drag it as far as you can, but it's fine if GParted will not let you expand it all the way.)
Apply your changes by clicking the green check mark in GParted.
If there were errors, you should be able to access the Internet from the live CD/DVD/USB system and provide information about them. (However, there will of course be no guarantee that I will be available to tend to them, or that I'll even be online at that time. Still, others can probably help too.)
Most of the time, if there are errors, nothing is damaged. So if you need to use your installed system, feel free to do so.
Assuming no errors, reboot (properly, not by holding down your power button or unplugging your computer). Remove the live CD/DVD/USB so that you boot to your installed system. It should boot fine--the start of /dev/sda1 was not moved.
If it does not boot, then boot from the live CD/DVD/USB again and use any of the methods given here (or if you prefer, any of these) to reinstall GRUB to the Master Boot Record. That should let it boot again. The particular method I recommend in this situation (which I emphasize, I do not think will occur) is this one, because I can fill in all the details for you of what commands you need to run (based on the information you've provided about your partitions):
sudo mount /dev/sda1 /mnt
sudo grub-install --root-directory=/mnt /dev/sda
Since you have no separate boot partition and your installed system's root partition is /dev/sda1, that's it. Then reboot, and your system should boot.
After booting back into your Kubuntu/Ubuntu system, there are a couple of things you should check. (This is unrelated to and independent from whether or not you had to reinstall GRUB to the MBR as described above.)
Check to make sure your / partition has really expanded. You can check this however you like; in Dolphin perhaps. Or run df -h and compare it with the output of df -h from before.
Check to make sure that the swap partition is still being used. Run:
swapon -s
If you get something like what you got when you ran this before, great! If you get no output at all, that means swap is not in use. In that case, you'll have to check for what the swap partition is now numbered as (by running sudo parted -l or sudo fdisk -l) and then edit the swap line in /etc/fstab to provide that device name. I can provide additional assistance or more detailed instructions for that on request (or perhaps find another question where more detailed information is given).
The swap partition will probably continue to be used, though, because most partitions including linux-swap are identified in fstab files by their UUID's these days (which don't change unless the partition is actually deleted and re-created, or, in the far less likely scenario, if the UUID is deliberately changed). Therefore, even if the device name off the swap partition changed as a result of performing the operations detailed above, your swap partition will most likely continue being used automatically.
If you didn't have to reinstall GRUB to the MBR from the live CD/DVD/USB (which you probably didn't), then I recommend running this command from your installed Ubuntu system after verifying that everything is working properly:
sudo update-grub
That's usually sufficient to remove any GRUB entries associated with the old operating system (that you've deleted).
Another Option is to Keep the Old Partition
According to the output of df, only 2.8 GB of the 136 GB in your old EasyPeasy partition is used. The rest of this space is already available for you to use. If the partition is not mounted, you can mount it in the Devices list in Nautilus (but it was mounted when you ran df).
If you encounter permissions problems, you can simply change the ownership permissions in the partition wherever you want to create your own files. The most logical ways to do this would be:
- Create a folder in the root of the EasyPeasy partition, or
- use your old EasyPeasy home folder.
Creating a Folder in the Root of the EasyPeasy Partition
The EasyPeasy partition has no volume label (you can change this in Disks if you like). So it's mounted by its UUID. To go to its root directory in a Konsole, run:
cd /media/5f92*
You can then create a folder for your files:
sudo mkdir Storage
(Call it whatever you like, it doesn't have to be Storage.)
And give ownership of this folder to your user so you don't have to be root to use it:
sudo chown $USER:$USER Storage
(You can keep $USER as it is or replace it with your username; either way works. (Don't write $username where username is your username.)
Using Your Old EasyPeasy Home Folder
You might already have the full ability to read, create, and modify files everywhere inside your old EasyPeasy home folder. This will happen if the UIDs of your old EasyPeasy user and your current Kubuntu user happened to be the same.
If that's not the case, then in your old EasyPeasy home folder, you can run:
sudo chown -R $USER:$USER .
The -R causes this operation to be performed recursively.
Removing the EasyPeasy System But Keeping Its Partition
2.8 GB is an insignificant amount of space compared to the other ~133 GB that are already free in the old EasyPeasy partition. I did not interpret your question as being about freeing that space--I interpreted it as asking how to reclaim the rest for your Kubuntu partition.
However, if you don't want to repartition, but would like to clear out the files from the old EasyPeasy partition, you can:
Simply delete all the files in the old EasyPeasy partition, then run sudo update-grub. When GRUB is updated, it checks what operating systems exist. If an OS no longer exists on a partition, GRUB will generally not list it.
Format the the partition (you can do this in Disks), then run sudo update-grub.
Your Ubuntu system uses KDE (Kubuntu) but you reported installing regular Ubuntu first and then installing KDE, so you should still have GNOME. Therefore, you should still have gnome-disk-utility (the package that provides Disks), or if you don't, you should be able to install it without pulling in too many dependencies that you already have.
Then you'll have to create whatever ownership and permissions you want for the drive.
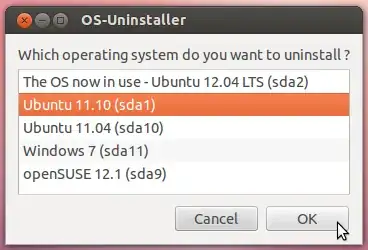
Use the OS-Uninstaller utility to automate formatting the partition and updating GRUB, so it's one step instead of two. For this, see LovinBuntu's answer.
Once you do that, you'll still have to create whatever ownership and permissions you want on the newly formatted drive.
If you keep the EasyPeasy system or even keep just its partition, the space in the EasyPeasy partition will not help you avoid running out of space from putting files in your home directory (of the [K]Ubuntu system), nor will it keep you from running out of space from installing lots of software. It will simply act like another drive you can use. (Like an external drive, except that since it's on the same physical disk as your installed system, it's not suitable for backups.)
From a data storage perspective, keeping the old EasyPeasy system and using its partition is very similar to removing the old EasyPeasy system but keeping its partition and using it. However, if you're going to keep the partition, you may want to remove the system (in any of the three ways listed above) anyway, since it no longer serves any purpose, its folders could confuse you (as they're named the same as some of the folders in your new system), and updating GRUB after removing it will cause the EasyPeasy option to drop from the boot menu.