1

So I've had issues with Windows which forced me to install and learn Ubuntu as I'm fed up with MSFT. So now I need to know the most efficient/best way to image Ubuntu so that if I messed something up in one point in time I could always come back to the healthy point in time.

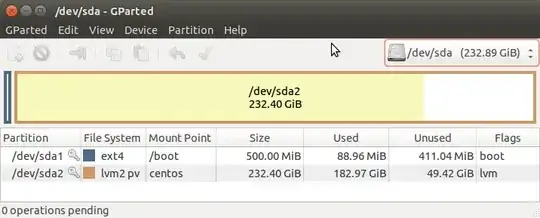
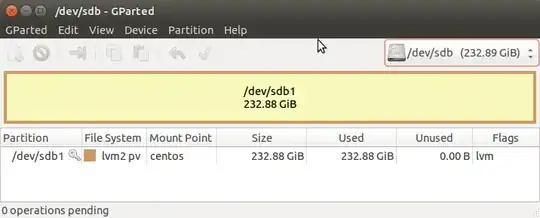
During the install I saw an option for LVM and read what it is though I don't know how to utilize it to prevent a situation where I have to reinstall everything. Help?

Note: I found on the right hand side of this Ask A Question area an area titled Similar Questions giving me Setting up LVM Snapshot as a backup/restore point in ubuntu

This is pretty in depth and a bit complex, though completely doable, is it possible to just use LVM out of the box after a complete HDD wipe and normal Ubuntu install? :Fingers crossed and rabbits foot in hand:

L2g2h
  • 52

1 Answers1

0

Yes, but you must do some CLI magic prior to launching the installer from the live cd.

Part 1:

  1. Boot the live cd/usb, and select the "Try Ubuntu" option.

    Note: unplug all USB storage devices not being used for the installation prior to booting. While not required, this precaution will help avoid disaster.

  2. Press "Super" key (Windows key), then search for and run "gparted."

  3. Once gparted is open, switch through the devices to identify which one is the USB flash drive from which you are booted (skip if booting from cd/dvd/bd and have no USB storage devices plugged in)

    For instance, I have identified /dev/sdc as my USB flash drive by the size (roughly 8GB): My usb drive in gparted

  4. Select the drive from which you wish to initiate the boot process, delete all partitions from it (you can use a right-click menu), and create a 500MB ext4 filesystem at the beginning of the partition.

    Note: I am creating these partitions on my USB drive for the sake of demonstration, but you want to create them on your primary boot storage device instead.

    Menu selection for new partition

    Note: After typing '500' into the "New size" field, I clicked the 'up arrow' next to the "Free space following" field once followed by a single click on the 'up arrow' next to the "New size" field to get a nice even 500MiB with the "Free space following" field automatically calcualted for me. It it is not really necessary to have exactly 500MiB here, though, so it won't hurt to be a few MiB off.

    enter image description here

  5. After this, use the remaining space on your primary boot drive to create a partition of type "lvm2 pv".

    enter image description here

  6. [Optional] - Select any additional disks that you would like to use for your Ubuntu installation, remove any existing partitions from it, and create a single "lvm2 pv" partition that spans the entire disk.

  7. Review your changes carefully, record the device names of the "lvm2 pv" partitions you created (i.e. '/dev/sda2' and '/dev/sdb1' in my case), then click "Apply" then "Apply" again in the popup window warning you that data loss may ensue.

I am using 2x250GB HDDs in my installation. Here is what they look like in gparted:

Note: My pictures show that I have "mount points" specified; ignore this for now, as you will decide such configuration later.

My sda: sda final

My sdb:

sdb final

Part 2:

  1. Press "Super" key, search for "Terminal" and open it.

  2. Run sudo vgcreate <vgname> <pv1> <pv2> to create a volume group using the "lvm2 pv" partitions that you created with the vgname of your choice. i.e. for me, assuming I wish to name my volume group ubuntuvg, it would be:

    sudo vgcreate ubuntuvg /dev/sda2 /dev/sdb1
    
  3. After the system reassures you that it has completed the task as requested, verify it yourself with sudo vgs. For me, this looks like this:

    [16:01:58][mgodby@mg-ws1 ~]$ sudo vgs
      VG     #PV #LV #SN Attr   VSize   VFree 
      centos   2   3   0 wz--n- 465.28g 50.00g
    

    Note: VG name says "centos" instead of "ubuntuvg" because it was created long before this tutorial was.

  4. Remaining conscious of the total size of your new volume group, you may now plot out your filesystems and sizes for them. If you have the space for it, I recommend the following methodology:

    • Create a LV for swap that is 8GB in size
    • Create a LV for / (name this one "root") that is 50GB in size
    • Create a LV for /home that is 100GB in size (or larger if you have a greater amount of personal files and folders to move onto the system after installation).

      Note: Resist the urge to use all of the space on your drives immediately because there is a beautiful command, lvextend, that will allow you to arbitrarily add unused space in the VG to any LV and extend the filesystem that it contains. i.e. if you run out of space on /home, you can simply lvextend -L +25G /dev/ubuntuvg/home -r (or something like that depending on what your vg and lv names are) to add 25GB to /home without offlining the filesystem.

      Assuming you chose "ubuntuvg" for your VG name:

      lvcreate -L 8G -n swap ubuntuvg
      lvcreate -L 50G -n root ubuntuvg
      lvcreate -L 100G -n home ubuntuvg
      
  5. Run sudo lvgs as a sanity check to see that your LVs were created successfully:

    Note: my "home" LV is actually 357GB since I have expanded it since my initial installation. This command should properly reflect a size of 150GB for "home" for you if you have followed the instructions exactly.

    [16:06:38][mgodby@mg-ws1 ~]$ sudo lvs
      LV   VG     Attr      LSize   Pool Origin Data%  Move Log Copy%  Convert
      home centos -wi-ao--- 357.39g                                           
      root centos -wi-ao---  50.00g                                           
      swap centos -wi-ao---   7.89g
    

Part 3:

  1. Click the icon for "Install Ubuntu 14.04.1 LTS" and begin the process.

  2. When you get to the screen labeled "Installation type", select "Something else" at the bottom, then click "Continue".

  3. Select the 500 MiB ext4 you created in Part 1, Step 4; click the "Change" button, then specify the following options before clicking "OK":

    • Use as: "Ext4 journaling file system"
    • 'check' the "Format the partition:" checkbox
    • Mount point: "/boot"
  4. Select each LV that you created and specify the options as follows (assumes VG name of "ubuntuvg"; substitute "ubuntuvg" with actual vg name if necessary):

    1. swap (/dev/mapper/ubuntuvg-swap)

      • Use as: "swap area"
    2. root (/dev/mapper/ubuntuvg-root)

      • Use as: "Ext4 journaling file system"
      • 'check' the "Format the partition:" checkbox
      • Mount point: "/"
    3. home (/dev/mapper/ubuntuvg-home)

      • Use as: "Ext4 journaling file system"
      • 'check' the "Format the partition:" checkbox
      • Mount point: "/home"
  5. Ensure that the "Device for boot loader installation" specifies your primary boot drive. For me, this was "/dev/sda".

  6. After reviewing your specified layout, click "Install Now" and reassure the system that you really meant what you said by clicking "Continue" on the popup window.

  7. Following the instructions for the remainder of the install, reboot, and enjoy!

MGodby
  • 1,162
  • Thank you so very much for your indepth guide! I'm very happy to be now in my Ubuntu system!

    Would you mind a follow up question on how to setup a snapshot? Essentially my only need for it is if for some reason tomorrow ubuntu gave me an equivalent of a MSFT BSOD after idk some install I could go back to exactly the way it is now freshly installed?

    https://www.dropbox.com/s/ged0vz6tmnld9b7/Selection_002.png?dl=0 This is how my partitions currently look. My 70GB partition is for W7 until I feel I'm fully situated with ubuntu replacements of my win7 programs.

    Edit: can't make paragraph breaks

    – L2g2h Aug 23 '14 at 22:39
  • Wow, my comment looks like a mess, I can't figure out how to edit it to make breaks after paragraphs. – L2g2h Aug 23 '14 at 22:41
  • Here are some pretty good instructions for it: http://www.switchroot.com/how-to-rollback-a-lvm-volume-to-its-snapshot . Note that you may have to boot from a live cd/usb to perform the restore if it requires offlining your root filesystem. – MGodby Aug 23 '14 at 23:56
  • Also, your gparted pic is showing that gparted thinks one or more physical volumes (PVs) is missing. Make sure you are truly booted into your new system and not back into the USB device. – MGodby Aug 24 '14 at 00:12
  • Thank you for your comment on my gparted pic, I included it because it did worry me though I didn't know what to make of it. I'm booting off of the HDD though no idea whats causing the error.

    I rebooted the computer after a system update and I got a message about failure to assign resource so I'll see if I can reboot to get it again so as to capture it in full. Maybe I need to repeat your steps and reinstall ubuntu.

    Those steps make far more sense than what I found & linked above.

    – L2g2h Aug 24 '14 at 02:38
  • When I went through the first step to check if the kernel (i'm running ubuntu 14.0.4) supports snapshot I didn't see what the guide prepared me to see. I saw as follows; striped v1.5.1, linear v1.2.1, error v1.2.0

    Thoughts/help? :)

    – L2g2h Aug 24 '14 at 02:40
  • I followed the guide you provided for trying to setup a snapshot. First i used the command sudo vgdisplay to verify the group was seeable followed by sudo lvscan to get the full drive pathing then I used the steps in the guide to come up with the command I needed to use "sudo lvcreate snap0 -L 20G /dev/ubuntuvg/root which gave me the following screen https://www.dropbox.com/s/sq205x2nsiraf63/2ndissue.png?dl=0 – L2g2h Aug 24 '14 at 03:07
  • Go ahead and run sudo vgreduce --removemissing as suggested. Since your system appears to boot and function properly, it should be fine. – MGodby Aug 24 '14 at 03:59
  • I must have messed something up somehow I get an error doing that as well. I will include a picture here on the error. https://www.dropbox.com/s/zl3l7ijs0yni43m/3rdError.png?dl=0 I'm going to try running the removemissing command and resize lvm commands after booting from cd, didn't think I would need to but hey worth a try. – L2g2h Aug 24 '14 at 15:51
  • Correction, the above screenshot was when I was trying to resize the home section of the LVM so I would have room for a snapshot. When I ran the vgreduce it said volume group missing so I specified the ubuntuvg which it told me ubuntuvg is already consistent. Since i get the same message for both resize and vgreduce off of livecd i'm just going to delete the partitions reformat do it again must have made an error somewhere. – L2g2h Aug 24 '14 at 16:12
  • Perhaps. Try only using partitions on one disk at first and add more disks later if you want (I.e. don't touch any disks other than your primary boot drive until after installation). – MGodby Aug 24 '14 at 17:19
  • From the guide you gave me which partition/spot do you save your snapshot to MGooby?

    I get the same errors after full format of HDD (removed my win7 will image it back on when this is sorted) so it must be PEBCAK likely too as this confuses me admittedly.

    – L2g2h Aug 25 '14 at 04:00
  • The snapshot is saved to a new LV within the main VG. You create it when you need it amd destroy it when you don't. Is it still saying that you have one or more PVs missing? When you create the VG (ubuntuvg) for the first time, don't include /dev/sdb1 (assuming that /dev/sda is your primary drive). – MGodby Aug 25 '14 at 10:27
  • I tried it that way, correct me if I'm wrong, to try doing a snapshot of the "home section which is where I think all the core/critical ubuntu stuffs is.

    I ran sudo lvcreate -s -n snap0 -L 20G Ubuntuvg-home return: There origin name should include the volume group Run 'lvcreate --help' for more information.

    As a reminder, I created my partitions cloning the pictures you had included. I realize in retrospect I must have deleted my ubuntu error pics off dropbox, sorry for that.

    – L2g2h Oct 11 '14 at 03:03