I don't know your knowledge of linux so, I'm writing the steps in a little detail. In any case you feel uncomfortable Please write back to me, I will be glad to assist.
1. Back up Windows
There are two steps to backing up Windows:
- Create a recovery drive for backing up Windows 8.1
- Create a file history for backing up personal files
For the recovery drive you will need a USB flash drive with at least 16gb of space. Insert the USB drive into your computer. You should make sure that you have no data that you need to keep on the drive as it will be wiped during this process. If you don't have a USB drive you can create recovery DVDs.
For the file history backup I would recommend using an external hard drive but it depends on how much data you have. If you don't have much then a USB drive will do. If you have nothing else to hand you can backup to DVDs.
2. Create a bootable Ubuntu USB drive
I assume you are well aware of how to create a bootable drive.
3. Shrink your Windows partition
Windows takes up the whole of the drive when it is first installed. In order to install Ubuntu you will need to make space for it.
Press the "super key" (Windows key) on your keyboard and click the magnifying glass in the top right corner. In the search box start typing "Partitions".
Click on the option called "Create and format partitions". This will bring up the "Disk Management" screen.
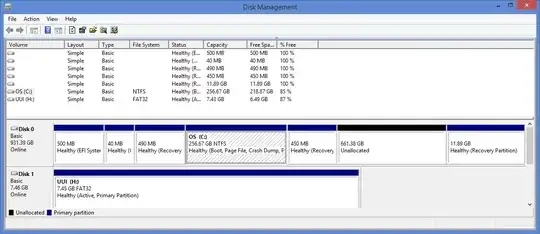

A screen will appear showing how much you can shrink the drive by. You can of course choose to shrink the drive by less than offered but never go for any more than offered as you will break your Windows 8.1 operating system if you do.
Click "Shrink" to continue.
When you are finished you will see that there is a lot of unpartitioned space. This is where Ubuntu will be installed.
4. Turn off fast boot
To be able to boot to your Ubuntu USB drive you will need to turn off the fast boot option.
Press the "super" key (Windows key) and then click the magnifying glass in the top right corner.
Enter "Control Panel". Click on the "Control Panel" option that appears.
When the "Control Panel" appears click on the "System and Security" heading.

Now click on "Power Options".
On the following screen click on "Choose what the power button does".

5. Turn off secure boot
In theory you don't need to do this any more. In practise it is almost certain that you will.
Turning off secure boot depends on the make and model of your computer as each one has slightly different methods for turning it off.
Basically though click on the "super" key (Windows key) and then click on the power icon next to your user name.
Hold down the shift key on your keyboard and select restart computer. Keep the shift key held down until your computer reboots.
You will now have an option to go into your UEFI boot settings.
Within the UEFI settings look for the option to turn off secure boot. You don't have to switch to legacy mode and you shouldn't switch to legacy mode as this will not help your cause.
Save and exit the UEFI settings
6. Install Ubuntu
When you have turned off secure boot, save and reboot. You will probably end up back in Windows.
Now at this point to boot into Ubuntu on the USB drive I had to again hold down the shift key whilst rebooting the computer.
One of the options that appeared let me boot from the USB drive into Ubuntu 14.04 live and you should have a similar option available to you.

When you first boot into the live version of Ubuntu you will be presented with a screen similar to the one above. The only difference is that I have closed the window that shows all the keyboard shortcuts to make it easier to highlight the "Install Ubuntu 14.04 LTS" icon.
To begin the installation double click on the "Install Ubuntu 14.04 LTS" icon.
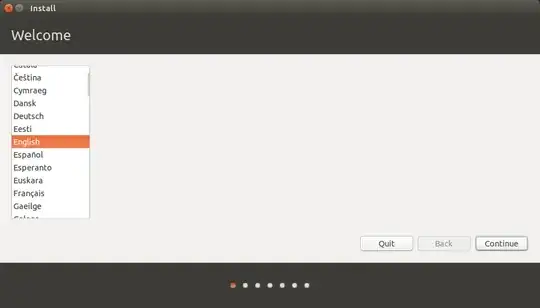
The first thing you need to do is decide which language you would like to use.
Unless you feel like the challenge isn't great enough I would choose the language that you would normally use.
Click "Next" to continue.
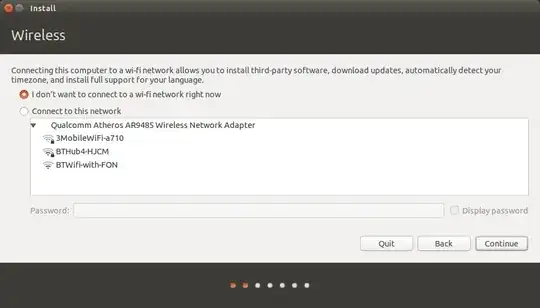
 The next screen lets you choose which internet connection to use whilst installing Ubuntu.
I always opt for not wanting to connect and there is a good reason for that.
I live in the countryside and my internet connection is poor. I don't want the installer failing half way through because the connection dropped.
I prefer to install the operating system and run updates as a separate task later on.
If you have a good broadband connection you may wish to connect to it now so that you download updates as you go. This will slow down the initial install but will save time later on as you won't have to install lots of updates.
When you click "Next" you will be shown a tick list highlighting how prepared you are for installing Ubuntu.
As you can see I have 2 ticks because I have enough disk space and I am plugged into a power source. I chose not to connect to a network as this stage (hence the cross).
Click "Continue".

 The next screen may look rather intimidating but it is just showing your current disk layout.
*> Be very careful with the next few steps.
If you haven't taken that Windows backup, quit the installation,
reboot and follow step 1 of this tutorial again.*
Look at the image above. You will see a large portion of free space (710155 MB). This is where I put Ubuntu.
The free space is going to be split into 3.
The first partition is for Ubuntu and will be 50 Gigabytes in size.
The second partition is for your home partition and stores configuration files and your personal files such as music, pictures etc.
The third partition is for swap space and is used for intensive operations and suspending the computer.
When you have found the partition with free space, click on it and press the plus symbol (+) under the disk layout.
MAKE THE PARTITION ACCORDING TO YOUR REQUIREMENTS
Press "Install Now" to continue.
The installation has now begun but whilst it is taking place you are asked a few configuration type questions.
First of all choose your location by clicking on the map.
Press "Continue".
The next screen asks you to choose your keyboard layout.
Simply choose the correct one for you and press "Continue"
You will now be required to create a default user.
Enter your name, a name to identify your computer, a username and a password.
You can also choose whether to log in automatically or require a password each time.
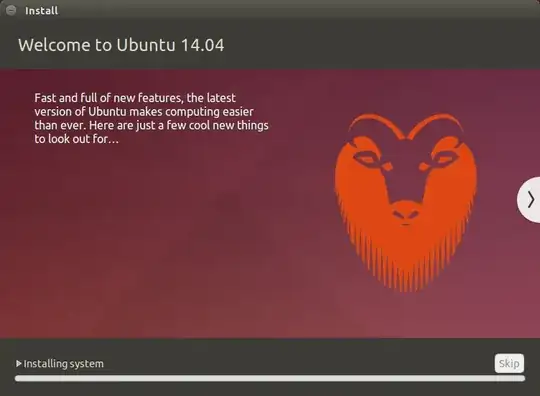
A progress bar will now show you how far through the installation you are.
You can also view a selection of messages telling you all about Ubuntu.
At this point you can take another comfort break and depending on your computer's speed you will either have time to boil an egg or wash your car.
At the end of the process you will be asked whether you want to reboot to start using Ubuntu or to continue using the live version.
When I rebooted it went straight back into Windows and I had to reboot back into the live session anyway. So at this point you can either take my word for it and stay in the live session or you can reboot and see if the installation has worked without any further steps required.
7. Boot Repair
I am going to assume that you chose to restart now and your computer booted straight into Windows without giving the option for Ubuntu.
Log into Windows and click the power icon next to your username in the top right corner.
Hold down the shift key and select to restart your computer. Keep the shift key held down until your computer reboots.
At the point of the UEFI settings appearing choose to boot from USB again.
You will now be booted back into the live session of Ubuntu.
Click on the network icon in the top right corner and choose your network connection. You will probably need to enter the security key. (If not then when you have finished with this process consider checking your router settings because your internet connection is wide open).
Now open up a terminal by pressing the "super" key (Windows key) and typing "term".
Within the terminal window enter the following commands one by one.
sudo add-apt-repository ppa:yannubuntu/boot-repair
sudo sh -c "sed -i 's/trusty/saucy/g' /etc/apt/sources.list.d/yannubuntu-boot-repair-trusty.list"
sudo apt-get update
sudo apt-get install -y boot-repair && boot-repair
Eventually the boot repair screen will appear.
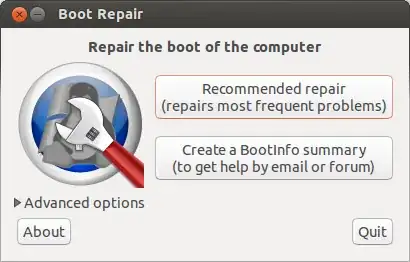 Click on the "Recommended repair".
When I did this I received a message stating "EFI is detected". This is just an informational message as far as I am concerned because it is perfectly fine to install Ubuntu with EFI turned on.
After clicking "OK" to the EFI detected message the utility performed a few tasks and then asked me to select some text and run it in a terminal window.
If you are asked to do this open a new terminal window (press the "super" key, enter "term" into the Dash and click on the icon that appears).
Copy the text from the boot repair window by selecting it with the mouse. Press CTRL and C and then right click in the terminal window and select paste.
Make sure all the commands have run correctly. You may need to press return to get the last command to run.
Now click on the "Forward" button within the boot repair application. You may be asked to copy and paste more text.
Repeat the process of selecting all the text, press CTRL and C and then right click in the terminal window and select paste.
Make sure the commands run.
Keep following through on the process until the boot repair finishes.
If you are like me then at the very end of the process you will see a message stating that boot repair completed with errors. (not good). It is worth copying the link and posting to pastebin as suggested but I think you can just continue onto the next step.
8. Fix the boot loader
Almost there now.
Reboot your computer.
Unless you are lucky it will still boot straight into Windows and actually this is ok because we are going to use Windows to fix the boot loader.
Log into Windows and make sure you are viewing the desktop and not the tiles screen.
Hover the mouse in the bottom left corner and right click. You should see an option for the administrator's command prompt. Click on this option.
Within the administrator's command prompt type the following command:
bcdedit /set "{bootmgr}" path \EFI\ubuntu\grubx64.efi
Exit the command prompt.
- Reboot into Ubuntu
Reboot your computer.
This time when the computer boots you should see 4 options.
1. Ubuntu
2. Ubuntu (advanced)
3. Windows (might say something similar like Windows boot options).
4. Setup
Choose option 1.
Ubuntu 14.04 should now appear. Get yourself a beer, you have earned it.
10. Reboot into Windows
Reboot your computer (click the symbol in the top right corner, click shutdown and restart).
This time when the boot menu appears click on the Windows option.
Your computer should boot back into Windows 8.
Troubleshooting
The steps I have written here are the steps I went through to get Ubuntu 15.04 to dual boot with Windows 8.1 on my i5 PC.
The process will hopefully work on other computers as well and as with my last guide I will do my best to help people and clarify the points within the article.
I can't guarantee success in every case as this doesn't appear to be an exact science.
Make sure you take a backup before attempting to dual boot Windows 8.1 and Ubuntu 14.04.
ref: > http://goo.gl/nRYGbl


