114

I have Ubuntu 14.04 with a lot of packages and work-related stuff that I am very happy with it. It is installed on my main SSD drive which is a 120GB one (I had chosen "/" when I installed Ubuntu, so I believe everything should be on this drive). It shows up as /dev/sda.

Now I have added another SSD to my computer which is a 240GB. I do not have any other storage media at hand at the moment (e.g. an external hard drive).

Since the new 240GB drive has obviously more capacity and is faster (a newer generation than my 120GB one), I want to move my Linux to this new drive. This new drive shows up as /dev/sdb and at the moment it is not formatted or anything (I have literally unpackaged and inserted into my PC right now :P)

How can I safely move my Linux installation to the new drive?

I can change the SATA cable so the new drive shows as /dev/sda if necessary.

This is the output of fdisk -l if that helps:

Disk /dev/sda: 120.0 GB, 120034123776 bytes
255 heads, 63 sectors/track, 14593 cylinders, total 234441648 sectors
Units = sectors of 1 * 512 = 512 bytes
Sector size (logical/physical): 512 bytes / 4096 bytes
I/O size (minimum/optimal): 4096 bytes / 4096 bytes
Disk identifier: 0x00076d7a

Device Boot Start End Blocks Id System /dev/sda1 * 2048 226064383 113031168 83 Linux /dev/sda2 226066430 234440703 4187137 5 Extended Partition 2 does not start on physical sector boundary. /dev/sda5 226066432 234440703 4187136 82 Linux swap / Solaris

Disk /dev/sdb: 240.1 GB, 240057409536 bytes 255 heads, 63 sectors/track, 29185 cylinders, total 468862128 sectors Units = sectors of 1 * 512 = 512 bytes Sector size (logical/physical): 512 bytes / 512 bytes I/O size (minimum/optimal): 512 bytes / 512 bytes Disk identifier: 0x00000000

Disk /dev/sdb doesn't contain a valid partition table

Dumbo
  • 1,912
  • 5
    It sounds like you're planning to use both of them now. If so, you should consider just using the newer, bigger one as /home instead of the entire system. It should be an easier change (just move everything over and add a single line to /etcs/fstab), and most large files are likely to go into your home directory (and so onto the larger disk). – Kevin Mar 03 '16 at 21:56

8 Answers8

66

You can use Clonezilla for this purpose.

Clonezilla is a free partition and disk imaging/cloning tool which can be used to backup all your data (whole disks or partitions) in a highly compressed way and later clone it back to your hard disk to get it into the exact same condition. This is faster than installing the OS most of the times.

  • Download Clonezilla stable ISO

  • Make a bootable (live) USB using the built-in Startup Disk Creator application or Tuxboot 7.0.

  • Boot from the created Clonezilla media.

  • Now you have many options:

    1. Create an image of only '/' (saveparts) and clone it to any partition of your other SDD.
    2. Create an image of the full disk (savedisk) and clone it to your new SSD.

Clonezilla screen shot

In your case you can use the "device-device" option too, but I am not familiar with it.

You can find a detailed guide about Clonezilla here: https://clonezilla.org

karel
  • 114,770
Severus Tux
  • 9,866
  • 3
    I suggest you watch these two tutorial videos before : https://www.youtube.com/watch?v=41tTudaQb0I and https://www.youtube.com/watch?v=LS6VhLDw-io – Severus Tux Mar 03 '16 at 19:15
  • 1
    This is also a good option. But I am too lazy to create the clonezilla stick ;-) – Pilot6 Mar 03 '16 at 19:15
  • I found clonezilla didn't copy over mbr so a whole disk image and a bit of worked with gparted should do the trick – codaamok Mar 04 '16 at 10:39
  • I ended up using clonezilla in parted magic...everything works now but I think it edited my grub boot loader...the boot time is slower now :( – Dumbo Mar 04 '16 at 12:24
  • 1
    wow! glad to hear this ;-) , The boot time, It is because of changed UUIDs , i.e, The new UUIDs and Old ones of your important partitions (home,Swap) has chamged. To correct this, please follow the instructions given here with suitable changes : http://askubuntu.com/a/737340/497359 If you find any problem, please comment it. – Severus Tux Mar 04 '16 at 13:52
  • 1
    @adampski : This seems to be a bug in Clonezilla 2.4.5. As a workaround you can use Clonezilla 2.4.2 or Clonezilla 2.4.2 Server Edition (DRBL) until it is fixed. :) – cl-netbox Mar 04 '16 at 14:24
  • Why not just get clonezilla from the repositories? –  Jun 03 '16 at 09:06
  • Hello. Can I use in someway Clonezilla, if I can not use display with linux machine? There's no interface to attach display. – Anton Novoselov Jul 05 '17 at 08:35
  • Does your machine support network booting ? – Severus Tux Jul 06 '17 at 10:06
  • I can recommend this method! I first tried myself just cloning with 'dd', but I guess that left things out. – Rick Nov 09 '19 at 14:39
  • It's not clear from the clonezilla.org page whether to need extra space to store the "image" before you then put it on the new drive, or if it can just copy it directly there. – Michael May 04 '20 at 23:11
  • Every instruction says, download clonezilla and make a bootable stick/disk, but clonezilla is available through the package manager, what is the purpose of the package then? I am just curious. – quanta Jun 02 '20 at 10:44
  • @quanta If you do any operation (say backing up) on clonezilla live, after finishing that, it displays an equivalent command of how the same results could have been achieved without the bootable stick. – Severus Tux Jun 02 '20 at 10:57
  • 1
    @severus, I wonder, why then nobody talks about using the package and insist on using the bootable stick/cd. The package way without booting sounds much easier. – quanta Jun 03 '20 at 21:29
  • I have a nuc pc. I want to use the bootable image and try to clone my current ubuntu installation (internal disk) to another disk that is plugged via usb. Will I be able to later install the new disk inside nuc and boot normally? – Marinos An Apr 15 '21 at 10:15
  • clonezilla works like a charm on machines with legacy boot. Little did I know, my new thinkpad has no legacy boot support... – Ricky Robinson Sep 19 '21 at 08:48
  • @quanta (just few years later): you can read on Clonezilla (1) The partition to be imaged or cloned has to be unmounted (you missed this point) and (2) Clonezilla live is suitable for single machine backup and restore. While Clonezilla lite server or SE is for massive deployment, it can clone many (40+) computers... So if you want to work on your active system you cannot install the package in that system and use it from there, because the partition has to be unmounted... In a normal computer you do not have Linux installed twice on different partitions. – Hastur Nov 23 '22 at 13:54
  • so it's a livedisk with dd with extra steps? – catbadger Sep 12 '23 at 16:44
60

It can be done in a few ways. But the easiest one is to just copy all files from the old drive to the new one.

  1. Create an ext4 partition and a swap partition on the new drive.

  2. Boot from LiveUSB.

  3. Mount the old Ubuntu partition to some directory, mount the new one to some other directory.

  4. Copy all files from the old one to the new one using cp -a command.

  5. Install grub to the new drive.

  6. Update /etc/fstab with new UUIDs.

If something is not clear, I can add some explanations.

Pilot6
  • 90,100
  • 91
  • 213
  • 324
  • 1
    So all files, groups and stuff would remain intact? – Dumbo Mar 03 '16 at 18:57
  • Right, cp -a preserves everything. – Pilot6 Mar 03 '16 at 18:57
  • 1
    @Saeid87 Forgot about fstab. Added that too. – Pilot6 Mar 03 '16 at 19:03
  • 1
    +1 - it's also possible to avoid booting from a LiveUSB and do everything while booted from the original drive, do all the changes, reboot, voila. – Sergey Mar 08 '16 at 20:17
  • Yes, "the easiest one is to just copy all files from the old drive to the new one". – karel Jun 19 '17 at 06:12
  • @Sergey: how do you handle /proc, /sys, /tmp, etc when copying while booted from the original drive? – Étienne Sep 24 '17 at 20:15
  • 1
    @Étienne: Do not copy those directories (also /dev), simply create empty dirs on the destination drive and set the same owner/permissions on them as they had on the source drive. – Sergey Sep 24 '17 at 20:40
  • 18
    I ended up using: sudo rsync -a / /mnt/linux/ --exclude sys --exclude proc --exclude dev --exclude tmp --exclude media --exclude mnt --exclude run

    then

    sudo mkdir sys proc dev tmp media mnt run

    – Étienne Sep 25 '17 at 20:50
  • 14
    To avoid having to exclude mounted filesystems as suggested by @Étienne, I used sudo rsync -a -x / /mnt/linux. The -x flag means that mount points will be created for proc, dev etc. but the actual contents of the mounted filesystems will not be copied. – Per Lundberg Nov 17 '18 at 18:42
  • 1
    @Étienne could you please edit your --exclude-comment? If you do it as you wrote it, /var/tmp is excluded as well (seems to me), after the clone this is beeing missed by systemd-resolved.service resulting in name-resolution not working... I think it should be --exclude /tmp --exclude /proc etc. Thanks – swe Feb 01 '19 at 11:26
  • 1
    @swe I should not maintain a comment, please rather propose an edit to the original answer. – Étienne Feb 09 '19 at 00:24
  • @Pilot6 Could you please edit your answer to include Étienns rsync-Command? Thank you very much. – swe Jul 19 '19 at 08:30
  • I have proposed an edit, adding @Étienne's command. From what I can see, the current form would preserve the /var/tmp file, so I guess the command in the comment was updated? – hayalci Sep 15 '19 at 16:15
  • Please don't add anything to the answer. You can write your own one if you like. @hayalci – Pilot6 Sep 15 '19 at 16:15
  • The current cp -a in the answer would copy the dynamically generated files as well, containing device IDs etc. This may interfere with a fresh start in the new hardware and it would extend the copying time. It's better to copy only non-dynamic data, and let the dynamic data be recreated at next boot. The rsync command with excludes does this, plus rsync can be re-run if interrupted and it'll continue from where it stopped. Re-running cp will copy from scratch, or worse, if the live distro aliased cp to cp -i it will bombard the user with prompts and be unusable. – hayalci Sep 15 '19 at 16:26
  • I meant copy all FILES. Not run cp / .... Write your own answer if you like. – Pilot6 Sep 15 '19 at 16:27
  • Currently trying to use this answer to migrate my install from old HDD to new SSD. I'm failing at the step "Install grub to the new drive". Grub keeps pointing/finding the install on the old HDD and I don't know how to convince Grub to look at the new SSD. – andrybak Nov 04 '21 at 16:31
  • @andrybak There are a lot of manuals how to install grub. – Pilot6 Nov 04 '21 at 17:49
  • I feel as if 99% of the complexity in this is contained within the innocent-sounding "install grub to the new drive". If you have to mess with chroots it gets complex fast. – thomasrutter Dec 28 '22 at 09:24
  • You can probably greatly simplify the grub installation on the new drive by adding it as a boot option on the old drive, and using grub on the old drive to boot into the new drive, then you can natively install grub from there without having to mount or chroot anything. Still has complexity in it though. – thomasrutter Dec 28 '22 at 09:26
42

In case you have some time and want to go safe:

$ dd if=/dev/sda of=/dev/sdb bs=64K conv=noerror,sync status=progress

Explanation of the command:

  • if is the input, of the destination
  • bs sets the block size. It's the size of the chunks dd will read and write in. Higher Chunk sizes usually means higher performance but also more corruption of data if input disk has errors, see here: archwiki on dd
  • noerror continues in r/w-errors.
  • sync synchronizes the offsets if an error has occurred.
  • status shows a live progress counter

Additionally, on Ubuntu and most other Linux systems (since GNU/coreutils 8.24, 2015) you can use status=progress to also print the progress of the process.

This will basically create an image of you disk sda and write it onto sdb (same partition layout etc.) Ofcourse this'll write the whole 120GB as it's file-agnostic. Thus very safe, but not the fastest, if you only use small portions of the disk. However if the input disk is rather full it might even be faster.

BUT:

  • After that you probably want to resize the partitions as otherwise you cannot take advantage of the extra space.
  • In any case it might be needed to edit the /etc/fstab file.
    This is the case if Hardware-IDs are used to recognize the disks.
ljrk
  • 817
  • 7
  • 14
  • 10
    Your dd command will run forever. Consider adding bs=1M to it – Dmitry Grigoryev Mar 04 '16 at 11:07
  • Afaik blocksize doesn't need to be 1M on SSDs but I'll look up on this and update – ljrk Mar 04 '16 at 11:09
  • 2
    The limitation is not in the SSD technology, but in bs default value which is 512 bytes. – Dmitry Grigoryev Mar 04 '16 at 11:13
  • I thought that there were disks for which different values of bs would be better (eg. SSDs). But that's not the case. On the other hand 1M might be bad for errors as it messes up a whole block. – ljrk Mar 04 '16 at 11:18
  • 1
    extended answer with bs, thanks for the heads-up – ljrk Mar 04 '16 at 11:25
  • 1
    Thanks for detailed answer...I learned some stuff! but I decided to go with clonezilla and resize the partitions afterwards. – Dumbo Mar 04 '16 at 12:26
  • I strongly recommend against dd unless you know what you are doing. There are safer tools like ddrescue – qwr Aug 24 '18 at 19:15
  • @qwr what's "unsafe" about it? It copies bytes, that's it's strength, but of course, with this simplicity come less fancful features. ddrescue is a data recovery tool. The usage of dd is really straight-forward and I'd argue that one should know how it works anyhow if one is doing anything in that regards. – ljrk Aug 24 '18 at 23:10
  • It's very easy to make a typo and it will do unsafe things gparted won't. See: posts on AskUbuntu about dd – qwr Aug 24 '18 at 23:13
  • @qwr If you're on root console any typo is dangerous. You should think twice there. Sure dd does anything, without checking, that's why it's so nice and simple, it doesn't care about the contents. That's why it can do things other tools cannot, too. It just creates a byte-by-byte copy., however that's exactly the approach we want here if we want every byte. Other tools are filesystem based etc. -- they serve a completely different usecase. Also dd is available on any POSIX system. – ljrk Aug 25 '18 at 07:25
  • 1
    Adding status=progress gives your progress as you copy – caffeineFiend May 19 '21 at 23:27
  • 2
    @ljden thanks, this wasn't very much available back then but is nowadays widely supported. I added it. – ljrk May 20 '21 at 14:40
  • 1
    About the need to edit /etc/fstab: I just migrated a whole Linux installation from an old SSD to a new larger one using dd if=/dev/sdX of=/dev/sdY, partition UUIDs didn't change. After the command finished (it took about 4 hours for the 500GB SSD), I just swapped the drives in the laptop and was up and running. – edison23 Jul 16 '22 at 08:06
  • 1
    @edison23, same here. Everything worked perfectly fine. Very simple and straightforward solution. Beware though, keeping 2 partitions with the same UUID is quite a bad idea, so one should remove the former drive before mounting the newer one – heinwol Sep 16 '22 at 11:35
  • Its not working for me, after dd the gparted shows unknown filesystem – Sumeet Dec 21 '22 at 18:41
12

The way I do it when I switch to a new HDD is:

  • create the partition layout I want on the new drive
  • boot from Live CD/USB or install, rescue etc.
  • mount the old hard disk partition(s) to be copied to, say, /mnt/a
  • mount the new hard disk partition(s) to receive files to, say /mnt/b
  • cp -a or use tar to copy the files from /mnt/a to /mnt/b
  • install the boot loader (lilo or grub) on new disk ¹
  • update the /etc/fstab (you might want to use blkid to identify new UUID's)
  • reboot and test if everything is ok

Note¹:

Check all the Hard disk and Partitions using following command:

sudo fdisk -l 

Now take a note of the partition, on which Ubuntu is installed which will look like: /dev/sda1

Mount the partition where you need to install GRUB 2 (Hard disk partition) and the file system appears in Nautilus. Now we have to mount the correct Hard disk partition to make changes to actual Hard Disk MBR. For that we need to:

sudo mount /dev/sda1 /mnt
mount

Now mount the partition to an alternate location

sudo mount /dev/sda1 /mnt/boot

Create an unbreakable link from the /dev folder on the live image you booted from to the /dev folder on the partition you mounted to /mnt

sudo mount --bind /dev /mnt/dev/

Now we have to change the root from live CD root ( / ) to mounted partition's root

sudo chroot /mnt

Now you are in a new root shell, in which the mounted partition is the new root. You can verify this typing ls. Since we are in the mounted partition now, we can got ahead and install GRUB 2:

sudo grub-install /dev/sda 

Installations should finish now, without errors

Exit your CHROOT shell, by typing exit or pressing Ctrl+D which brings you back to the Live CD/USB Shell

Unmount the partitions we've mounted before to have a clean reboot:

sudo umount /mnt/dev
sudo umount /mnt/boot
sudo umount /mnt

and reboot after removing the Live CD or USB Stick to boot from the Hard Disk:

sudo reboot

Source

Fabby
  • 34,259
delt
  • 333
  • @baobab33: You're allowed to copy-paste instructions over here to this site and then attribute. You're not allowed to just link to the external source. Please also update source with corrections above. – Fabby Sep 03 '18 at 22:52
9

Unlike the other answers this allows you to clone the Linux installation and have it added to Grub menu with your current installations intact. Additionally it automatically modifies /etc/fstab for you and updates grub boot menu.

A menu is provided to help you select the correct partition to clone to. The clone from partition is your current booted partition.

rsync is used for optimal speed should you choose to reclone the partition. This is beneficial if upgrade fails, you wait for bug fix and want to run upgrade again. Similarly you may have chosen wrong options during upgrade and want to do it again.

The full script can be found here: Bash script to clone Ubuntu to new partition for testing 18.04 LTS upgrade and this is what the screen looks like:

clone-ubuntu.png

3

I decided to do an experiment related to this post.

I acquired a Lenovo ThinkCentre. It had a 256 GB SSD and a 1 TB HDD (spinner type - fast, but not as fast as an SSD).

When I installed Linux Mint 19.2 (LM19.2), it installed it on the 1 TB drive. The SSD ended up being unrecoverable, and I bought a new Kingston 240 GB SSD.

I was about to install LM19.2 onto the new SSD, but it seemed that there must be a way to transfer my well developed LM19.2 image from the 1 TB drive onto the new SSD.

I found this post, and while there's some solid advice above, I was in a mode to experiment. Below is an account of what I did, and it worked VERY well.

  1. I used GParted to create a partition table and partition on the SSD that were the same types as those on the 1 TB HDD.
  2. I performed a TimeShift (new tool in Ubuntu / Linux Mint) snapshot of EVERYTHING on the LM19.2 1 TB HDD.
  3. I restored that snapshot onto the SSD.
  4. Once the above steps were completed (you can even do 1 in parallel with 2 and 3), I rebooted, making sure that it would choose the SSD.
  5. The only thing that was strange during reboot was that the INITIAL grub screen asked if I wanted to boot to Ubuntu. I assumed this was peculiar to the TimeShift restoration, and it was.
  6. Subsequent startups booted as LM19.2 normally does.
  7. I'll edit this answer once I've verified that I can do this with a new drive hanging off the PC externally (and it seems obvious that this will work), because this would mean that I can quickly replicate any of my LM machines to new hardware.

The boot speed alone made these simple steps worth the effort. Even Dropbox transferred fine - it just wanted me to log in again, and it took the full time to index files, but it worked great.

Thom Ives
  • 193
  • 1
  • 5
2

I always use the following procedure:

  1. Make sure your installation includes a partition manager (PM). If not, install gparted.
  2. Connect the new disk via a USB-adapter. Check well with PM which disk is which. Normally the old one is /dev/sda and the new one /dev/sdb, but it is better to be safe than sorry. If you confuse the disks, you simply wipe the existing installation. Remember: dd is not nicknamed disk destroyer for nothing.
  3. Use dd as explained above by ljrk to copy the old disk byte-by-byte to the new one. Add status=progress to dd options to follow the progress.
  4. Start the PM. On the new disk, create and then destroy a temporary partition filling the excess space. This enforces rewriting of the partition table according to size of the new disk. Important: the sequence of actions should be create-apply-destroy-apply.
  5. Using the PM, resize the partition(s) on the new disk to your liking so as to use the whole disk.
  6. Shut down, swap the disks, start up, make sure it works fine.

If your want to also use the old disk as an internal one:

  1. Connect the old disk via the USB adapter, format it and partition to your liking.
  2. Shut down, install the old disk alongside the new one, start up.

If you want to use the old disk as part of your file system, add something to the tune,

UUID=actual-uuid-here /data ext4 defaults,discard 0 2

to /etc/fstab, then run sudo mount -a, or restart.

If you do not have a USB adapter, the same procedure should work with hot-swapping of disks, but here you are on your own. A safer way is to use a USB disk or CD/DVD with installed system (e.g., installation medium). In this case, you can put both disks (the new and and the old one) in their places from the start, then boot from the medium and do the copying etc.

It is not compulsory to plug the new disk into the same SATA connector as the old one, but then your might need to change the boot sequence in BIOS.

1

Below is my research with description of trying to copy Ubuntu 20.04 with enabled hibernation on separate swap partition on Thinkpad T420 to new SSD drive based on answers in the current question. Eventually I had success but encountered many problems (nuances) while trying this recommendations. Below SSD and HDD will be considered as interchangeable terms.


Firstly I tried the most simpler and straightforward way (as I thought) which is described in the Pilot6's answer - copying files from source partition to destination partition

For copying I used rsync command. The problem was that my new SSD drive did not boot Ubuntu without old SSD drive (both SSD drives must be connected). The only recommendations about this situation I found was to install or update or recover Grub configuration. But this was not helpful. Setting UUID of new root to grub config and updating grub as recommended here:

/etc/default/grub
GRUB_DEVICE_UUID=40dbf2e4-e0c5-4f75-83bc-3176dc06d164

also did not work.

The problem was not in Grub but in UUID of swap partition which was pointing to old drive.

If you do this for Ubuntu with enabled hibernation on separate swap partition you also have to update UUID of swap partition in /etc/uswsusp.conf and run command for updating initramfs to apply the change:

update-initramfs -u -k all

Otherwise at boot time there will be black screen with no diagnostic message.

Happily by accident one time I left this black screen on about 5 minutes to hang. Then the following diagnostic message appeared:

resume: Could not stat the resume device file '/dev/disk/by-uuid/8e8927aa-eca7-43d6-b7cd-66cfda70a242 Please type in the full path name to try again or press ENTER to boot the system:

stat, not start - probably typo in the message.

Related question: Could not stat the resume device file

Later I found out that '8e8927aa-eca7-43d6-b7cd-66cfda70a242' - is UUID of my swap partition on old hdd drive.

I was able to boot in new system by specifying root location on new drive by simple partition name, not UUID: "/dev/sdx1" and hitting Enter.

Interestingly that I specify new root location, not new swap location. It seems that Ubuntu somehow figured things out.

I run command for updating initramfs after booting to new copy of Ubuntu. In the command log there was the following:

update-initramfs: Generating /boot/initrd.img-5.13.0-27-generic
I: The initramfs will attempt to resume from /dev/sda4
I: (UUID=0253f7b6-8e26-4d19-b262-6d8923911752)
I: Set the RESUME variable to override this.

which means that swap UUID was successfully changed.

Also I tried to run update for initramfs from chroot (from the old copy of Ubuntu or Live version of Ubuntu):

sudo mount /dev/sdx1 /mnt
sudo mount /dev/sdx5 /mnt/boot/efi
for i in /sys /proc /run /dev /dev/pts; do sudo mount --bind "$i" "/mnt$i"; done
sudo chroot /mnt

initramfs command was executed from chroot but there was no message about updating resume UUID as in previous log - do not know if it works properly.

At that moment I already updated Grub from chroot by the following commands:

sudo grub-install /dev/sdx
sudo update-grub

After that I was able to boot from new SSD drive without old SSD drive.

Under this answer in comments there is comment from andrybak:

Currently trying to use this answer to migrate my install from old HDD to new HDD. I'm failing at the step "Install grub to the new drive". Grub keeps pointing/finding the install on the old HDD and I don't know how to convince Grub to look at the new HDD.

This may be the similar problem as I described above.

Ubuntu copied in such a way is loading normally but I noticed some problem with security system: When I mount other drive's partitions by gnome-disks I cannot open them in nautilus (clicking their links in gnome-disks will do nothing). This is due to error: Permission denied.

The solution was the following:

  1. I normally installed new Ubuntu (minimum version without office and updates) on new SSD drive.
  2. Copied files of old Ubuntu to partition with new Ubuntu installation. In this case there was no problem with Permission denied.

( Update. Later I found out that problem with Permission denied was due to bad files copying. Command rsync -a does not copy all properties of files and cannot be used for copying system files. Need to use command like rsync -axHAWXS --numeric-ids --info=progress2 in case of rsync but better to use cp -a because cp works faster than rsync for local copying - Copy entire file system hierarchy from one drive to another )

By such approach I copied my Ubuntu from MBR disk to new GPT disk. (Before installing the minimum version of Ubuntu I formatted new SSD as GPT.) Related questions:


Copying files under working source OS is not working:

I tried copying files under current working system (not Live version) as discussed in comments under the Pilot6's answer by the following commands:

sudo rsync -a / /mnt/dest/ --exclude sys --exclude proc --exclude dev --exclude tmp --exclude media --exclude mnt --exclude run
sudo mkdir sys proc dev tmp media mnt run
sudo mkdir /var/tmp

And updating Grub from chroot.

In this case new copy of Ubuntu booted but the resolution of screen was lower. Probably some monitor-specific drivers was not copied or copied with errors due to currently working system.


Also tested ljrk's answer - using dd comand

sudo dd if=/dev/sda of=/dev/sdb bs=64K conv=noerror,sync status=progress
127945670656 bytes (128 GB, 119 GiB) copied, 818 s, 156 MB/s
dd: error writing '/dev/sdb': No space left on device
1953669+1 records in
1953669+0 records out
128035676160 bytes (128 GB, 119 GiB) copied, 829,897 s, 154 MB/s

By using USB SSD with installed Ubuntu and dd command I copied bit by bit source SSD to the target SSD. In result target SSD had the same partitions, same UUIDs, same PARTUUID.

Below is about making Live USB SSD and changing UUIDs, PARTUUIDs to new ones.


For more high speed it is better to insert source and destination SSD drives inside notebook (the second SSD drive by optibay / caddy adapter), and will run dd command from Bootable USB stick or USB SSD / USB HDD. I found two programs for Ubuntu to make bootable USB stick or USB HDD. I wanted to make USB HDD (SSD) and this was quite challenging.

WoeUSB program also can be used for creating bootable HDD, not only USB stick but this is not specified in the program description. The command below creates bootable HDD from Windows 10 Pro image (by UI it is not possible to specify USB Hard drive, only USB stick):

sudo woeusb --device "/home/username/Downloads/Win10_21H2_Russian_x64.iso" /dev/sdx --target-filesystem ntfs

How to create a bootable Windows 10 USB on Linux with the new WoeUSB

Also tried UNetbootin tool (for Ubuntu) but it cannot use NTFS, only FAT32 - this is not appropriate in case image of Win 10 pro since it has file with about 4,5 Gb in size (FAT32 does not support files with the size more than 4 Gb). Ubuntu 20.04 installation image must be able to be installed on FAT32 partition (the most biggest file in ubuntu-20.04.3-desktop-amd64.iso image is casper/filesystem.squashfs with the size of 2,1Gb). I used already installed Ubuntu connected via USB SSD.

The following command writes image to USB SSD with FAT32 FS:

sudo unetbootin installtype=HDD targetdrive=/media/username/winds/ method=diskimage isofile="/home/username/Downloads/Win10_21H2_Russian_x64.iso"

By UI it is not possible to specify target as USB Hard drive, only as USB stick. In targetdrive parameter path must be specified to the mounted USB drive. And at the end there must be slash sign / otherwise command will fail with error:

unetbootin /dev/sdx1sources is out of space

Or maybe not fail but will write files not to the destination drive.

dd is useful if you want just move your system to another drive - even Dropbox works on target SSD without requiring re-linking. Old drive can be formatted. And you are done.

But if you want both HDD disks to work in the same notebook UUIDs and PARTUUIDs of the new HDD must be changed to unique. Below information about this.


How to Change UUID of Partition in Linux Filesystem

blkid | grep sdb1
/dev/sdb1: UUID="0c0f5bf5-4e0f-4f4e-85df-896c88e14ba0"
umount /dev/sdb1
sudo e2fsck -f /dev/sdb1 #required by tune2fs before changing UUID
sudo tune2fs -U 0c0f5bf5-4e0f-4f4e-85df-896c88e14ba5 /dev/sdb1
sudo blkid | grep sdb1
/dev/sdb1: UUID="0c0f5bf5-4e0f-4f4e-85df-896c88e14ba5"

Source: How to Change UUID of Partition in Linux Filesystem


How to change PARTUUID?

sudo blkid | grep sdb1
/dev/sdb1: PARTUUID="a41c501b-1800-41ed-968b-b7bbfe4ef5ef"
sudo gdisk /dev/sdb
x # enter x to change to experts menu
c # enter c to change PARTUUID
1 # enter the number of the partition you want to change
a41c501b-1800-41ed-968b-b7bbfe4ef6ef
m # enter m to go back to main menu
w # enter w to write the change to disk
q # enter q to exit gdisk
OK; writing new GUID partition table (GPT) to /dev/sdb.
Warning: The kernel is still using the old partition table.
The new table will be used at the next reboot or after you
run partprobe(8) or kpartx(8)
The operation has completed successfully.
sudo blkid | grep sdb1
/dev/sdb1: PARTUUID="a41c501b-1800-41ed-968b-b7bbfe4ef6ef"

Source: How to change PARTUUID?


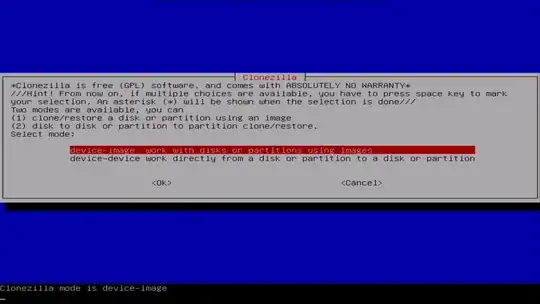
Severus Tux'answer - about using Clonezella

This is also good way to go but will take more time in preparation and set up in comparison to using dd command - Clonezella Live USB stick must be prepared, booted, and many menus of Clonezella UI must be went through before starting the process of cloning or saving an image of the system. Clonezella works in the similar way as dd - UUIDs, PARTUUIDs will be copied to target SSD drive also.

Discussion about UUIDs, PARTUUIDs on Clonezilla page: