0

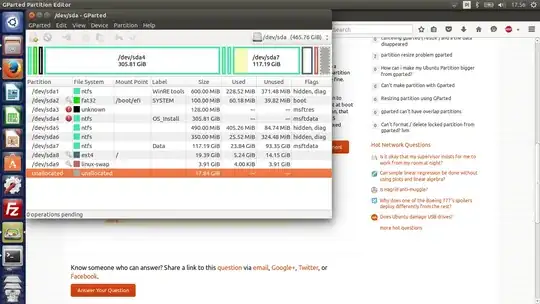
I have Linux Ubuntu intalled on partition, that have about 19 GB. I want to make it bigger, to about 40 GB. I have that space unallocated. In GParted (live cd) I have resize option, but i cant make it larger.
How to make it bigger (or link linux partition to the new partition).
I have hitachi HDD, alongside the Windows 10, that not working.

The output of parted -l:

Number  Start   End    Size    File system     Name                          Flags
 1      1049kB  630MB  629MB   ntfs            Basic data partition          hidden, diag
 2      630MB   735MB  105MB   fat32           EFI system partition          boot
 3      735MB   869MB  134MB                   Microsoft reserved partition  msftres
 4      869MB   329GB  328GB   ntfs            Basic data partition          msftdata
 5      329GB   330GB  514MB   ntfs                                          hidden, diag
 6      330GB   330GB  367MB   ntfs                                          hidden, diag
 7      330GB   456GB  126GB   ntfs            Basic data partition          msftdata
 8      456GB   477GB  20,8GB  ext4
 9      477GB   481GB  4194MB  linux-swap(v1)

screenshot

Byte Commander
  • 107,489
Kacper
  • 3
  • It would be useful if you could describe us your partitioning layout in more detail. Just add the output of sudo parted -l which you run in a terminal to your question. Don't forget that you should [edit] your question to provide new information and not just put it in a comment, because that will not preserve the formatting. Thanks and welcome. – Byte Commander Apr 03 '16 at 15:46
  • @ByteCommander added – Kacper Apr 03 '16 at 15:49
  • You can't resize the partition because it is has no space at the end of the partition to make it larger in a continuous block. You could temporarily delete the swap partition which would allow you to resize partition 8, then recreate the swap partition, which Ubuntu will just reinitialize on the next boot so it should be fine. – acejavelin Apr 03 '16 at 15:53
  • Thanks, but there is no unpartitioned space visible in your output. You will have to shrink one partition to enlarge another. - @acejavelin No, by default new Ubuntu versions recognize partitions to automount at boot time by their UUID, not by their /dev/sdXY name. And this UUID is practically unique for every partition, that means deleting and recreating it will stop Ubuntu from automounting them. It will search for it for 1.5 minutes at boot and then skip it and boot without swap until the configuration in /etc/fstab is fixed again. – Byte Commander Apr 03 '16 at 15:55
  • @ByteCommander photo – Kacper Apr 03 '16 at 15:57
  • @ByteCommander I went by the OPs statement of "I have that space unallocated" and assumed they knew they had the space. I thought about the UUID thing after my statement and you are correct, but in most cases swap is not essential and can be easily fixed with a couple commands after the fact. That was a comment, not an answer. :) – acejavelin Apr 03 '16 at 16:00
  • Soo @acejavelin what's the anwser? – Kacper Apr 03 '16 at 16:03
  • @qcperek You could do exactly what I said initially, you would just have to use blkid to get the UUID of the swap partition and update /etc/fstab for the cache partitions new UUID afterwards (or in the live environment) manually. – acejavelin Apr 03 '16 at 16:06
  • @acejavelin can you tell this more simplier? I'm new at ubuntu... – Kacper Apr 03 '16 at 16:08

2 Answers2

2

From the screenshot we see that there are 17GB of unpartitioned space at the end of the drive. We see that there is only the swap partition (/dev/sda9) between the / (/dev/sda8) partition you want to grow and the free space. So we can do this in few simple steps, even from your running system without having to boot from a live disk:

  1. Launch gparted.

  2. Unmount the swap partition (/dev/sda9) by right-clicking on it and selecting Swapoff from the context menu.

  3. Move the swap partition (/dev/sda9) to the end of the drive.

    Therefore right-click on it and select Resize/Move. In the appearing dialogue simply grab the block in the graphical visualization with your mouse cursor and drag it to the right border, so that finally the Free space following (MiB) shows a value of 0 (or maybe a bit more, depending on the alignment). Then click the Resize/Move button to confirm.

    You will get a warning that moving partitions can lead to data loss. Confirm it if you can stand the risk (because you have backups that are up to date). But as we're only moving the swap partition, nothing should happen anyway.

    Then the moving task will be added to the queue, but not executed yet. We're doing that later.

  4. Enlarge your / (/dev/sda8) partition.

    Therefore right-click on it and select Resize/Move. In the appearing dialogue simply grab the block's right border in the graphical visualization with your mouse cursor and drag it to the right border, so that finally the Free space following (MiB) and the Free space preceding (MiB) show a value of 0 (or maybe a bit more, depending on the alignment). Then click the Resize/Move button to confirm.

    Then the resizing task will also be added to the queue, but not executed yet. That's what we're doing now.

  5. Confirm that in the lower section of the GParted window you see exactly (and only) those two tasks:

    • Move /dev/sda9 to the right
    • Grow /dev/sda8 from 19GB to 37GB.

    If this is the case, click the green tick button in the toolbar that says Apply all operations.

    Another confirmation dialogue will pop up where you click Apply to continue.

  6. GParted will start its work now. Wait until it's done.

  7. Reactivate your swap partition (/dev/sda9) by right-clicking on it and selecting Swapon from the context menu.

    As you did not delete the partition but just move it, both its /dev/sda8 name and its UUID remained the same and Ubuntu will still recognize it on boot without any further configuration.

  8. Finally you can exit GParted. Finished.

Byte Commander
  • 107,489
0

You not have enough contiguous space for Partition 8 to grow because of the location of your swap partition. You will need to delete the swap partition and recreate it, which will change it's UUID (how fstab knows partitions).

1) Boot into your live environment
2) Delete your swap partition and commit the change
3) Resize your root ext4 partition as needed and commit it
4) Recreate your swap partition and commit the change
5) Reboot (it will take an extra minute or two and you will get an error, but it should boot normally after that)

Now we need to make a change to /etc/fstab to bring the swap back online.

1) Login and open a terminal window and execute blkid which will give you output something like this:

acejavelin@Mint-p6310f ~ $ blkid /dev/sda1: LABEL="System Reserved" UUID="3C9CD85F9CD8156C" TYPE="ntfs" /dev/sda2: LABEL="Win7Pro" UUID="345CDCC65CDC8450" TYPE="ntfs" /dev/sdb1: UUID="d7dd7c87-050c-4dac-ba59-1e07fade2599" TYPE="ext4" /dev/sdb2: UUID="c22cf1cc-08f5-4995-a2d8-cca62125351d" TYPE="swap" /dev/sdb3: UUID="c5e1f6de-2a75-4507-8d09-285f18296915" TYPE="ext4" /dev/sdb4: UUID="b190e13f-699d-4005-bf5c-3500e888b281" TYPE="ext4"

Make note (or copy to the clipboard) of the UUID in the line with TYPE="swap" as we need that to make in change.

2) Start editing the file with sudo nano /etc/fstab
3) Look for a line similar to this:

UUID=c22cf1cc-08f5-4995-a2d8-cca62125351d none swap sw 0 0

and change the UUID to the proper one we found above and save the file.

4) Reboot and you should be all set

RELATED: How to edit files in a terminal with nano

  • Actually in this case there is neither a need for a live system because ext4 supports growing while mounted and because we can simply unmount (swapoff) the offending swap partition, nor do we need to delete, recreate and reconfigure the swap partition because we can simply move it. See my answer. – Byte Commander Apr 03 '16 at 16:33
  • @ByteCommander My answer would work, but you are correct and your answer is much simpler and easier to implement, I will upvote your answer. – acejavelin Apr 03 '16 at 16:42