41

When I try to install a software using Ubuntu Software center I get:

Failed to download repository information
Check Your Internet connection

When I try to do a apt-get install something, I get:

407  Proxy Authentication Required

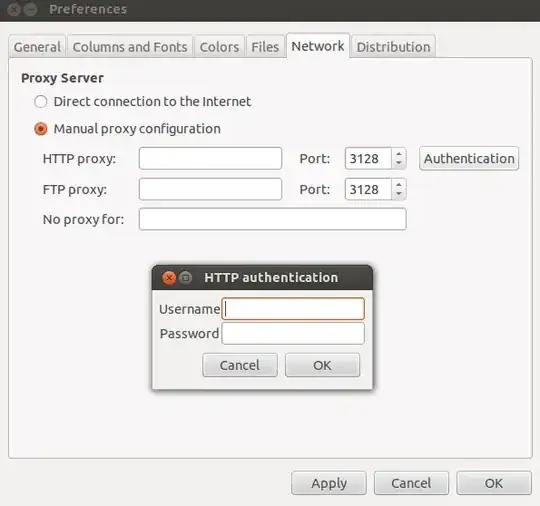
I use a proxy server that requires a user-name and a password. I have set my systems proxy manually, by plugging in the required numbers in the Networks proxy and applied it system wide. I guess the problem now is plugging in my user-name and password.

When I use INTERNET via Mozilla, it specifically asks me for my user-name and password.

Braiam
  • 67,791
  • 32
  • 179
  • 269
user38507
  • 411
  • 1
  • 4
  • 3

10 Answers10

54

For your apt-get to work, you should edit your apt config file:

sudo -H gedit /etc/apt/apt.conf

And add Acquire::http::Proxy "http://username:password@proxyhost:port/";

The syntax shown above should be strictly followed.

This configuration may fail if your username or password has an '@' in it. You can also add proxy configuration for other protocols such as FTP.

Update: If your username or password has '@' in it you can replace it with %40 Example:If your password is @123 enter it as %40123.

For other characters see this Percent-encoding

jaseem
  • 691
  • 4
  • 7
12

First set your proxy setting via Linux wizard use option manually and apply setting systemwide just like this wizard box.

Add your proxy environment. These are just example settings...
Open your command prompt login and edit the apt.conf file:

sudo vi /etc/apt/apt.conf

There are already 4 lines of code starting with Acquire key word, edit it like this:

Acquire::http::Proxy "http://username:password@proxyhost:port/";
Acquire::https::Proxy "https://username:password@proxyhost:port/";
Acquire::ftp::Proxy "ftp://username:password@proxyhost:port/";

Note
If your Password contains special characters like @,$,! (e.g. Password: P@ssword) then replace the special characters by their hex code equivalents with % prefix like this:

Acquire::http::Proxy "http://username:p%40ssword@proxyhost:port/"; 

@==>%40
$==>%24
!==>%21

sebisnow
  • 109
  • 3
user226173
  • 281
  • 3
  • 2
5

If you're behind an enterprise proxy that's running NTLM authentication, you could use CNTLM:

$ sudo apt-get install cntlm
$ sudo vi /etc/cntlm.conf

Change the default settings (domain, username, password and proxy). Then restart the service:

$ sudo /etc/init.d/cntlm restart

You can now use localhost:3128 (default CNTLM port) as the system-wide proxy for Ubuntu.

Check http://cntlm.sourceforge.net/ for docs.

theogfx
  • 51
  • 1
  • 2
3

If your user name is separated by space then use:

export http_proxy='http://Pankaj Kumar Pandit:ABCD@192.168.1.1:3128/'

If your user name is not separated by space then use:

export http_proxy=http://Pankaj_Kumar_Pandit:ABCD@192.168.1.1:3128/

The difference is the addition of opening and closing '.

Damien
  • 105
  • 6
2

One nice alternative is to use Synaptic Package ManagerInstall Synaptic, where you can specify system independent proxy settings and also store username and password.

Proxy Settings

However, this won't change proxy for Software Center.

ignite
  • 8,936
2

In the latest versions of Ubuntu, you can use System Settings > Network > Network Proxy, and when you click "apply system wide" it modifies proxy settings in different places, at least including the /etc/apt/sources.list file, HOWEVER...

It does not have any mechanism to prompt for authentication. No idea why no one has made that part of it yet, but because of this, if you need authentication, you need to put your password and username there too in this format:

username:password@proxy.address

If your password or user name has any special characters in it, including @ or # or ! or whatever, you probably are going to have to use the HTML-ized character code for any of those special characters. See this page for how you can that: http://www.obkb.com/dcljr/charstxt.html

Yfrwlf
  • 21
  • 1
2

I think this tutorial should help you.

Click on Network tab select Manual Proxy Configuration option and enter your proxy server,port details.If you have username,password click on Authentication to enter these details click on ok

(from http://www.ubuntugeek.com/how-to-configure-ubuntu-desktop-to-use-your-proxy-server.html)

To invoke it for all programs launched in a shell I would suggest you either add it to your /etc/bash.bashrc using gksudo gedit /etc/bash.bashrc to apply it system-wide for all bash sessions or to your user-space ~/.bashrc.

As far as Synaptic goes, in the Preferences under the Network tab you seem to be able to set authentification for your proxies. This appears to be specific to Synaptic, though.

bkzland
  • 806
  • 5
  • 7
1

I have made a python script to set the proxy settings in Ubuntu

Assume the following setting, you need to replace at relevant places

  • proxy_address 172.16.26.214
  • proxy_port 3128
  • proxy_username king
  • proxy_password queen

I have made a video which takes you through all the steps:

https://www.youtube.com/watch?v=eBtzKa-dvJg

Steps are Detailed here:

  • First click on Dash
  • In Search Box Enter "Proxy" (Without Quotes)
  • Click on "Network" under Applications
  • Select "Network Proxy"
  • Select Manual
  • Enter the proxy address and proxy port
  • Apply. Enter your system password to confirm

Download the script setproxy.py

https://pastebin.com/MbBHta8g

Let’s say you have saved the setproxy.py in the Downloads folder

  • Open terminal Type
  • cd ~/Downloads

General Command:
sudo python setproxy.py proxy_address proxy_port proxy_username proxy_password
For our example

  • sudo python setproxy.py 172.16.26.214 3128 king queen

In case of simple proxy Without authentication the command is:

  • sudo python setproxy.py 172.16.26.214 3128

In case you have python 3 and above run using python2.7 so the commands will look like

  • sudo python2.7 setproxy.py 172.16.26.214 3128
  • sudo python2.7 setproxy.py 172.16.26.214 3128 king queen
  • 1
    Using dropbox or copy for storing scripts is very bad. You should use github, or paste.bin at least – Quan To Sep 26 '17 at 06:37
0

In my case, I saved apt.conf created based on jaseem's answer, to home directory instead of /etc/apt and specified the -c option in the apt command.

$ sudo apt -c=~/my-apt.conf update

You can also specify the configuration file path in the environment variable APT_CONFIG.

$ export APT_CONFIG=~/my-apt.conf
$ sudo apt update
cubick
  • 135
0

You can also try the following commands.

For http connection - export:

http_proxy="http://username:password@proxy_server_address:port_no"

For https connection - export:

https_proxy="https://username:password@proxy_server_address:port_no"

And likewise for ftp and other connections.

v2r
  • 9,547