12

I use Ubuntu 12.04 at my home and have good internet connection and my system works fine.

One of my friend is having small office and he is thinking to switch from Windows to Ubuntu 11.10 or above. The problem is that he does not have an Internet connection.

He ask me that is there any possibilities to install all updates without having Internet. I make many search, I found this question that says using Keryx or Synaptic Manager will do that.

But I am using 11.04 and there is no Synaptic manager in that so that I generate and download script.In other way when I try to install keryx (on any fresh install system on which I have to fetch the updates or system having Internet connection) enter image description here

Its shows me error that I am not having python.But I am having that

enter image description here

Installing these application doesn't meet dependencies. The key point here is

  • How I Install updates without having internet on fresh install Ubuntu.
  • How I install ubuntu-restricted-extras
twister_void
  • 5,924

8 Answers8

4

As far as I know, you can't download updates for a Oneiric (11.10) system using Ubuntu Natty (11.04). You must have a working Ubuntu 11.10 system.

An sketch about the process we are following:

  1. First we'll install a Virtual machine in OP's Natty (11.04) system.
  2. We'll install Ubuntu 11.10 in that virtual machine
  3. We'll setup virtual machine to have a common shared folder between the host OS (11.04) and the guest OS (11.10)
  4. We will generate a download script of packages which are required to upgrade that system (guest OS i.e Ubuntu 11.10).
  5. We'll transfer the download script to the host OS using shared folder set up in step 3.
  6. In host OS, we'll download all the required packages with the help of download script we get in step 5.
  7. We'll transfer all the downloaded .deb files in the Offline system, that is actual Ubuntu 11.10 system in his friend's PC.
  8. We'll create a local repository in his friend's PC with those packages.
  9. We'll upgrade OP's friends Ubuntu with the help of local repository created in step 8.

1. Getting a working Oneiric system

There are two ways to have a working Oneiric system.

  • By Doing an actual installation

    You have to install Ubuntu Oneiric (11.10) on the computer with Internet connection. Though it is also possible from a live system running from USB or CD, I recommend installing. You can get help for installing Ubuntu from these links:

  • Installing Oneiric in a VirtualBox Virtual Machine

    1. To install VirtualBox in Ubuntu 11.04 Natty Narwhal, run these commands in a terminal:

      sudo apt-get update
      sudo apt-get install virtualbox
      
    2. Then install Oneiric in the virtual machine.

    3. Set up a shared folder in the virtual machine.

      You need to install VirtualBox Guest Additions to enable shared folder feature. Run this command in the virtual machine to install that:

      sudo apt-get install virtualbox-guest-additions
      

      If you need help enabling the shared folders feature in the VirtualBox, check this link:

2. Grab the .deb files required for updates

Please Note these specific points:

  1. It is recommended not to update the virtual system during installation or afterwards before installing Synaptic. Cause, those updates might be deleted from cache and without those updates, you can't successfully generate package download script.

  2. Don't run sudo apt-get clean or sudo apt-get autoclean, because those commands removes .deb files from cache.

Then boot to the Oneiric system that has an Internet connection (either from the installed system or in VirtualBox) and follow this procedure:

  1. Install Synaptic Package Manager. Run these commands in a terminal for this: (Note, You must connect the virtual machine to the Internet, without Internet access the machine cannot update the package list)

     sudo apt-get update 
     sudo apt-get install synaptic
    

    You may also want to download the packages required for the ubuntu-restricted-extras package. To do so, Run this command additionally with the previous two commands

     sudo apt-get install -d ubuntu-restricted-extras
    

    This command will not install the packages, it only downloads them with all dependencies in /var/cache/apt/archives folder.

  2. Then open Synaptic Package Manager. Push the button Mark All Upgrades.
    image of upgrade push button

  3. When asked if you want to Mark additional required chanages, press the Mark button.
    image of additional mark window

  4. Then going to File --> Generate package download script, save the script as a file. Let it be update-downloader.sh in a folder named Updates. We assume the Updates folder is in your home directory, i.e., in /home/username. Then close Synaptic.

  5. Now download the .deb files.

    1. Go to the Updates folder, where you saved update-downloader.sh.

    2. While you are still in the Terminal and have cd'd to the Updates folder you created earlier, run this command:

      cp /var/cache/apt/archives/*.deb .
      

      That copies the downloaded .deb files which are used for installing Synaptic Package Manager and the files downloaded for the ubuntu-restricted-extras package.

    3. Then run this command sh ./update-downloader.sh to download all the .deb files required to update in the current folder (i.e., in the Updates folder.

      Or

      Alternatively, you can transfer the Updates folder with the few .deb files you just copied from /var/cache/apt/archives with the update-downloader.sh script in it to the host OS via VirtualBox's shared folder feature.

      Then in the host Ubuntu system, open a terminal and run the below command by going to the Updates folder you just copied from the guest OS using shared folder feature, where update-downloader.sh file resides:

      sh ./update-downloader.sh
      
    4. If you downloaded the .deb files in the virtual machine, in this step, transfer the Updates folder with those files using Virtual Box's shared folder feature. (This step is only required if you downloaded the files in virtual machine)

    5. After you get the Updates folder with all .deb files in your host PC (i.e., in your Natty system) copy that folder with all files on a USB flash drive. You may also want to burn a DVD with those packages, though I am not recommending that.

    6. Transfer the Updates folder using your USB drive (or CD/DVD, if you burned them) to your friend's PC.

3. Use the .deb files to create a local repository

Copy the whole folder named Updates to the Internet-less computer. Put that folder in a directory. Let say, you have put the Updates folder in the home directory. Create a new directory in your home folder with name offline, and move the Updates folder into the offline folder. Now, the directory structure looks like this

   + home 
     +- username
       +-  offline
         +-  Updates (contains the .deb files)
 
  1. Now open a terminal and go to the offline folder. Once in the offline folder, run this command to generate the necessary package index file:

    apt-ftparchive packages . > Packages
    

    It will create a file with name Packages.

  2. Now open /etc/apt/sources.list file with root power. In a terminal do this

    gksu gedit /etc/apt/sources.list
    
  3. Then press an Enter while your cursor is at the beginning of the file. This will create a new blank line at the top. Write this line as the first line in the file

    deb file:/home/username/offline /

    Then save the file with Ctrl+S and exit gedit, the text editor.

    Remember to use the exact folder / path names for the offline folder, and replace username with login name of the user.

    Also, if you are sure, your friend cannot use other repository sources, you may want to disable all other repositories by placing a # mark before each line in the /etc/apt/sources.list file. (This is not actually required, but recommended).

    Note that it is generally required to put a local repository at the top of the file, to give it a higher preference then other repository sources. (But in this particular case, you might be able to get away with not doing this, since your friend can't even connect to the Internet to access any of the other configured repositories.)

4. Do the update without accessing the Internet!

  1. Run sudo apt-get update in the terminal to make the package manager recognize your local update directory.

  2. Then do this command to upgrade the offline system:

     sudo apt-get upgrade --allow-unauthenticated
    

Done! You have upgraded your system without Internet access.


Some Notes:

1. Don't want to write allow-unauthenticated option every time?

If you want to use this local repository to install packages time to time, but feel bored to always use that allow-unauthenticated option, do this.

Create a file named 99mysettings in /etc/apt/apt.conf.d with gedit and add the line in that file and save.

    APT::Get::AllowUnauthenticated "true";

To open a file named 99mysettins in that directory with root power use this command in a terminal

gksu gedit /etc/apt/apt.conf.d/99mysettings

2. Note about allow-unauthenticated option:

You might wonder why I have provided the --allow-unauthenticated option. This is used because your local update repository is not authentic to the system. But it will not harm, because you downloaded those packages from an authentic official Ubuntu repository.

3. I want to have a trusted repository instead:

Check this awesome and epic post in Ubuntu forums about creating a trusted local repository. If you create a trusted repository, you don't have to provide --allow-unauthenticated option anymore.

Recommendation: I would recommend you not to use PPA repositories, unless you really trust them. In particular, don't use experimental repositories, because they may introduce dependency problems in the system, which is often referred by Unix geek as dependency hell. This can be harder to fix when you do not have an Internet connection.

Anwar
  • 76,649
3

You can use Keryx without installing it. I regularly use keryx 0.92.4.1 instead of version 1.

The reason I chose the older version was, if my memory serves me well, that v0.92x would let you install additional packages, while v1 would only let you update. I never managed to get it to install (automatically) any package for me, anyway, so the following might be applicable for version 1 as well.

This is how I use it:

  1. Extract keryx to your home directory in the computer without internet (let's call it computer w/o internet).
  2. Run:

    python keryx/source/keryx.py
    
  3. Create a new project. By default, the computer's name is the project's name. You can change that before clicking on "New project". In this example, I call it "chompituga".

  4. It will ask you to "download the latest package lists". You have no internet, so click no.

  5. After a short while you'll have a list of all packages, with those installed appropriately marked. You can close the program now.

  6. Now copy the folder keryx/projects/chompituga to a usb. It contains the following:

    chompituga.keryx
    debian.conf
    installcache.sh
    lists/
    packages/
    sources/
    
  7. Now in the computer with internet access (let's call it computer w/ internet): extract keryx to the home directory.

  8. Copy your project folder (in this example, chompituga) and all its contents from the USB to the keryx/projects/ folder on the computer w/ internet.

  9. Run keryx:

    python keryx/source/keryx.py
    
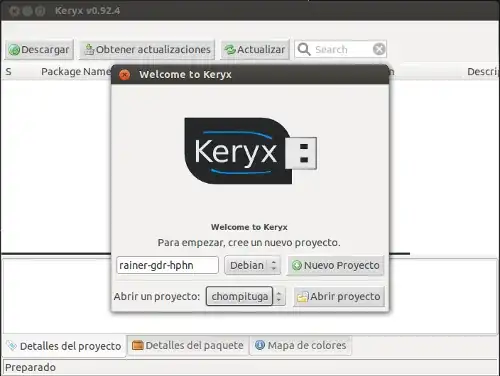
  10. This time, open the project, called "chompituga" in this example (see figure).

    keryx wellcome window

  11. It will ask to download the latest package lists, this time click yes. After a while, it will indicate that the package lists have been updated. You can see the list of packages in the main window and the ones that have a newer version will be differently marked.

  12. Now it is possible to download updated packages with the menu Project|Get Updates, the button "Get Updates", or the combination Ctrl+U.

  13. It is also possible to install new packages (it should take care of dependencies) by selecting the desired packages and then the menu Project|Download package.

  14. Packages are downloaded to the keryx/packages/chompituga/packages/ folder. You take the contents of that folder back with you to the computer w/o internet.

  15. Back at the computer w/o internet, copy the downloaded packages somewhere and, in that folder simply do:

    sudo dpkg -i *.deb
    
  16. Make sure to install kernel updates ("linux-header", "linux-image" or other "linux-something" packages) separately -- maybe after other updates.

  17. Sometimes, it seems necessary to install with the option --force-depends. I do it, just in case, when I see very very many packages to update.

    sudo dpkg -i --force-depends *.deb
    
  18. Once finished installing updates, run keryx again (step 2); open the project (step 10) and, from the menu Project|Update Status, update the list of installed packages. This will require your user password twice. Make sure to do this only in the computer w/o internet.

  19. Now all you have to do is to repeat steps 6 to 18 every time you want to update your computer w/o internet.

I'm sorry this answer is long. I can assure you that the procedure is rather simple and straightforward.

Notes: It doesn't matter if the computers have different versions/flavours of Ubuntu. I haven't tested keryx with distros other than *buntu.

carnendil
  • 5,451
  • I'm sorry for the poor English. – carnendil Aug 29 '12 at 19:01
  • 1
    Your English is fine, but the current version of Keryx looks completely different and appears to have completely removed a lot of this functionality! I still managed to loosely follow these instructions - I got Keryx to download the appropriate debs and was able to install them with dpkg, so have an upvote. – John Lyon Nov 20 '12 at 04:52
  • edit: Thank you @jozzas. It was indeed the functionality of being able to install additional packages, instead of only updating, what prompted me chose the older version. Still, I had to learn to do it semi-automatically like this. – carnendil Nov 23 '12 at 15:52
1

There is another way to achieve this:

First upgrade:

  1. First Boot up old Ubuntu version (11.04) in your computer which has Internet connection using either Live CD or USB.

  2. Then open a terminal and run sudo apt-get update to update the list of packages available online. (Please note that, this command won't update the system, it only update package list).

  3. Then run the following command in a terminal to generate a list of url's of package files needed for upgrade.

     sudo apt-get upgrade --print-uris -y | grep -o "http:.*deb'"  | grep -o .*.deb > list
    

    _If the repository is an ftp archive instead of an http archive, replace http with ftp_. The above command will create a list of url's of packages need to be downloaded.

  4. Then save the list file, so that you can use it later. Now boot your regular Ubuntu, connect to the internet and place the list file somewhere and run it with wget to download all files. I suggest you to create a folder and place the file there, Then go to the specified folder in terminal and use the below command to download all.

    wget -c -i list
    
  5. Copy the whole folder in your friend's computer, login to Ubuntu, open a terminal and going to the folder using cd use sudo dpkg -i *.deb to install all updates.

Later upgrades:

If you need to upgrade your friend's Ubuntu again, copy the file status from /var/lib/dpkg/ folder in your PC and then again boot Ubuntu 11.04 again. Then follow these process:

  1. Open terminal and type gksu nautilus.

  2. Copy the status file which you have copied and paste it in /var/lib/dpkg folder to replace the original one.

  3. Then follow step 2 to 5 from the First upgrade section

Note: Don't re-use earlier Live Ubuntu sessions. Use "startup-disk-creator" in your Ubuntu to create a Live USB and select discarded on shutdown option at the bottom or Use a Live CD.

Anwar
  • 76,649
0

You may be able to insert a disc/ISO and update that way.

https://www.reddit.com/r/Ubuntu/comments/etpajx/how_do_you_update_ubuntu_without_a_direct/

In earlier days when dinosaurs roamed the earth, this was done by adding a cdrom as a deb source. You can easily use an .iso file:

sudo mount focal-desktop-amd64.iso /mnt -o loop
### Put the next line as the first line into /etc/apt/sources.list, or as file iso.list in `/etc/apt/sources.list.d`
deb [ trusted=yes ] file:///mnt/ focal main restricted

sudo apt update && sudo apt full-upgrade

I could not get it to work, but the principle seems fine. If you don't have a lot of non-Ubuntu packages it might work. focal needs to be replaced with the adjective of the ISO you are trying to upgrade to.

0

You just need to install apt-offline or apt-offline-gui to the machine that is without internet.

Description-en: offline apt package manager
 apt-offline is an Offline APT Package Manager
 .
 apt-offline can fully update and upgrade an APT based distribution without
 connecting to the network, all of it transparent to apt
 .
 apt-offline can be used to generate a signature on a machine (with no network).
 This signature contains all download information required for the apt database
 system. This signature file can be used on another machine connected to the
 internet (which need not be a Debian box and can even be running windows) to
 download the updates.
 The downloaded data will contain all updates in a format understood by apt and
 this data can be used by apt-offline to update the non-networked machine.
 .
 apt-offline can also fetch bug reports and make them available offline
Sepero
  • 4,557
  • The problem of this method is, apt-offline copy all the .deb files in /var/cache/apt/archives folder and if your downloaded .deb files are very large, and the freespace in filesystem is small in size, it will be a problem – Anwar Jul 21 '12 at 06:01
  • As per the link that I have added in the answer, you can configure apt-offline to download to a directory of your choice – Hashken Jul 21 '12 at 07:07
0

No matter what option you use to achieve what you want to achieve, you will need to use your internet connection to help your friend.

Another option available is to make a customized live usb/cd for them with all the updates added and included for them.The easiest tool to achieve this with is ubuntu builder.

You will need to install this onto your machine, with internett access, so you can customise the livecd/usb/install for your friend without internett access.

So first you will need to install ubuntu builder on your computer. To do so you will need to open your terminal and add the ubuntu builder ppa

sudo add-apt-repository ppa:f-muriana/ubuntu-builder

sudo apt-get update

sudo apt-get install ubuntu-builder

Next you will need to download a currrent livecd image http://cdimage.ubuntu.com/dvd/current/

Now talk to your friend and make a list of every bit of software your friend will require on there machine . Once your list is complete, start up ubuntu builder on your computer.

step 1 First import the ubuntu image you previously downloaded by clicking on Select iso then import from local

Import the image you previously downloaded

Once imported click on edit sources.list in ubuntu builder

An editor should appear, now scoll down and remove the # from the following 4 lines in this example its an ubuntu 12.04 livecd being used

deb http://archive.ubuntu.com/ubuntu precise main restricted

deb-src http://archive.ubuntu.com/ubuntu precise main restricted

deb http://archive.ubuntu.com/ubuntu precise-updates main restricted

deb-src http://archive.ubuntu.com/ubuntu precise-updates main restricted

Also add any other sources required for additonal software to the sources.list if not already available from the main repositories.

Click save then click close once finished

Step 2

Now from ubuntu builder click on the console button

A terminal will open and may take some time as it updates

First lets update the livecd system

In the terminal that opened

apt-get upgrade

wait until all upgrades have completed

Now still in the terminal install any additional software required from the software list made earlier with your friend

apt-get install "package name"

eg if your friend wanted gimp installed

apt-get install gimp

Remember everything installed and updated this way will be installed to the live/cd iso not your computer

Repeat and Install everything required for your friend including additional software and the resticted extras you wanted installed

apt-get install ubuntu-restricted-extras

I think the suggestions made earlier are good ones, so lets install apt-offline and apt-offline-gui to your livecd so your friend can update the system again at a later date,with your help, from a internett connection.

apt-get install apt-offline apt-offline-gui

Once you have added everything required type exit in the terminal and press enter

Now in ubuntu builder fill in a couple of the fields EG give your livecd a name

Now click on the build button in ubuntu builder This will take some time so be sure to leave until completed.

Once built close ubuntu builder

Now to find the location of the iso you just made, simply click files/ file system/home/ubuntu-builder/ and you should see the name/image you you just made in that folder

Your updated livecd image is now ready to burn the usual way.When installed onto your friends computer all updates and additional things you added will also be installed.

damien
  • 2,096
0
  1. Insert live-cd/usb of ubuntu 11.10 in your system .
  2. press ctrl+alt+delete for opening the terminal ,and run

    sudo apt-get update

    sudo apt-get install synaptic

  3. Open /var/cache/apt/archives and save the contents in safe directory

  4. Update your system(live cd/usb) using update manger

  5. Install some softwares if you wish :-),

    Ie ,if you want ubuntu-restricted-extras Install ubuntu-restricted-extras ,

    run sudo apt-get install ubuntu-restricted-extras in terminal

  6. Install aptoncd Install aptoncd

  7. Launch aptoncd and press create button, It will create an iso file

  8. Goto your friends home/office with Generated iso and directory made for step3

  9. Copy the directory and iso file to the desktop , Open the terminal and move to that directory

    cd /path/to/directory

  10. Run sudo dpkg -i *.deb ,It will install synaptic

  11. Open the synaptic and clickEdit->add cdrom It will display a dialog box , Don't click on it

  12. Return to terminal and run

    sudo mkdir /media/cdrom

    sudo mount -o loop /path/to/iso /media/cdrom

  13. Now press ok button on the dialog generated from synaptic in step11 ,

  14. Press Mark all upgrades , Apply buttons ,respectively

  15. Your friends system is updated , Now have a cup of coffee ;-)

For future updates

  1. Insert live cd/usb in your system( In offline mode), This step is not needed if you are using persistent usb

  2. Take the iso and directory created for previous update,

  3. Copy the directory and iso file to the desktop , Open the terminal and move to that directory

    cd /path/to/directory

  4. Run sudo dpkg -i *.deb ,It will install synaptic

  5. Open the synaptic and clickEdit->add cdrom It will display a dialog box , Don't click on it

  6. Return to terminal and run

    sudo mkdir /media/cdrom

    sudo mount -o loop /path/to/iso /media/cdrom

  7. Now press ok button on the dialog generated from synaptic in step11 ,

  8. Press Mark all upgrades , Apply buttons ,respectively

  9. Now upgrade your system(live cd/ usb) using update manager, It will install update live cd/usb to previous update state,

  10. Update your system from synaptic package manager

  11. Install aptoncd Install aptoncd

  12. Launch aptoncd and press create button, It will create an iso file

  13. Goto your friends home/office with Generated iso

  14. Open the synaptic and clickEdit->add cdrom It will display a dialog box , Don't click on it

  15. Return to terminal and run

    sudo mkdir /media/cdrom

    sudo mount -o loop /path/to/iso /media/cdrom

  16. Now press ok button on the dialog generated from synaptic in step11 ,

  17. Press Mark all upgrades , Apply buttons ,respectively

  18. Your friend's system is updated again

    Feel free to comment/edit , If my post is ambiguous :-)

Tachyons
  • 17,281
-2

To install ubuntu-restricted-extras type in terminal
sudo apt-get install ubuntu-restricted-extras

To install Python type in terminal
sudo apt-get install python
this should solve your problems in installing keryx

Here you can find a tutorial for keryx it states in simple steps how to do the job.

Ashu
  • 9,482
  • Link 2 tutorial for keyx is broken . and how come i install these package on computer without having internet. i am clearly mention this – twister_void Apr 30 '12 at 15:44
  • Srry for the broken link fixed it with a new link – Ashu Apr 30 '12 at 18:21
  • 1
    The machine has no Internet access, so sudo apt-get install ubuntu-restricted-extras and sudo apt-get install python are not going to work unless the software being installed is available from some local package source. – Eliah Kagan Jul 17 '12 at 03:48
  • @EliahKagan what i understand from the question is that the OP's computer has internet but his friend does not. – Ashu Jul 17 '12 at 06:27
  • @Ashu You understand correctly. one system is having internet but the fresh install system don't – twister_void Jul 17 '12 at 10:47
  • @Gaurav_Java i dont think updates from one version (11.04) can be used for a different version (11.10/12.04) but still i'll try and find out. – Ashu Jul 17 '12 at 11:02