4

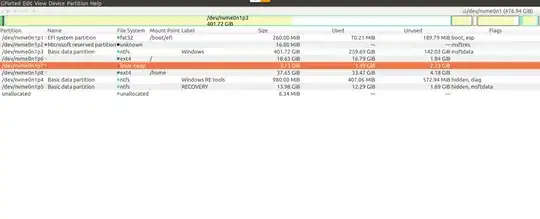
This is my GParted space allocation:

My GParted space allocation

  1. I want to increase my root space ext4, /dev/nvme0n1p6 to the left side.
  2. I want to increase my home space ext4, /dev/nvme0n1p8.

Please, could you suggest me some ways to increase both the partitions, without using any Live USB?

Lorenz Keel
  • 8,905
  • Anyway you need to boot from some other media. It may be another HDD, etc. LiveUSB is the easiest way. – Pilot6 Oct 28 '20 at 09:52
  • Is it a big problem to make a LiveUSB? How did you install Ubuntu? – Pilot6 Oct 28 '20 at 09:55
  • With Android smart phone you can use DriveDroid or EtchDroid, You can install Ubuntu Live on the SD card from your camera. I have Ubuntu installed on my MP3 player. – C.S.Cameron Oct 28 '20 at 10:22
  • 1
    You can't change the size or bounds of a partition that is mounted. The nvme0n1p6 partition is the one where the software is stored that does the actual changing. It would be very dangerous to change that on the fly. – Jos Oct 28 '20 at 10:24
  • @Pilot6, the problem is that i dont have a pendrive. – BALARAM KORRAPATI Oct 29 '20 at 04:10

3 Answers3

7

Boot Ubuntu Live without a USB

  • Use Windows Disk Manaement to shrink your Windows partition.

  • Place the Ubuntu ISO on your /home partition or change swap to ext4 for a while and place it there.

  • Add the following menuentry to /etc/grub.d/40_custom.

Menuentry

menuentry "isoname ISO" {
    rmmod tpm
    set root=(hdX,Y)
    set isofile="/[path]/[name].iso"
        loopback loop $isofile
        linux (loop)/casper/vmlinuz boot=casper iso-scan/filename=$isofile toram fsck.mode=skip --
        initrd (loop)/casper/initrd
}
  • Where hdX is the disk and Y is the partition number of the ISO location.

  • [path] is the path to the ISO file, [name] is the name of the ISO file.

  • Run sudo update-grub to add the menuentry to grub.cfg.

  • Shutdown and reboot.

  • Select "isoname ISO" from the GRUB menu. (you may need to boot toram if your ISO is located on a partition you are changing).

  • If needed you can use sudo umount -lrf /isodevice to unmount the isodevice.

You will have access to GParted the same as if you were booted from a Live USB.

C.S.Cameron
  • 19,519
  • Great answer. I had no idea you could do that. I guess this is permanent once set up which could be useful from time to time. – PonJar Oct 28 '20 at 12:11
  • 1
    @PonJar You can have multiple OS ISO's, perhaps keep a copy of Tails for security stuff. – C.S.Cameron Oct 28 '20 at 12:34
  • 1
    Use Windows Disk Manaement to shrink your Windows partition is important - I had no end of trouble with using gparted to shrink a Windows partition. – Kryten Oct 28 '20 at 18:29
1

I was very interested in the answer by C.S. Cameron and was keen to try it on some of my machines. The code in that answer did not work for me. The rmmod tpm line generated a non fatal error so I removed it. There is no /casper directory in the GParted iso that I downloaded. However there is a /live directory and I found changing the "casper" entries to "live" was necessary. /live contains vmlinuz and initrd.img. This got me most of the way to success and various searches threw up "toram=filesystem.squashfs" to boot other iso in this manner. Then I found this GParted website link with the following code with a couple of modifications:

menuentry "GParted ISO" {
set root=(hd0,msdos1)
set isofile="/path/gparted.iso"
    loopback loop $isofile
    linux (loop)/live/vmlinuz boot=live union=overlay username=user components noswap ip=net.ifnames=0 toram=filesystem.squashfs findiso=$isofile
    initrd (loop)/live/initrd.img

}

This works for me on legacy Ubuntu 20.04 and Arch. I haven't tried it on a UEFI/GPT machine which I expect will be different. I found I had to remove "vga=788" from the code because its deprecated. On both machines I placed the iso in my home directory and renamed it to "gparted.iso". The Ubuntu machine has a single partition so the path was /home/user/gparted.iso. The Arch machine has separate / and /home partitions so the path was shorter /user/gparted.iso

One other thing that was vital was to find the correct parameters for root=(hdX,Y). You can find these from the grub menu, just press c for command mode and ls to list the partitions and ls (hdX,Y)/ to list the contents of the top level of that partition which helps with identification. Y will be a number or something like msdos1.
PonJar
  • 1,868
  • @C.S.Cameron Thanks for getting me started on this. I hope you don't mind my alternative answer. I've learnt a lot from many of your other answers to questions – PonJar Oct 31 '20 at 12:47
  • You might be interested is this question also: https://askubuntu.com/questions/1269462/bios-uefi-template-image-for-booting-iso-files +1 for your additions. – C.S.Cameron Nov 01 '20 at 01:15
  • @C.S.Cameron Interesting link, thank you. It explains some of the parameters in the linux line however I have not been able to find a man page or similar to explain the rest. Can you point me to any documentation that would help? Thanks again. – PonJar Nov 01 '20 at 09:02
  • There seem to be lots of stuff when Googling, but not much interesting like: nomodeset, toram, persistent, persistent-path, nopersistent, fsck.mode=skip, only-ubiquity, maybe-ubiquity, quiet, splash, oem-config/enable=true, The items you show above also look interesting: username=user, toram=filesystem.squashfs, noswap. etc – C.S.Cameron Nov 01 '20 at 11:07
0

I would opt for C.S.Cameron's answer, but alternatively entering those entries at the grub command line... but in a pinch:

If available/feasible, one can also take the drive FROM the subject machine to another linux machine and boot as normal and make your changes... and remove...

The reverse is possible but graphics drivers may come into play, by bringing a drive in from another linux machine TO the subject machine and overriding the normal boot and making your changes.

WU-TANG
  • 3,071