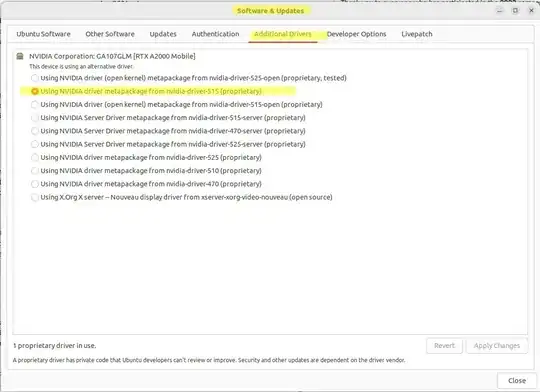
Update 25 Jan. 2023: Ubuntu kept undoing my manual driver installation when it would run automatic updates (see my notes at the end of Option 2 below), so my final configuration is this: choose the latest-possible-version non-open-kernel NVIDIA driver version provided by Ubuntu which works properly, makes external monitors work, and still allows you to adjust laptop screen brightness with your function keys. For me, that is version nvidia-driver-515 (proprietary). You can see it in the image below in my "Software & Updates" GUI as "Using NVIDIA driver metapackage from nvidia-driver-515 (proprietary":
Update 22 Dec. 2022: I found Option 2 below to be the best (I think...so far).
Note to self: future thing to try next time first instead of doing everything below:
See also:
- Can you reverse 'ubuntu-drivers autoinstall'?
- https://www.linuxcapable.com/install-nvidia-drivers-on-ubuntu-linux/ - this looks really useful!
- HDMI Port not recognised (NVidia Geforce RTX 3060, Xubuntu 22.04, Dell laptop)
# Do NOT run this now if you've already got your drivers working!
# This is just a note to myself to try this *first* next time is all,
# and then only try the manual steps below if this doesn't work.
# - Supposedly this will fix the NVIDIA issue I first experienced on
# Ubuntu 22.04 where my external monitor would not work when I
# plugged it in.
sudo ubuntu-drivers autoinstall
reboot
How to install the proper NVIDIA graphics driver to hopefully prevent freezes
I'm trying to follow the OP's accepted answer, but don't know which "proprietary one" to use to fix it. I have 8 proprietary driver options to choose from. From the "Software & Updates" --> "Additional Drivers" tab, here is what I am using now (the bottom "X.Org X server" one in the list below--with lots of freezes):

I plan on choosing the top option in that list to see if that works, then moving my way down the list.
I may also go to NVIDIA's website directly to see if they have any driver downloads I can get straight from them.
My computer literature says my graphics card is the "NVIDIA RTX A2000 4GB GDDR6". This seems to coincide with what lspci shows, which is good. Notice lspci says I have the NVIDIA Corporation GA107GLM [RTX A2000 Mobile] (rev a1):
$ lspci | grep -i nvidia
01:00.0 VGA compatible controller: NVIDIA Corporation GA107GLM [RTX A2000 Mobile] (rev a1)
01:00.1 Audio device: NVIDIA Corporation Device 2291 (rev a1)
First (required for compatibility with NVIDIA-provided proprietary graphics drivers, probably regardless of which option you do below): enable "Discrete Graphics" in your BIOS/UEFI
Follow the instructions in my answer here: Enable "Discrete Graphics" in your BIOS/UEFI. NVIDIA's documentation which I cite there and below as well states that disabling "Hybrid"/"Integrated" graphics is required, meaning that you have to choose the "Discrete Graphics" option instead.
Changing the setting from "Hybrid" to "Discrete" graphics is likely required since your computer's manufacturer probably shipped it with the "Hybrid Graphics" option set instead, since hybrid is a little more energy-efficient.
Option 1: use the first driver in the list in the image above
Before beginning this option, first enable "Discrete Graphics" in your BIOS/UEFI, as explained above, in order to follow NVIDIA's guidance and be compatible with their drivers.
So, after choosing the first driver in the "Software & Updates" --> "Additional Drivers" list, the little blurb at the top now says:
This device is using the recommended driver.
...which is good, instead of:
This device is using an alternative driver.
Here is the new selection and that text:

So, "the recommended driver" seems like a good option. :) We'll see how well this one works now.
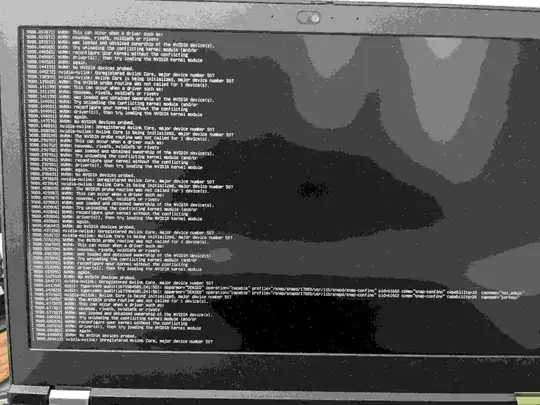
Update 4 hrs. later: Nope! Bad option! 2 important tips:
- Plug in an external monitor and test it any time you change your update your graphics driver! Some drivers don't support or work with exteranal drivers at all! But, you won't notice at first if you don't test it.
- Reboot right after changing your graphics driver, even if not prompted to! Rebooting ensures you're actually testing your newly-installed driver and not the one you had running before.
So, after I changed to the driver above, it seemed to work fine for 15 minutes or so (because it was actually still running the previous driver), then it randomly spit this image onto my main monitor only, and froze (note: sorry for the horrible quality of the image; I'm uploading a high-quality image and this site keeps horribly compressing it days later):
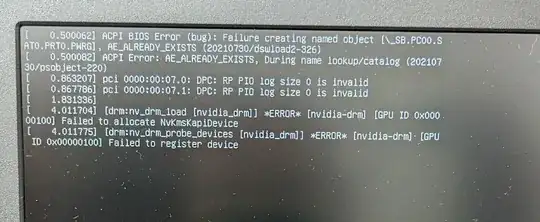
When I rebooted, prior to the boot screen even coming up, it also printed these error messages. The "ACPI BIOS Error" was already there, but the last few lines, starting with the line which says "[nvidia_drm]", are all new!:
And, this new driver didn't work with an external monitor at all! The external monitor was blank.
So, I reverted back to the "X.Org X server" driver I had previously in-use above (which freezes sometimes), and after rebooting, it was back and my external monitor worked again. Let's go on to Option 2 now.
(Recommended) Option 2: download and install the driver straight from NVIDIA
Before beginning this option, first enable "Discrete Graphics" in your BIOS/UEFI, as explained above, in order to follow NVIDIA's guidance and be compatible with their drivers.
(Here's a quick link to the NVIDIA "Advanced Driver Search" page, in case you need to rapidly try installing multiple drivers to see which one doesn't break your screen brightness function keys.)
If the above option still has lots of freezes or otherwise doesn't work (ex: with external monitors as I saw here), then you should download the driver straight from the manufacturer, here: https://www.nvidia.com/Download/index.aspx?lang=en-us#
Remember, you can find your NVIDIA graphics card version from the output of lspci via lspci | grep -i nvidia, as I show above.
To find the driver for this card, I went to the link above and chose these options. I highlighted the "Product" line which shows "NVIDIA RTX A000 Laptop GPU", which seems to be my card:

Once I clicked the "Search" button it brought me to this page: https://www.nvidia.com/Download/driverResults.aspx/196723/en-us/:

Here is the info. for this driver. Notice how new it is (from 28 Nov. 2022 when today is 20 Dec. 2022):
Linux X64 (AMD64/EM64T) Display Driver
Version: 525.60.11
Release Date: 2022.11.28
Operating System: Linux 64-bit
Language: English (US)
File Size: 394.72 MB
First, I check to make sure my card is supported. Under the "Supported Products" tabs I search with Ctrl + F in my browser and see that NVIDIA RTX A2000 Laptop GPU is in the list.
The "Additional Information" has this valuable information and installation help from NVIDIA:
Note that many Linux distributions provide their own packages of the NVIDIA Linux Graphics Driver in the distribution's native package management format. This may interact better with the rest of your distribution's framework, and you may want to use this rather than NVIDIA's official package.
Also note that SuSE users should read the SuSE NVIDIA Installer HOWTO before downloading the driver.
Installation instructions: Once you have downloaded the driver, change to the directory containing the driver package and install the driver by running, as root, sh ./NVIDIA-Linux-x86_64-525.60.11.run
One of the last installation steps will offer to update your X configuration file. Either accept that offer, edit your X configuration file manually so that the NVIDIA X driver will be used, or run nvidia-xconfig
Note that the list of supported GPU products is provided to indicate which GPUs are supported by a particular driver version. Some designs incorporating supported GPUs may not be compatible with the NVIDIA Linux driver: in particular, notebook and all-in-one desktop designs with switchable (hybrid) or Optimus graphics will not work if means to disable the integrated graphics in hardware are not available. Hardware designs will vary from manufacturer to manufacturer, so please consult with a system's manufacturer to determine whether that particular system is compatible.
See the README for more detailed instructions.
For further information please visit our forum, https://forums.developer.nvidia.com/c/gpu-unix-graphics/linux/148.
See their README or forum above, if needed.
Then, I search the "Release Highlights" tab for the word "bug" to see if this new driver has any relevant bug fixes. Sure enough, they do! Here are some of them that look particularly important:
Fixed a bug which caused Dynamic Boost to not engage on certain AmpereGPU based notebooks.
Fixed a bug that resulted in stutter when moving windows in GNOME.
Fixed a bug which caused suspend to fail on systems running GNOME 3as a Wayland compositor with NVreg_PreserveVideoMemoryAllocations enabled.
Fixed a bug in the Vulkan driver which could lead to corruption ingeometry and tessellation control shaders.
etc.
Anyway, this manufacturer-provided driver looks corrrect and useful, so let's try it!
Click "Download" --> "Agree & Download". It's a pretty large file, at 414 MB.
Install the driver:
For any NVIDIA installation help, reference their readme here: http://us.download.nvidia.com/XFree86/Linux-x86_64/525.60.11/README/installdriver.html.
First, we must disable the Nouveau open-source reverse-engineered GPU driver in order to continue. Read more about that here if you need background info. or to do additional debugging later: http://us.download.nvidia.com/XFree86/Linux-x86_64/525.60.11/README/commonproblems.html#nouveau.
To disable the Nouveau NVIDIA driver, follow these instructions here: https://linuxconfig.org/how-to-disable-blacklist-nouveau-nvidia-driver-on-ubuntu-22-04-jammy-jellyfish-linux:
# create the file to disable Nouveau
sudo bash -c "echo blacklist nouveau > /etc/modprobe.d/blacklist-nvidia-nouveau.conf"
sudo bash -c "echo options nouveau modeset=0 >> /etc/modprobe.d/blacklist-nvidia-nouveau.conf"
Verify its contents
cat /etc/modprobe.d/blacklist-nvidia-nouveau.conf
It should now contain this:
blacklist nouveau
options nouveau modeset=0
Update the kernel initramfs file system.
Don't quote me on this, but I think this is a RAM-loaded file system
which helps the system boot.
sudo update-initramfs -u
reboot
reboot
Enable the grub boot menu, if needed, as a tool to let you boot into the command-line without loading graphics drivers first.
See: How to get to the GRUB menu at boot-time?. In short:
# edit the grub file
sudo gedit /etc/default/grub
Comment out GRUB_TIMEOUT_STYLE=hidden by adding a # at the beginning of that line. Then change GRUB_TIMEOUT=0 to GRUB_TIMEOUT=5 to give it a 5 second delay before automatically loading the OS. Then:
# apply the grub changes
sudo update-grub
reboot to the grub menu
reboot
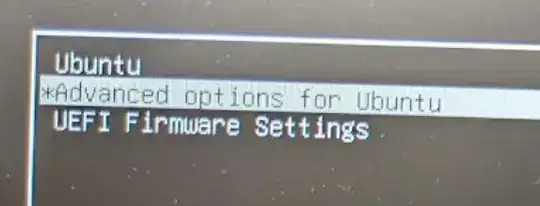
Now, you can not be graphically logged in, since we are about to update the graphics drivers. So, at the Grub screen, shown here, choose "Advanced options for Ubuntu":
Next, choose the "recovery mode" option, as shown here:

It will begin printing a bunch of boot-up text to the screen, and if your partition is LUKS-encrypted, it will ask you to type in your password:
Begin: Mounting root file system ... Begin: Running /scripts/local-top ... Please unlock disk nvme0n1p5_crypt: _
Type in your encryption password, if applicable.
On the "Recovery Menu" screen, choose the "root" option to "Drop to root shell prompt":

It will say:
Press Enter for maintenance
(or press Control-D to continue): _
Press Enter to enter the command prompt as root. You'll now see a prompt like this:
root@my_computer_name:~#
You're ready to go! Just keep in mind that when cding into a directory, ~ will not get you to your user's home directory, since you're logged in as root, not as your user. Getting to your user's home directory will look like this:
cd /home/username
(Optional, I think, but I did this anyway) Install some 32-bit compatibility libraries:
sudo apt update
sudo apt install pkg-config
# Install cmd source: https://zoomadmin.com/HowToInstall/UbuntuPackage/libglvnd-dev
sudo apt install libglvnd-dev
Start the installer.
# cd to where you saved it; ex:
cd /home/my_username/Downloads/Install_Files/NVIDIA
# start the installer
sudo sh ./NVIDIA-Linux-x86_64-525.60.11.run
It will extract the file and run the installer.
Choose "Continue installation" when prompted, by selecting with the arrow keys and hitting Enter.
It will then say "Building kernel modules" and have a green bar which progresses to 100%.
If you chose to install the 32-bit compatibility libraries above (I did), then when it says this:
Install NVIDIA's 32-bit compatibility libraries?
Choose "Yes".
When it says:
Would you like to run the nvidia-xconfig utility to automatically update your X configuration file so that the NVIDIA X driver will be used when you restart X?"
Use the arrow keys to move the white selector box, and choose "Yes".
When it says the installation is complete, choose "Ok".
Cool. That was a pain. I'm glad that's over :). Now reboot.
reboot
Log in and test an external monitor with your setup. Test your screen brightness function keys. Do they work? If yes, great! You're done! If not, follow my instructions here: Brightness not working after installing NVIDIA driver. You'll have to repeatedly download and install the next-oldest NVIDIA driver until you find one which has functioning brightness buttons. In my case, the latest driver at the time of this writing, 525.60.11, did not work, but 5.15.86.01 did.
- Reinstalling the graphics driver is actually really fast and can be done in < 5 minutes now that you know how to do it. Just reboot into the root terminal via the Grub boot menu and install the next NVIDIA driver, as you just did above.
DON'T LET UBUNTU ACCIDENTALLY AUTO-UPDATE YOUR NVIDIA GRAPHICS DRIVER IN THE FUTURE: in the future, when running Ubuntu's automatic updates, read carefully and uncheck any options to install or update NVIDIA graphics drivers. Apparently I wasn't paying attention, and I accidentally allowed it to auto-install some Ubuntu-provided NVIDIA graphics driver, ruining my ability to have an external monitor and control my screen brightness again, so I just had to re-install version 5.15.86.01 manually again, minutes ago (on 8 Jan. 2023). I didn't notice the change until I rebooted and my external monitor didn't work, my screen brightness was at 100% (too bright), and I was unable to decrease it using my Fn + BrightnessDown button. That was annoying. So, watch out for that. If anyone knows how to block Ubuntu's automatic updates from trying to upgrade the graphics driver automatically after doing a manual NVIDIA install, let me know please.
Update 18 Jan. 2023: it did it again. :( I just rebooted and my driver was mysteriously changed. Since I had manually installed the 5.15.86.01 driver which worked perfectly, this time I chose the 5.15 option provided by Ubuntu, and rebooted, and it seems to work just fine as well, including allowing me to adjust my screen brightness using my laptop's function keys. Here's the option I just chose:

It's flipping annoying that my manually-installed driver keeps getting changed by Ubuntu, so I'll try to investigate that further to make it stop. Meanwhile, the 5.15 version provided by Ubuntu (same version as what I manually installed) works just fine.
Here is my follow-up question about this: Ubuntu keeps undoing my manually-installed NVIDIA graphics driver after reboots every couple weeks
Last tip for a smoother-running experience, in particular when typing in Chrome, use the X11 window server instead of Wayland!
X11 is a surprisingly much faster and much better experience, especially in Chrome.
Wayland seems to be more buggy and glitchy and slow. I especially notice it when typing in Chrome, such as when editing this answer right now in Ask Ubuntu. X11 works much smoother, whereas Wayland is jerky and feels a bit unresponsive, again, even while typing this.
To use X11, when you reboot and get to the login screen (assuming your computer doesn't automatically log in for you), after you type in or select your username only, there will be a little gear icon in the bottom-right of the login screen. Click it and select the "Ubuntu" option rather than Ubuntu 22.04's default "Ubuntu with Wayalnd" option. The "Ubuntu" option runs the traditional X11 window manager server, whereas the "Ubuntu with Wayland" option runs the newer (and glitchier, in my experience) Wayland window manager server.
Note to self: other things to look into in the future
- See also my new notes about
sudo ubuntu-drivers autoinstall at the very top of this answer.
- Which display manager (dm) to use?
- Google search for "lightdm vs gdm3"
- https://www.linuxfordevices.com/tutorials/linux/gdm3-vs-lightd
- Is gdm3 preferred to lightdm?


