I'd like to know if there is any alternative to Deep Freeze for Linux that still under development, because I've read some things on the internet and looks like the same company which developed Deep Freeze had a Linux version of it, but the project was discontinued.
Asked
Active
Viewed 2.3k times
12
5 Answers
10
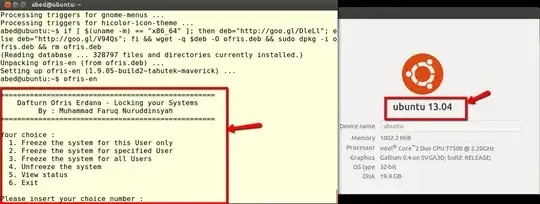
OFRIS is an open source application that can freeze your Linux, it is like Deep Freeze in Microsoft Windows operating system.
For Ubuntu versions 9.10, 10.04 and 10.10. To Install OFRIS, just press Ctrl+Alt+T on your keyboard to open Terminal. When it opens, run the command(s) below:
sudo add-apt-repository ppa:tldm217/tahutek.net -y
sudo apt-get update && sudo apt-get install ofris-en -y
For Ubuntu versions 11.04, 11.10, 12.04, and 13.04. To Install OFRIS, just press Ctrl+Alt+T on your keyboard to open Terminal. When it opens, run the command(s) below:
if [ $(uname -m) == "x86_64" ]; then deb="http://goo.gl/DleLl"; else deb="http://goo.gl/V94Qs"; fi && wget -q $deb -O ofris.deb && sudo dpkg -i ofris.deb && rm ofris.deb
Image below shows OFRIS running on 13.04
Source:XGeek
Mitch
- 107,631
-
I installed this in 15.10 then i applied Freeze by pressing 3 it confirmed me system is in frozen mode. Then i rebooted, i made a file /var/tmp/myname with value, then again i rebooted but still the file is there. How is this freezing? – Mar 02 '16 at 10:44
-
What do you exactly mean? Also I need to check to see if this works on 15.10. System freezing is reseting everything to the way it was before it was frozen. Please let me know. – Mitch Mar 02 '16 at 11:15
3
Warning: I have implemented this solution and it does work, but the merge times to get back to the snapshot can cause the boot process to take a long time if large changes were made to the system during it's last boot. During this wait period, it may appear to users that the system is hanging!
Also beware that anyone who has sufficient knowledge to mount the snapshot, could make changes to the "frozen" state. I have taken advantage of this possibility to update "frozen" systems, but again, this too can increase time it takes to merge (revert to) the snapshot!
LVM snapshots + cron + script = "frozen" state
I recently started digging into LVM and it occured to me that one could feasibly create a "frozen" state on a machine using LVM and it's snapshot capabilities. Of course, this method requires a system that is configured using LVM (or at least LVM on the partitions to be frozen).
Summary:
- Install system on LVM partitions reserving enough space on a PV for a snapshot
- Get the system configured the way you want it.
- Create a cron job that runs as root at boot to merge the snapshot and create a new snapshot to replace the merged one
- All successive reboots revert to the snapshot. All snapshots created are taken of the system in the state you created it in.
- As an added bonus, the snapshot can be mounted and modified (provided you have root privileges) and the "frozen" state can be updated if needed.
Proof of concept: Freeze everything except for one partition from a clean install
The installation:
Boot from a live Ubuntu disc/USB and choose the option to "Try Ubuntu without installing." This is important for manually configuring partitions with LVM
When Ubuntu loads partition your disk using the tool of your choice so that it has one partition that takes up the whole space of the drive. Here's what I'm working with:
/dev/sda(size 1T)/dev/sda1(size 1T)
Next in a terminal set up LVM on
/dev/sda1. I'm going to put most of the system on a single partition, but you wouldn't have to.sudo pvcreate /dev/sda1 sudo vgcreate ubuntu-vg /dev/sda1 sudo lvcreate -n swap -L 1G ubuntu-vg sudo lvcreate -n unfrozen -L 10G ubuntu-vg sudo lvcreate -n root -l +50%free ubuntu-vgNow if you were to run
sudo vgsfollowed bysudo lvsyou should be able to see that the amount of free space left in the volume group "ubuntu-vg" (VFree under vgs output) is equal to the amount of space taken by the logical volume "root" (LSize under lvs output). In my case, I have 506.44g free in ubuntu-vg and my root partition is 506.44g large. If the free space left in the volume group is equal to the the size of the partition I want to freeze, I should be able to wipe out the entire partition and still be able to recover with a reboot. Leave the rest of the free space in ubuntu-vg unused for now. We'll be using it later.Now install Ubuntu using manual partitioning

When install is finished, go ahead and reboot into the newly installed system.
Once booted into your new system, configure it so that it is exactly the way you want it to be when the computer boots each time.
- If you don't accidental changes to the snapshot, and you don't want the snapshot partition to show up in the menu bar...
mkdir /steady- Edit
/etc/fstabby adding (this is all one line)/dev/ubuntu-vg/steadystate /steady ext4 defaults,ro,nofail 0 1as the last line of the file
- Since things like updates will get blown away with each reboot, you may want to turn them off.
- If you have an unfrozen partition like mine at /unfrozen, don't forget to make it accessible to users who need access to it
- If you don't accidental changes to the snapshot, and you don't want the snapshot partition to show up in the menu bar...
Once you have the system configured exactly the way you want it, create the following script (you'll need root privileges) and save as
/root/steadystate.shwith your favorite editor. Note that if you changed the volume group name when setting up LVM, you'll need to update that in the script below as well.#!/bin/bash LOG=/dev/kmsgwait for merge in progress
echo -n "Reverting to snapshot if present... " | tee -a $LOG merging=1 while [ "$merging" == "1" ]; do /usr/sbin/service lightdm stop #prevent the auto-login/login screen from loading [ "$(sudo lvs -a | grep steadystate)" == "" ] && merging=0 sleep 1 done
create snapshot
echo -n "Creating new snapshot... " | tee -a $LOG /sbin/lvcreate -s -n steadystate -l +100%free /dev/ubuntu-vg/root
make sure root comes online before trying to merge
while [ ! -e /dev/mapper/ubuntu--vg-root]; do sleep .5; done echo -n "Scheduling reset to snapshot... " | tee -a $LOG /sbin/lvconvert --merge /dev/ubuntu-vg/steadystate
echo -n "Starting lightdm... " | tee -a $LOG /usr/sbin/service lightdm start
Finally run
sudo crontab -e, select an editor and put@reboot /bin/bash /root/steadystate.shat the end of the file. Save and close (Ctrl + X; answer Y to save)Reboot, and you should have a system that is frozen except for the partition mounted at /unfrozen
This works because the snapshot is created at boot time, and even though we pass the command to merge the snapshot right after that, the snapshot can't be merged while the logical volume for root is active. It therefore postpones the merge action until the next time /dev/ubuntu-vg/root is activated which is at the next reboot. This action would also be triggered if the system was booted from a live USB.
Just for kicks, I went in after a reboot and ran sudo apt remove --purge firefox* libreoffice-* unity* which I would not normally advise doing because it removes some useful programs and puts the system in what might be a less than desirable state!

The system wouldn't even shutdown properly from the GUI. So how does one fix this? Reboot!

Upon rebooting, everything was back in order. Firefox, LibreOffice, and Unity were all back where they belonged.
I also tried removing Linux*. This left the machine unable to boot, however, simply booting from a live Ubuntu disk seemed to make the merge take place. Restarting again left the system in its "frozen" state.
If you wanted to be able to make changes, you could (re)mount the snapshot with rw privileges and then chroot to it and make any changes that you want to remain permanent. This isn't flawless, but it's a proof of concept.
Pablo Bianchi
- 15,657
b_laoshi
- 4,660
- 4
- 25
- 46
1
Add a Guest User to Ubuntu 22.04 +
A Guest user requires Lightdm. Lightdm was replaced by GDM in Ubuntu 16.10. It is easy to reinstall and activate the Guest Account.
Install lightdm:
sudo apt-get install lightdmAt popup select lightdm as display manager.
For 23.04 install gedit:
sudo apt install geditAfter installs run:
sudo gedit /usr/share/lightdm/lightdm.conf.d/50-disable-guest.confChange:
allow-guest=true.On next boot there will be a guest user, no changes will be saved during a guest user session.
The administrator may change settings and add programs.
- I also managed to get Guest User working on a USB flash drive with Ubuntu 22.04 and prior:
C.S.Cameron
- 19,519
-
I have not yet managed to get guests working with Ubuntu 23.04 Persistent USB drive. – C.S.Cameron May 25 '23 at 11:07
1
By default Ubuntu and most other Unices deny regular users (students, guests) write access to system files. Only an administrator with the proper authorisation (username and key) can install software, change system settings, or delete partitions.
Regular users can, by default, only write in their home directory and the system's temporary directory. A common way to handle one-time guest sessions is to put their home directory inside the temp directory, and the temp directory in main memory.
If you want to make extra sure, mount the system partition read-only and lay an aufs partition over it that stores changes in main memory.
David Foerster
- 36,264
- 56
- 94
- 147
1
fsprotect
fsprotect is a set of scripts that protect existing filesystems. fsprotect is excellent for public computers like those in libraries, internet cafés, etc.
Using aufs they pack a tmpfs filesystem forcing changes to be written to the tmpfs filesystem.
The root filesystem is protected by an initramfs script. Other filesystems are protected by an init script. All protected filesystems become read-only ensuring their immutability even on power-offs.
To install fsprotect in all currently supported versions of Ubuntu open the terminal and type:
sudo apt install fsprotect
The benefits of using fsprotect are:
- Filesystems are protected and no change is ever written to the disk.
- Protected filesystems are mounted read-only. This means that they aren't damaged when the computer is turned off improperly.
- It is very easy to use.
- In some cases it makes the filesystem access faster.
The drawbacks of using fsprotect are:
- Filesystem changes cannot be more than a predefined limit in bytes (set by you).
- Since tmpfs is heavily used, you need to have adequate swap space.
Pablo Bianchi
- 15,657
karel
- 114,770
-
Install fails on Ubuntu 16.04.2. Problem is a bad reference to
touchin an initram script. It points to/usr/bin/touchrather than/bin/touch. This can be forced to work, but even when installed, network stops working. – b_laoshi Apr 26 '17 at 08:55 -
Network stops working could be because you are using a bad kernel or a kernel without header files. When the computer reboots wait until the manufacturer's splash screen disappears, then press the Shift key to show the GRUB boot options. From the purple GRUB screen select Advanced options for Ubuntu and press Enter. A new purple screen will appear showing a list of kernels. Select a different kernel and press Enter. – karel Apr 26 '17 at 09:20
-
It's practically a new install with all updates. I tried the old kernel, and at first it booted with networking, but then I realized that fsprotect wasn't bundled in the old kernel. I updated all kernels and now I have no networking when I boot in from either kernel. – b_laoshi Apr 27 '17 at 01:00
-
1Removing the fsprotect option from grub and updating initramfs disabled fsprotect of course, and network works again. Clearly it's something in fsprotect that is breaking networking. – b_laoshi Apr 27 '17 at 01:23
/tmp, and are cleaned up after logout... isn't this sufficient? – Rmano Mar 20 '14 at 14:37