14

I am unable to alter the screen brightness in my laptop; it is always 100%.

The laptop is Acer Aspire 5740, and graphics/chipset/VGA all are by Intel.

The laptop has a keyboard shortcut, Fn+Right and Fn+Left which shows the brightness being increased or decreased (the brightness icon blinks on the top!), but in reality no change.

I have other options for the same function key (Fn), like Fn+Up & Fn+Down for volume control, which are working perfectly!

The brightness control in Ubuntu System Settings is also not responding!

I did try a few options available here!

(1)

I did try to edit the "GRUB" like many have suggested. But I'm unable to locate the "LINE" to be edited, i.e. GRUB_CMDLINE_LINUX="". I get the following as the error message or so!

(gedit:8235): Gtk-WARNING **: Calling Inhibit failed: GDBus.Error:org.freedesktop.DBus.Error.ServiceUnknown: The name org.gnome.SessionManager was not provided by any .service files

(2)

I tried to add "xbacklight". I got the following:

Reading package lists... Done
Building dependency tree
Reading state information... Done
The following NEW packages will be installed:
  xbacklight
0 upgraded, 1 newly installed, 0 to remove and 190 not upgraded.
Need to get 8,488 B of archives.
After this operation, 61.4 kB of additional disk space will be used.
Get:1 ftp://ftp.iitb.ac.in/distributions/ubuntu/archives/ trusty/universe xbacklight amd64 1.1.2-1 [8,488 B]
Fetched 8,488 B in 0s (26.5 kB/s)
Selecting previously unselected package xbacklight.
(Reading database ... 165039 files and directories currently installed.)
Preparing to unpack .../xbacklight_1.1.2-1_amd64.deb ...
Unpacking xbacklight (1.1.2-1) ...
Processing triggers for man-db (2.6.7.1-1) ...
Setting up xbacklight (1.1.2-1) ...

The YouTube video Xbacklight - Dim Your Screen - Ubuntu 10.10 shows xbacklight as a part of keyboard shortcut, but I am unable to locate one in Ubuntu 14.04, so I tried to create a custom! With the xbacklight as the command! And Ctrl+Up & Ctrl+Down. The Ubuntu seems to recognize it, but no response!

How can I proceed? Or I'm I making any mistake?

At present my update/download server is the IIT-Bombay server for India. Which is the only responsive server for India.
wjandrea
  • 14,236
  • 4
  • 48
  • 98

11 Answers11

12

Manually changing brightness

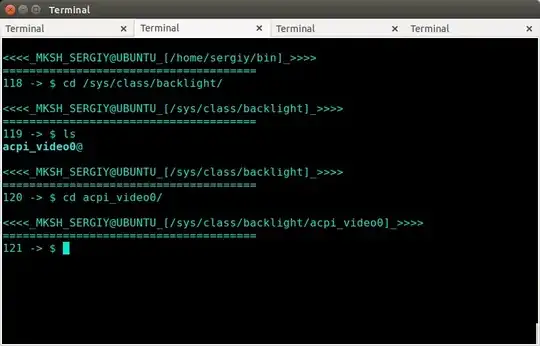
Remember that on Linux/Unix everything is a file. Brightness value is also stored in a file. Open a command line ( aka Terminal) by pressing Ctrl+Alt+T, or by searching 'terminal' application in the dash. Then execute these commands:cd /sys/class/backlight/. cd is basically used for navigating through directories. And under backlight for me there is folder acpi_video0, but for you it may be different. Use ls command to find out what folder name it is. cd to that folder as well. So for example, I would do as show in picture

enter image description here

OK, so by now you have navigated to the folder which contains your brightness settings. Inside there is brightness file and max_brightness file.

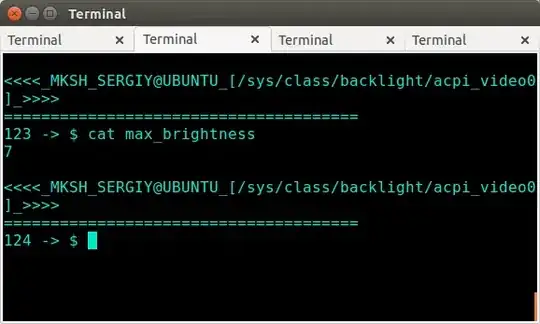
cat max_brightness will tell you the maximum brightness that you can set on the screen. brightness is the actual file that controls brightness. You can change it from 0 to whatever number is in max_brightness.

enter image description here

See the number 7 after I did cat max_brightness ? This is my maximum brightness value, so it means i can change brightness from 0 to 7.

Now we can edit brightness file to actually change screen brightness. We will need some text editor command. I prefer using command line text editor nano. So I would do

sudo nano brightness

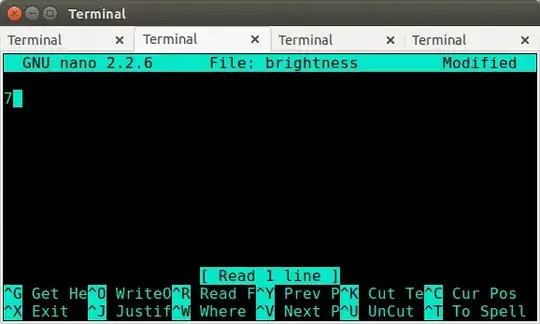
It will ask you for your password. Enter it, and you will see a screen something like this:

enter image description here

Do you see where is my cursor? right after the number. That's what i mean when i said, don't hit enter. This file has to have only that one line, no other. You can use left/right keys to move cursor, and backspace or del keys to delete old number, and then type new. Remember, that you can only go from whatever number was in max_brightness file to 0.

When you wrote new number, press Ctrl+X, it will ask if you want to "Save modified buffer". Press Y. Then it will asks what name of the file to write. Just press enter, we do not want to change name of this file. Done. At this point your brightness should change.

Small note on the side: The problem with graphic text editor like gedit, is that it tries to create a backup for every file, and brightness file and that folder has permissions such that only root can modify it, so it won't let gedit to change that file or create backup, even with gksudo - i tried

Script version: This script opens my brightness file with nano editor. Make necessary adjustments for your system, as some folder names may be different.

#!/bin/mksh
printf " \n Entering file to change brightness in 3 seconds\n remember - no new line after number.  ";
sleep 3;
sudo nano /sys/class/backlight/acpi_video0/brightness
Sergiy Kolodyazhnyy
  • 105,154
  • 20
  • 279
  • 497
10

Try the utility xbacklight.

What worked for me was:

sudo apt-get install -y xbacklight
xbacklight -set 50  # Set display backlight to 50%
xbacklight -set 100 # Set display backlight to 100%
xbacklight -inc 10  # Increase display backlight by 10%
xbacklight -dec 10  # Decrease display backlight by 10%

Confirmed to work on:

  • Ubuntu 15.10 + ASUS machine
  • Ubuntu 16.04 + MacBook Air
David Foerster
  • 36,264
  • 56
  • 94
  • 147
raggyp
  • 101
5

Extending @Serg's answer.

  1. Navigate to the directory containing brightness, e.g. /sys/class/backlight/intel_backlight

  2. Use sudo chmod 770 to change file permissions Note: there is some security risk associated with making this file less restricted.

  3. Use sudo chown user_name brightness where user_name is your user name. The whoami command will tell you your user name if you aren't certain. Note: there is some security risk associated with making this file less restricted.

  4. cd ~/bin. If it [1] does not exist, first mkdir ~/bin.

  5. Create a script file named "brightness" from the command line.

    $> touch brightness $> chmod 777 brightness

  6. Edit brightness with your favorite editor to:

    #!/bin/bash
    echo "$1" > /sys/class/backlight/intel_backlight/brightness
    
  7. From the command line:

    sudo ~/bin/brightness 1000

will set the brightness to 1000. Note: the appropriate settings for your machine may be different. Be sure to verify the max_brightness as mentioned above.

  1. Adding ~\bin\ to the path reduces the command to brightness <n> where n is the desired level of brightness.

[1] Or it's equivalent

  • 1
    add to bash_profile alias brightness="sudo subl /sys/class/backlight/intel_backlight/brightness" – Shai M. Dec 11 '16 at 15:32
  • @ShaiM. My Ubuntu installation does not have Sublime Text. – ben rudgers Dec 11 '16 at 15:36
  • You are right. you can use any editor you would like. :) Thanks for the answer! – Shai M. Dec 11 '16 at 15:38
  • @ShaiM. The implementation I describe does not display an editor to the user. Instead it runs in a way a user expects the command line utility to operate. A more sophisticated implementation can do bounds checking based on the specific limits of a display. For example, my Thinkpad had a maximum brightness value around ~3000, my current laptop has a maximum brightness value of 937. The utility could abstract away such differences by accepting keywords like "maximum", "half", "dim", etc. – ben rudgers Dec 11 '16 at 16:13
4

I am unsure about the changes that you are doing to grub and trying to install xbacklight.

But there are some good guides out there. An article from itsfoss worked for me.

Before you try out the article, open up terminal and key in acpi_listen and then press your fn+up and fn+down key combinations to check whether your brightness keys are actually getting registered by Ubuntu or not.

astrob0t
  • 1,746
  • Thanks! I edited GRUB, but no change! and the article you shared for editing Intel Details, I get the following error message, and the screen to be edited is shown EMPTY. "(gedit:5100): Gtk-WARNING **: Calling Inhibit failed: GDBus.Error:org.freedesktop.DBus.Error.ServiceUnknown: The name org.gnome.SessionManager was not provided by any .service files " & how do I use "acpi_listen" – wish.naren Oct 24 '14 at 09:53
  • Please ignore the errors that you are getting in the terminal while editing in geditor. Add those lines as suggested in the link, and save and exit geditor. Then logout and log in back – astrob0t Oct 24 '14 at 10:02
  • open terminal, key in acpi_listen and hit enter. the cursor will start blinking awaiting your inputs. now press the key combinations for adjusting brightness. you would see some output in the terminal and if the keys are not working, there wount be any output visible. When done testing, simple press ctrl+c to exit. – astrob0t Oct 24 '14 at 10:06
  • thanks, I did the same, and it is being described for "brightness up" and "brightness_down" same goes for "Volume Up/Down" – wish.naren Oct 24 '14 at 10:09
  • ok. that's good. this means, the keys are getting registered. now can you give the output of ls /sys/class/backlight/ – astrob0t Oct 24 '14 at 10:12
  • it says "acer-wmi intel_backlight" – wish.naren Oct 24 '14 at 10:14
  • You do have intel drivers controlling your brightness. now open terminal and paste lspci | grep -i vga and provide the output – astrob0t Oct 24 '14 at 10:26
  • okay! it says "00:02.0 VGA compatible controller:Intel Corporation Core Processor Integrated Graphics Controller (rev12)" – wish.naren Oct 24 '14 at 10:34
  • now paste sudo gedit /usr/share/X11/xorg.conf.d/20-intel.conf in the terminal. this would open geditor. Copy the following to the file and save and exit, logout and log in back again. you may ignore any error messages that appears in the terminal. Section "Device" Identifier "card0" Driver "intel" Option "Backlight" "intel_backlight" BusID "PCI:0:02:0" EndSection – astrob0t Oct 24 '14 at 10:39
  • thanks again, but the file being opened is totally empty! am I suppose to type the entire thing there? the msg in terminal while opening of file is "(gedit:2723): Gtk-WARNING **: Calling Inhibit failed: GDBus.Error:org.freedesktop.DBus.Error.ServiceUnknown: The name org.gnome.SessionManager was not provided by any .service files

    (gedit:2723): Gtk-WARNING **: Calling Inhibit failed: GDBus.Error:org.freedesktop.DBus.Error.ServiceUnknown: The name org.gnome.SessionManager was not provided by any .service files"

    – wish.naren Oct 24 '14 at 10:44
  • Yes the file is supposed to be empty. you need to type in the entire thing. – astrob0t Oct 24 '14 at 10:45
  • It worked! thanks, and let me add it to the article! – wish.naren Oct 24 '14 at 11:00
  • Glad it helped. You may accept any answer which helped you control the brightness and yes, welcome to the new and exciting world of ubuntu. – astrob0t Oct 24 '14 at 11:08
4

It worked by following the article Fix Brightness Control Not Working for Ubuntu 14.04 & Linux Mint 17!

Just add the given data in the "intel file" when it's opened, copy paste, save the file, shutdown and start your system! :)

4

I think this one is the easiest of all the solutions, and it provides you with a graphical icon to control brightness:

sudo add-apt-repository ppa:indicator-brightness/ppa
sudo apt-get update && sudo apt-get install indicator-brightness

Reference: Add Brightness Control to Ubuntu Desktop With This Handy App

3

Save the following code as "brightme"

#!/bin/bash

BRIGHTNESS_PATH='/sys/class/backlight/acpi_video0/brightness'
MAXBRIGHTNESS=$(cat /sys/class/backlight/acpi_video0/max_brightness)
MINBRIGHTNESS=1
NUMBER=$1
#Check if integer
Int='^[0-9]+$'
if [[ $NUMBER =~ $Int ]]; then
    if (( "$NUMBER" >= "$MAXBRIGHTNESS" )); then
        NUMBER=$MAXBRIGHTNESS
    elif (( "$NUMBER" < "$MAXBRIGHTNESS" )); then
        NUMBER=$MINBRIGHTNESS
    fi
    if [[ "$USER" = "root" ]]; then
        echo $NUMBER > $BRIGHTNESS_PATH
    else
        echo "Run as root, use sudo"
    fi
fi
echo "Now the brightness is $(cat $BRIGHTNESS_PATH)"

Then give permission to this file

chmod 777 brightme

Save the file in local binaries

sudo cp brightme /usr/local/bin

Now you can use like this

sudo brightme 65 #Any positive number as you wish 
1

I have the same issue: the buttons are actually responsive, you just have to wait around 5 to 20 minutes for the effect to show...

Simple workout: I have installed a brightness indicator showing in the menu bar, which you can easily click to change brightness settings in a 0-16 scale. You can find it in a repo:

ppa:indicator-brightness/ppa

It made things so easy, even though the function keys for brightness are sooo useless!

ZeBug
  • 11
  • 1
1

Did you try to add 20-intel.conf file in /usr/share/X11/xorg.conf.d/ with the following lines:

Section "Device"
        Identifier  "card0"
        Driver      "intel"
        Option      "Backlight"  "intel_backlight"
        BusID       "PCI:0:2:0"

EndSection

Then reboot or login again.

To remember the brightness level when you start your computer, I found a solution with adding a simple line in /etc/rc.local.

First adjust the desired brightness level and then check the value in

cat /sys/class/backlight/intel_backlight/brightness

Then add the following line in /etc/rc.local

echo 615 > /sys/class/backlight/intel_backlight/brightness

For example 615 is my desired value.

m1nev
  • 351
0

Well I had the same problem for my Aspire and found that editing the grub worked for me. When I edit the grub-file the same errormessage appears in console but found the solution to working anyways.

You can try the same solution I've used and run the commands in terminal:

sudo gedit /etc/default/grub

Find and edit the GRUB_CMDLINE_LINUX line and replace it with:

 GRUB_CMDLINE_LINUX="quiet splash acpi_osi=Linux acpi_backlight=vendor"

If the line doesn't exist, add it under the GRUB_TIMEOUT, GRUB_DEFAULT lines.

Then you should save the grub file and run:

sudo update-grub

A restart might be required.

Hope this helps

magnusnn
  • 136
  • 1
  • 1
  • 12
  • Thanks, I did the same. i.e. I did some how updates, and edited the grub but net result the same! you may note that I have same for Volume Control (Fun+Up & Fun+Down) which is working.! – wish.naren Oct 24 '14 at 09:44
  • Ah I see, can you try to edit the grub-file yet again, edit to GRUB_CMDLINE_LINUX="rootflags=sync"and add a line GRUB_CMDLINE_LINUX_DEFAULT="quiet splash acpi_osi=Linux acpi_backlight=vendor" , save the file and run sudo update-grub and reboot. let me know the result. – magnusnn Oct 24 '14 at 09:55
  • I think now my brightness is set for the lowest intensity! but no change in terms of setting the brightness to high/low! – wish.naren Oct 24 '14 at 10:23
  • Another possible argument for the GRUB_CMDLINE_LINUX_DEFAULT line, which works very well for me, is video.use_native_backlight=1. –  Oct 24 '14 at 13:20
0

For my issue, when I was using the dim light buttons of the laptop ( Hp pavillion i7) the light was not dimming and neither rising.

  1. So this worked, put on terminal and press enter:

    sudo gedit /etc/default/grub

  2. Grub file is open, and add the line, in the GRUB_CMDLINE_LINUX=``

    GRUB_CMDLINE_LINUX="quiet splash acpi_osi=Linux acpi_backlight=vendor"

  3. Then save.

  4. After update the Grub in the terminal add:

sudo update-grub

  1. And press Enter.Reboot computer/laptop essential to make the changes possible, and done, it works.