177

How to setup an Access Point (AP) mode Wi-Fi Hotspot?

Point to be noted: Wireless access points aren't the same as ad hoc networks. They differ significantly. In short, ad hoc networks aren't supported on newer devices and most Android, Windows Phone and Blackberry devices (and maybe iOS devices too), whereas AP mode Wi-Fi hotspots are. To get an idea about AP mode hotspots, ad hoc networks and their difference, refer to this Wikipedia page.

Web-E
  • 21,418

6 Answers6

117

Whether your wireless card support Access Point mode.

First thing to be done is perform the test whether your wireless card support going into wireless access point mode. As told earlier following test is for mac80211 framework based driver.

Install iw & execute following

sudo aptitude install iw
iw list

Look for supported interface section, where it should be a entry called AP like below

Supported interface modes:
         * IBSS
         * managed
         * AP
         * AP/VLAN
         * monitor
         * mesh point

If your driver doesn't shows this AP, It doesn't mean it can't create wireless hotspot. But those cards aren't in scope of this tutorial. For more tests follow ubuntu documentation on master mode.

The setup is divided in three sections,

  1. Setup & host a wireless network
  2. IP address setup
  3. Internet sharing

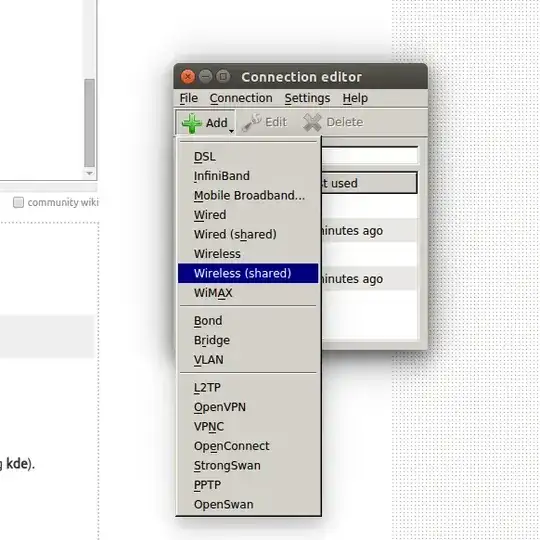
1.Setup and host a network

  • Software required: hostapd Install hostapd (install it)
  • Press alt + F2 and type gksu gedit & press enter. We are going to edit a lot of files.
  • In gedit, press ctrl+o, ctrl+l & paste it in location box /etc/hostapd/hostapd.conf. Press Enter.
  • Paste the following code,
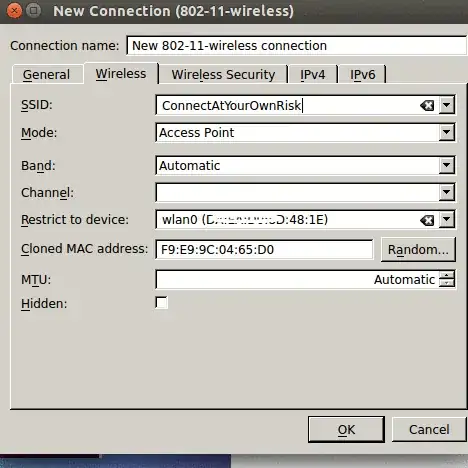
    interface=wlan0
    driver=nl80211
    ssid=test
    hw_mode=g
    channel=1
    macaddr_acl=0
    auth_algs=1
    ignore_broadcast_ssid=0
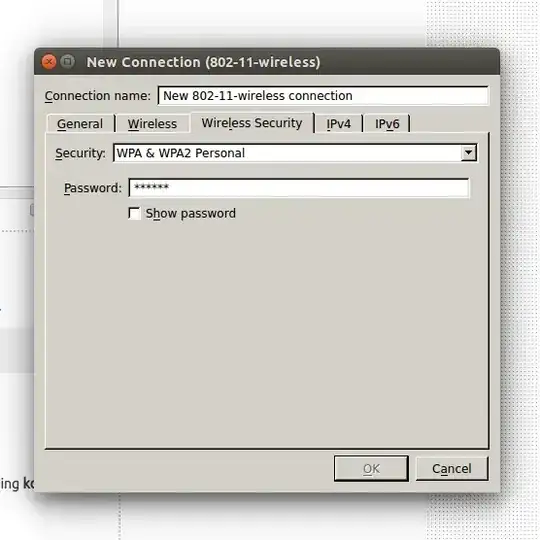
    wpa=3
    wpa_passphrase=1234567890
    wpa_key_mgmt=WPA-PSK
    wpa_pairwise=TKIP
    rsn_pairwise=CCMP
    

Please make sure there are no trailing white space and the end of the line! Hostapd is very sensitive to ending white spaces that are hard to troubleshoot!

Changes you need to do:

  1. Change interface=wlan0 to your wireless card name. (If you have one wireless card it should be wlan0)
  2. ssid=test. test is the name of your hosted network.
  3. wpa_passphrase=1234567890, 1234567890 is the password of your network.

The configuration above creates a wpa & wpa2 enabled access point in g mode. A more detailed instruction to build configuration file can be found here

Now start the hostapd. Edit the file /etc/default/hostapd and modify the line of DAEMON_CONF like this:

DAEMON_CONF="/etc/hostapd/hostapd.conf"

Then start the hostapd service using the following command,

sudo service hostapd start

It should start a wireless network. In your mobile device now you can see a wireless network and can authenticate. But the device won't get IP address. Stop it with the command sudo service hostapd stop

If you get any error, possibly your card doesn't support g mode. Try with other >modes. Guide

Part 2: Set up DHCP server for IP address management

Install isc-dhcp-server Install isc-dhcp-server

Edit the file /etc/default/isc-dhcp-server and set INTERFACES like this:

INTERFACES="wlan0"

In gedit, press Ctrl+O, in location box paste /etc/dhcp/dhcpd.conf Find (ctrl+F) below lines and put # before it. It should look like after editing

# option definitions common to all supported networks…
#option domain-name “example.org”;
#option domain-name-servers ns1.example.org, ns2.example.org;

Again comment out following lines too

#default-lease-time 600;
#max-lease-time 7200;

Add following lines at end

subnet 10.10.0.0 netmask 255.255.255.0 {
        range 10.10.0.2 10.10.0.16;
        option domain-name-servers 8.8.4.4, 208.67.222.222;
        option routers 10.10.0.1;
}

Range describe how long the address pool will be. you need to adjust subnet value also. This config can give IP up to 15 devices

Again press Cctrl+O in gedit and paste following in location bar /etc/network/interfaces, Add below

auto wlan0
iface wlan0 inet static
address 10.10.0.1
netmask 255.255.255.0

wlan0 is your wireless interface. Change it accordingly.

Note: After reboot the wireless will be shown as not managed. So you can't use any other wi-fi network. To get wireless with normal behaviour, put # before those newly added line and execute sudo start networking

now run

sudo service isc-dhcp-server start

sudo service hostapd start

At this point , your mobile device will see a network, authenticate it & after authentication it will get ip address something like 10.10.0.2.

Setup internet connection settings

For Internet connection sharing we need ip forwarding and ip masquerading. Enable ip forwarding : execute

echo 1| sudo tee /proc/sys/net/ipv4/ip_forward

Now say you are using to a dial up/usb modem connection to connect to INTERNET. You need to get the logical interface name. For that execute ifconfig or ip address

For dialup/usb modem: it should be ppp0. If you want to share Ethernet connection you should use ethXwhere X is your ethernet device number. If you are connecting to internet through an android device with USB tethering, then the interface name should be usb0.

Now once you get the interface name execute sudo iptables -t nat -A POSTROUTING -s 10.10.0.0/16 -o ppp0 -j MASQUERADE

The ppp0 in above command is the interface whose internet connection you are sharing over wireless.

If you have edited upto /etc/network/interfaces you can use this script to start the service. Edit it if you are not sharing ppp0. if you are using script and want to stop the server, use sudo killall hostapd


A blog that is mostly a summary of what has been described here: http://dashohoxha.blogspot.com/2013/06/how-to-setup-wifi-access-point-on-ubuntu.html

A script that tries to automate the steps described here: https://gist.github.com/dashohoxha/5767262

Please feel free to report or fix any bugs that you notice.


Great helps from :

Web-E
  • 21,418
102

Ubuntu 20.04 LTS and newer

With GNOME 3.36 desktop on Ubuntu 20.04 LTS, WiFi tethering has become easier than ever! Just open the Wi-Fi Settings from system menu.

System Menu

In the Wi-Fi Settings window, click on the drop-down menu on top right and select Turn On Wi-Fi Hotspot option.

Turn On WiFi Hotspot

A dialog will show up, where you can set the name and password for your new hotspot.

Set name and password for hotspot

If your hotspot gets created successfully, Wi-Fi Settings would now show a section with a toggle for the newly created hotspot.

Newly created hotspot

A hotspot indicator would appear on the top bar as well, showing it's active status.

Active hotspot indicator

If you need to edit the hotspot and do more advanced configuration, follow instructions similar to that of Ubuntu 18.04 LTS described below.

Ubuntu 18.04 LTS

GNOME 3.28 desktop on Ubuntu 18.04 LTS makes it easy to start a WiFi hotspot. Open the Wi-Fi Settings from system menu.

GNOME system status menu

And then from the hamburger menu on Wi-Fi Settings, select Turn On Wi-Fi Hotspot. That's it, your WiFi access point is now up and running!

WiFi Settings

Advanced Stuff

If you wanna change the name (SSID) and password of your access point, open Network Connections editor tool by entering the following in either Terminal or Alt+F2:

nm-connection-editor

Network Connections

Double click on Hotspot and the editor window'll appear. You may change SSID and password from the Wi-Fi and Wi-Fi Security tabs.

Edit SSID Edit password

Ubuntu 16.04 LTS & 14.04 LTS

Step 1: Test whether your WiFi card supports AP mode

Follow the Access Point mode check in the answer provided by Web-E

Step 2: Start the built-in Hotspot

Network comes with a built-in option to start an Ad-Hoc hotspot. So, let's use this first, so that it could be configured and converted to an Access Point mode hotspot in the next step.

Search Network in Dash and open it.

DashSearch

Press the "Use as Hotspot" button and Network Manager will start an AdHoc hotspot.

Hotspot

But that's not what we want, is it? Stop the hotspot.

Step 3: Configure Hotspot

Open Network Connections from Dash or 'Edit Connections' from Network Indicator menu.

Edit Connections

In the Network Connections window that appears, there'll be a connection named Hotspot listed under the WiFi section. Select it and click the 'Edit' button.

Network Connections

In the window that appears, you may edit the broadcast name (SSID) of your hotspot. Now comes the most important part of this configuration: change mode to 'Hotspot', which'll finally convert the hotspot to Access Point mode. Users of Ubuntu 14.04 LTS'll notice that this mode isn't available to choose from the dropdown. Don't get disappointed, as you can still do it via an extra Step 3.1.

Edit Hotspot Name and Password

Save and open the same Editing Hotspot window again. This time go to the WiFi Security tab for selecting password type. If you don't want to set a password, you can set security to none and thus create an open hotspot. If you're setting a password, it's recommended to change the security key from WEP to WPA2. Once the configurations are done, don't forget to save it so that the changes could apply.

In the General tab, make sure that “Automatically connect to this network when it is available” is turned off (unless you only ever use your wifi as a hotspot). Otherwise, since the hotspot is always available, you won't see the menu entries to connect to other wifi networks in the network manager applet.

Step 3.1: Only for Ubuntu 14.04 LTS

Since Ubuntu 14.04 LTS's Networks (network-manager v9.8.8) doesn't offer a graphical setting to select AP mode, we'll manually edit it's config file to force the conversion. Copy the following command, then press Alt+F2 or open Terminal and paste it there:

pkexec env DISPLAY=$DISPLAY XAUTHORITY=$XAUTHORITY gedit /etc/NetworkManager/system-connections/Hotspot

Type your password in the authorization dialog that appears and the configuration file will be opened in text editor. Find a line beginning with mode=, change it to mode=ap and save the file.

Step 4: Start Hotspot

Now that the configuration part is over, we'll start the hotspot. Click on 'Create New Wi-Fi Network' from Network Indicator menu.

Create New WiFi Connection

In the window that appears, click on the connection drop-down button and change "New..." to "Hotspot". Press the "Create" button and your hotspot will start running. From now on, whenever you need a hotspot, you just need to do this step i.e Step 4 only.

Start Hotspot

K.. That's all folks! Have fun with your new Access Point

  • Coolest easy steps @HEXcube – Amit Rane Aug 18 '14 at 07:32
  • 1
    I had completed the 3 steps described by @Web-E but my android phone wouldn't connect, perennially trying to "obtain ip address." Then I just did the "mode=ap" change in /etc/NetworkManager/system-connections/my_wifi_connection_name suggested by HEXcube and got connected instantly. My Ubuntu is 13.10 64bit on Acer laptop Aspire E1-531. – Sri Sep 09 '14 at 18:51
  • The ip_forward and masquerade commands were executed as part of Web-E's steps - should we revoke them? If yes, how? – Sri Sep 09 '14 at 19:05
  • I wish more people knew about this solution. This should be the preferred answer. – Lars Nyström Jun 02 '15 at 09:48
  • The solution below using KDE connection editor worked for me. However, the solution in this article didn't, because it miss very important thing: to what value should be IPv4 tab set? I have «Automatic(DHCP)», which on start ends up with spamming syslog with «DHCPDISCOVER on wlan0 to 255.255.255.255» for ≈5 seconds, and then disconnecting because of timeout. (I didn't try the variant with hostapd though) – Hi-Angel Jan 12 '16 at 06:08
  • @Hi-Angel If you followed Step 1 and started the built-in Hotpsot first, then there's NO NEED to manually edit IPv4 settings. Just leave Hotspot's default IPv4 setting ("Shared to other computers") as it is. – Rohan 'HEXcube' Villoth Jan 13 '16 at 10:10
  • @HEXcube ah, well, of course I didn't start that, because you titled Step 1 as «Test whether your WiFi card supports AP mode», which I don't need because I know that it does :Ь Btw, the default IPv4 settings were just «Automatic(DHCP)», not the "Shared to other computers" (perhaps because of the first step). – Hi-Angel Jan 13 '16 at 10:56
  • 1
    @Hi-Angel Oh, I meant Step 2! My bad! By the way, which Ubuntu release are you using? I haven't tested on 15.10 yet. Will update the answer when 16.04LTS is out. – Rohan 'HEXcube' Villoth Jan 14 '16 at 14:33
  • @HEXcube ah, well, it still isn't obvious. It is written, like "start hotspot" is the easy way, but for those who don't seek ones, below is another one. I have a Kubuntu-14.04.03, though I do use Awesome WM (due to low RAM without KDE, so I'm using nm-applet). Thank you! ☺ – Hi-Angel Jan 14 '16 at 16:27
  • I'm trying this on 15.10. It didn't work at first until I installed hostapd. Now it connects, but doesn't seem to be allocating an IP address. I tried installing isc-dhcp-server but it didn't make any difference. dnsmasq seems to be running with some dhcp ranges but not allocating to the wlan0 interface. What could have gone wrong? – tudor -Reinstate Monica- Apr 29 '16 at 06:29
  • @tudor Sorry for the late reply, but I updated the answer for Ubuntu 16.04LTS! So, can u give this a try on Ubuntu 16.04LTS? – Rohan 'HEXcube' Villoth May 01 '16 at 19:38
  • @HEXcude, Thanks, but really needed an answer for 15.10. I haven't yet got the kernel working properly on 16.04 yet due to the shift to I2S audio. :-( – tudor -Reinstate Monica- May 01 '16 at 23:16
  • @HEXcube - no, these steps don't work on 16.04 for me. Everything seems good up until Step 4. After choosing "Create new network..." the dialog doesn't look like what is shown above. I have 4 fields: (1) Wifi-adapter (2) Network Name (3) Wifi Security (4) Key – BeeOnRope Nov 12 '16 at 22:53
  • ... and I don't see any option to select my existing configured Hotspot there, only to create what I guess is a new ad-hoc network. – BeeOnRope Nov 12 '16 at 22:54
  • For 16.04LTS setting the mode as Hotspot was the key. However, there may be a set missing? On an Aspire F15 a network (up down arrows in top right corner) then WiFi network > Disconnect, disable wifi wait for a minute, enable wifi, then Create New Wi-fi Network. Otherwise devices could not connect to the Ubuntu hotspot. – Underverse Feb 10 '17 at 09:10
  • @BeeOnRope Sorry 4 the late reply. But I was able to reproduce your issue when using more than one WiFi adapter. Does your machine have two of them? Or maybe a virtual one? I suggest you try either disabling one or create hotspot connection under the first one – Rohan 'HEXcube' Villoth Mar 30 '17 at 18:53
  • @Underverse Are u using a development version of Ubuntu, like 17.04? I haven't tested on 17.04 yet. Or it could be a hardware specific issue. – Rohan 'HEXcube' Villoth Mar 30 '17 at 18:56
  • @HEXcube 16.04LTS :-) – Underverse Mar 31 '17 at 01:54
  • @HEXcube - indeed, I have one internal adapter but also a second one was connected via USB while I was attempting that. I don't have a choice of what adapter to use as I need to use the external one for receiving long-range signals. – BeeOnRope Apr 02 '17 at 23:15
  • @BeeOnRope - I have two wifi adapters (one is built in, one is a USB dongle) on my Ubuntu 17.04 laptop. I'm seeing the same problem as you: in step 4 the "New Wi-Fi network" dialog doesn't give me the option to select the hotspot I configured. Did you ever figure out how to make this work? – Adam Dingle Jun 07 '17 at 19:32
  • @adam - nope. Extra characters to meet limit. – BeeOnRope Jun 07 '17 at 20:00
  • 1
    IMPORTANT. WEP does not work for android phone. Change to WPA. – sureshvv Mar 21 '19 at 05:36
33

I too had the same problem. The best solution I could find is to use ap-hotspot for creating a hotspot of the ubuntu machine. It works fine for connecting to almost all android, windows phones, etc.

To install it:

$ sudo add-apt-repository ppa:nilarimogard/webupd8
$ sudo apt-get update
$ sudo apt-get install ap-hotspot

Next, to start the hotspot:

$ sudo ap-hotspot start

It asks you which adapter's internet you want to share, name of the network, password, etc. in an interactive manner.

To stop the hotspot :

$ sudo ap-hotspot stop

To configure it:

$ sudo ap-hotspot configure

If any problem, hope this link helps.

EDIT:

For now it seems there is some problem with Ubuntu 14.04, and as specified in the webupd8.org article linked, you have to downgrade hostapd:

64bit:

cd /tmp
wget http://ftp.ksu.edu.tw/FTP/Linux/ubuntu/pool/universe/w/wpa/hostapd_1.0-3ubuntu2.1_amd64.deb
sudo dpkg -i hostapd*.deb
sudo apt-mark hold hostapd

32bit:

cd /tmp
wget http://ftp.ksu.edu.tw/FTP/Linux/ubuntu/pool/universe/w/wpa/hostapd_1.0-3ubuntu2.1_i386.deb
sudo dpkg -i hostapd*.deb
sudo apt-mark hold hostapd
shivshnkr
  • 5,063
  • Dude, that worked like a charm! – Milkncookiez Nov 12 '13 at 22:24
  • I followed the instructions on the previous answer and found that my wireless card was not supported for access point mode. But ap-hotspot still worked perfectly. So my advise would be to just install ap-hotspot and see if it's working – Hashken Dec 10 '13 at 14:34
  • 1
    It works for me if I stop network-manager with sudo stop network-manager before starting ap-hotspot. Thanks! – Rmano Dec 18 '13 at 15:51
  • You have to turn the wireless on the computer on first, but not connect it to anything - This works brilliantly :-) -But I will say that I could just use the default Use as Hotpot button in Fedora 19 (other half off dual boot) – Wilf Jan 02 '14 at 11:10
  • Didn't work for me. When I try connecting with my iPhone, it can connect and give a password successfully, but it never gets past that. – Seanny123 Jan 10 '14 at 07:29
  • For both this answer and the one above, I will connect on my nexus10 at full signal for a bit, then drop out, state "authenticating" again, before finishing with "authentication problem". Disabling authentication just results in an endless loop. – Programster Mar 10 '14 at 22:11
  • This answer combined with the accepted one helped me do it. Thanks. – darxsys Apr 14 '14 at 09:22
  • I get Your wireless card does not support Access Point mode even though it works on Connectify and Virtualrouter in windows – 3l4ng Jun 03 '14 at 16:47
  • 1
    The script now seems to be deprecated. – Léo Lam Dec 13 '14 at 10:04
  • I tried same steps but wifi is getting connected and disconnected continuously on my Lenovo thinkpad latop ( I created hostop in sony laptop). Also on android mobile wifi gets connected but shows limited connectivity and no internet connection. Please help. – snoop Aug 22 '15 at 12:39
  • Doesn't work for me. Ubuntu 14.04. After sudo ap-hotspot start I see Starting Wireless Hotspot... line. But my Honor 9 Lite doesn't even see the connection. What it could be. – LRDPRDX Jun 29 '18 at 12:35
5

Now, here's a method that's simple and will definitely do the job.

Install KDE Connection Editor

Open Terminal (Ctrl+Alt+T) and type the following commands, one after the other.

$ sudo apt-get install plasma-nm
$ sudo apt-get update

Now, you've just installed KDE Connection Editor.

Let's create a Wi-Fi Hotspot.

Create a Wi-Fi Hotspot (Access Point mode)

1.Now open the installed application by either,

  1. Search(Alt+F2) for kde-nm-connection-editor( You'll it as soon as you start typing kde).

    OR

  2. Open it manually from the Terminal.

    $ sudo kde-nm-connection-editor
    

2.Now click + Add and select Wireless (shared)

Adding A new connection

3.Now, you'll see the below window.

Connection setup tab

SSID: Give a name for your new Hotspot

Mode: Select Access Point

Cloned MAC address: Click Random button to generate a random MAC address.

Everything else should be already set to fine.

4.Now let's go to the Wireless Security tab.

WPA Password tab

Select WAP & WPA2 Personal and type your password.

Click Ok.

5.Now your connection is ready.

Ready

Enjoy!

ngub05
  • 153
  • 2
  • 7
2

one of the easiest way i found is by using create_ap by github user oblique

Prerequisite:

1) hostapd

sudo apt install hostapd

steps :

git clone https://github.com/oblique/create_ap
cd create_ap
make install  (use sudo if you want to install it systemwide)

then two turn on hotspot

assuming u want to share internet from ethernet with interface name eth0 using wifi interface wlan0, You can use following syntax:

create_ap -m nat wlan0 eth0 MyAccessPoint MyPassPhrase

for more info and reference

https://github.com/oblique/create_ap

1

@Web-E's answer was helpful, but also configures the computer as a router. I wanted only an Access Point, since I am already using my ISP's router.

I'm also running Ubuntu Server (18.04.2), so I couldn't use any GUI tools to set this up.

So, what I did was install and configure hostapd as described in this answer and then simply bridged my Ethernet and Wi-Fi adapters. Here are the contents of my `/etc/netplan/01-netcfg.yaml file:

network:
  version: 2
  renderer: networkd
  ethernets:
    # My Ethernet adapter
    enp1s0:
      # For some reason it seems I must specify at least something here.
      dhcp4: no
    # My Wi-Fi adapter
    wlp2s0:
      dhcp4: no
  bridges:
    br0:
      interfaces:
        - enp1s0
        - wlp2s0
      # Using a static IP for this box.
      addresses:
        - 192.168.0.45/24
      gateway4: 192.168.0.1
      nameservers:
        addresses: [1.1.1.1,1.0.0.1]

Of course you will need to tweak your config file for your own needs. Just run sudo netplan apply afterwards to apply the configuration.

David
  • 121