3

Ubuntu 18.04 Full Disk Encryption now works on Full install flash drives.

The ability to separately encrypt home directory / home partition has been eliminated.

How to make an Encrypted BIOS/UEFI Flash Drive with different passwords for home and system using a script?

DevHugo
  • 121
C.S.Cameron
  • 19,519

4 Answers4

6

BIOS/UEFI Flash Drive with Full Disk Encryption (18.04)

I have been playing with Paddy Landau's Manual Full System Encryption: https://ubuntuforums.org/showthread.php?t=2399092

Out of the box the script works UEFI only.

With a mkusb base, almost anything BIOS/UEFI is possible.

At this point the flash drive will be UEFI only.

enter image description here

  • Now mount the ESP boot partition and copy ESP/EFI/ubuntu/grub/grub.cfg and overwrite ESP/boot/grub/grub.cfg.

Your Bootable flash drive will now have encrypted system, home and swap files and will boot either BIOS or UEFI.

Notes:

  • *Separate home, swap and NTFS partitions are optional.
  • Many people recommend against using swap with a bootable USB or SSD for fear of wear.
  • The swap partition, if used, can be encrypted using ecryptfs-utils.
  • The NTFS partition, if used, can be encrypted using VeraCrypt so that it can be used in both Linux and Windows.
  • If there are problems reusing the installer drive on a second encrypted install, confirm /mnt/root/ has been deleted and that the correct UUID for sdx3 has been used in fstab.
  • GParted on the encrypted drive may not work.
C.S.Cameron
  • 19,519
  • 2
    It would be a good idea to test how well this works after an update to the kernel. Please test this before placing any important data on the drives. (You should be making frequent backups anyway.) – Paddy Landau Oct 23 '18 at 11:11
  • @Paddy Landau: Thanks Paddy, will give it a try in the morning and report back. Regards – C.S.Cameron Oct 23 '18 at 15:00
  • +1: @ C.S.Cameron & @PaddyLandau, Very interesting :-) The text near the end is not quite clear - does this system boot also in BIOS mode? – sudodus Oct 23 '18 at 18:32
  • @sudodus: Yes, so far it is working BIOS and UEFI, (brilliant guy that mkusb inventor), Power here has been out a while, now trying a kernel upgrade, (which I have never tried before and will likely mess up a few times). Regards – C.S.Cameron Oct 24 '18 at 04:38
  • @C.S.Cameron — To get a kernel upgrade, simply run the usual updates. If a pending kernel upgrade is available, it will install automatically. There's nothing to mess up! If you run the updates after a fresh installation, almost certainly one is available. To see your current kernel, enter uname --kernel-release in a terminal. Run your updates; reboot; and enter uname --kernel-release again. If the kernel was updated, the result will change. – Paddy Landau Oct 24 '18 at 06:25
  • 2
    @Paddy Landau : Already had latest kernel update from Updates. Tried UKuu and updated from 4.15.0.38 to 4.17.19. All is well. – C.S.Cameron Oct 25 '18 at 15:32
  • @C.S.Cameron Excellent! Thank you for testing it. – Paddy Landau Oct 25 '18 at 20:09
5

Encrypted 20.04 Full Install USB that Boots BIOS and UEFI Modes

Ubuntu 20.04 makes full disk encryption easy.

  • Unplug HDD

  • Boot Live USB in BIOS/Legacy mode, insert Target drive.

  • Start Install Ubuntu 20.04 LTS.

  • Select Language, Keyboard, Wireless, Normal Installation, Install third Party... .

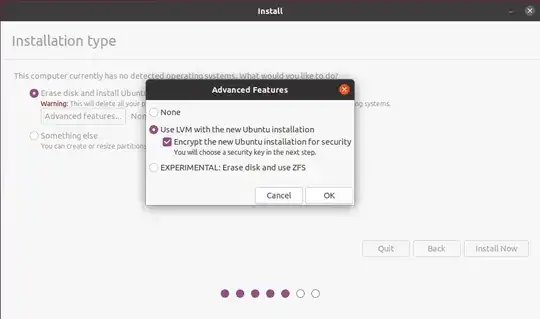
  • At Installation type Tag "Erase disk and install Ubuntu" and then select "Advanced features". Click "Use LVM with the new Ubuntu installation" and then "Encrypt the new Ubuntu installation for security".

enter image description here

  • Choose a security key. Overwrite empty disk space if inclined.

  • Select Country, then User name and Password.

  • When Installation completes the drive will boot encrypted in BIOS mode.

  • Open the 20.04 ISO file and copy boot and EFI folders to partition 1.

enter image description here

  • Copy grub.cfg from Partition 5 /boot/grub/ to Partition 1 /boot/grub/ overwriting the existing grub.cfg.

  • Re-Install GRUB:

    sudo mount /dev/sdx1 /mnt
    sudo grub-install --boot-directory=/mnt/boot /dev/sdx

Encrypted Full install USB should now boot in both BIOS and UEFI modes.

Contents of sdx1/boot/grub/ folder after reinstalling grub, sdx1/EFI/boot folder will only contain three files enter image description here

C.S.Cameron
  • 19,519
  • Will confirm if method works when created in UEFI mode. (As soon as wife lets me back on her UEFI computer) – C.S.Cameron Jul 08 '20 at 12:52
  • @Claude: I will remake the encrypted drive and add a view of the content of partition 1 to the answer. Did you try making the drive in BIOS, (Legacy), mode? – C.S.Cameron Mar 11 '21 at 11:43
  • @Claude: sdx1 only has boot and EFI folders, I have shown contents of grub folder instead. – C.S.Cameron Mar 11 '21 at 12:20
  • Cameron I answered your question in my edited previous post. Essnetially, yes it is 20.04 and x86_64-efi folder is present – Claude Mar 13 '21 at 22:03
  • @user68186 Thank you for catching my typo. yes ESP should read EFI sorry. – C.S.Cameron Apr 11 '21 at 03:02
  • @user68186 Thank you. Were you using a UEFI mode computer to make the drive? The BIOS grub install worked for me on my wife's UEFI mode computer, but I think I need to double check. – C.S.Cameron Apr 11 '21 at 13:24
  • @user68186 I recall that copying grub.cfg from Partition 5 /boot/grub/ to Partition 1 /boot/grub/ can be done either booted from Live USB or from the Target thumb drive, (as SU). The important part is to use the existing, (or updated) grub.cfg in partition 1 as the one from the copied boot folder does not work as is. Note that sudo update-grub only updates the partition 5 grub.cfg. – C.S.Cameron Apr 12 '21 at 05:14
  • @user68186 I got a great idea, Why don't you submit an answer to this question based on your experience creating encrypted bootable USB's using VirtualBox? Everyone needs an encrypted flash drive but not everyone has a driveless computer to make one on. (easy upvote). While you are at it, here is another question that could use the same answer: https://askubuntu.com/questions/1260830/create-encrypted-bootable-usb-without-overwriting-internal-disk (easy accept). – C.S.Cameron Apr 12 '21 at 06:16
  • Great idea! I use QEMU/KVM with VirtualMachineManager, not VirtualBox, but still it will be useful to anyone who can run a VM on their hardware. I will write an answer. – user68186 Apr 12 '21 at 15:37
3

Encrypted 20.04 Full Install USB using a Virtual Machine (BIOS First)

Introduction

The other answers to this question assume you have a computer where you can remove the internal drives or somehow disable them. This is not always possible or convenient. I did this using a QEMU-KVM virtual machine. If you already have the QEMU-KVM virtual machine setup on your Ubuntu desktop or if you have a computer running Ubuntu that is capable of running QEMU-KVM virtual machines, then this approach may be easier than unplugging hard drives from inside of your computer.

In general a virtual machine (VM) is great for managing full installs of Ubuntu in USB. Once I set it up, I can boot the USB full install in the VM and maintain it without shutting down my main Ubuntu desktop.

Prerequisites

  1. QEMU-KVM Virtual Machine Manager GUI running on Ubuntu 20.04.

The following command will install the all the packages needed:

sudo apt install --install-recommends virt-manager
  1. An empty USB drive large enough for a full installation of Ubuntu and sufficient space to keep your data
  2. The Ubuntu 20.04 ISO stored in the computer where the QEMU-KVM is running

Find USB device name

We need to find the device name of the USB drive. Insert the USB drive and open the Gnome Disks app:

enter image description here

Note, my USB drive is called /dev/sdc. Yours may be different. You will need this information in the next step.

Unmount any and all partitions using the black square button and turning it into a black triangles.

It is important unmount all the USB partitions of the USB.

The process of installing Ubuntu in the VM will require the VM to have full access to the USB drive, so that it can overwrite and create new partitions in the VM.

Create a new VM to use USB drives

Normally when you create a new VM it prompts you to create a virtual hard disk (a file) where the OS is installed. We want to directly access the USB and install Ubuntu there. This requires a new VM setup. We also want create a VM that boots Legacy BIOS and optionally another VM that boots UEFI.

Open the app Virtual Machine Manager and go to File > New Virtual Machine:
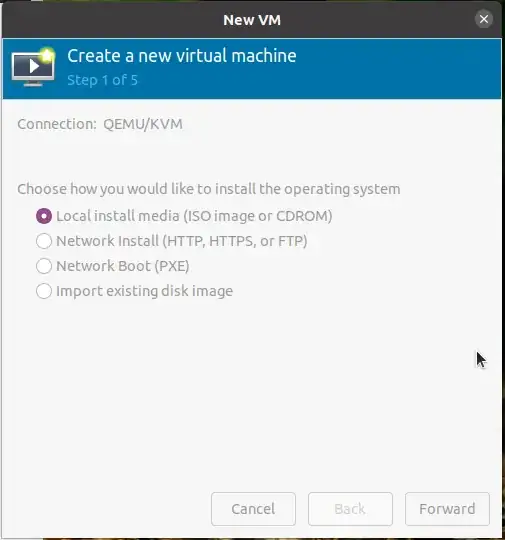
enter image description here

We will use the Ubuntu 20.04.2.0 Desktop ISO. click Forward and proceed to the next screen:
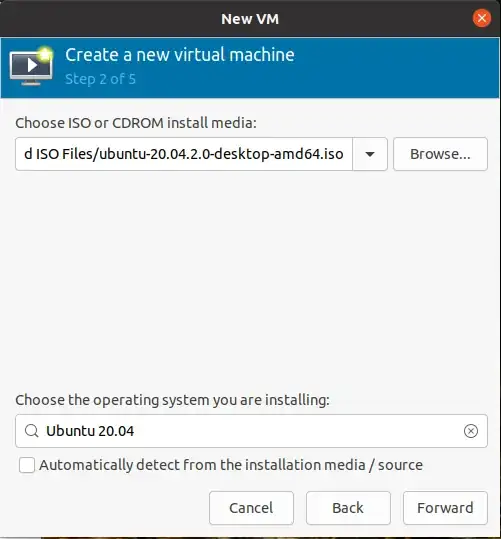
enter image description here

Click the browse button and find the ISO file. Then click Choose Volume to select it. Fill in the Name of the OS you are installing as seen above.

Select the amount of RAM and the number of CPUs you want to allocate to this VM:

enter image description here

Now comes the important part. click on Select or create custom storage and type in your USB device name:
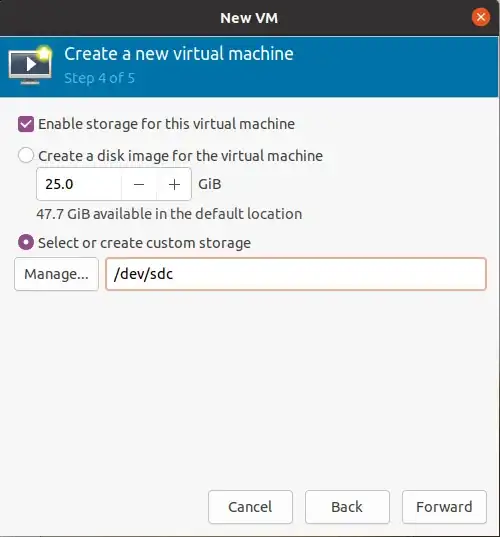
enter image description here

Note, mine is /dev/sdc, yours may be different. If you have done this before, you will get a warning Disk "/dev/sdc" is already in use by other guests.... Click Yes to use this disks.

Edit the name of the VM if you want.

Select Customize configuration before install:

enter image description here

This is where you choose BIOS or UEFI mode:

enter image description here

Select BIOS if not already selected.

If you want to create another VM to test UEFI booting of the USB you are creating, follow all the steps above and select the UEFI option for the second VM.

Click the Apply button at the bottom to make the changes.

When satisfied with all the changes, click Begin Installation at the top to continue. This will start the newly created VM and boot from the ISO you selected in the BIOS mode. You should see this screen:
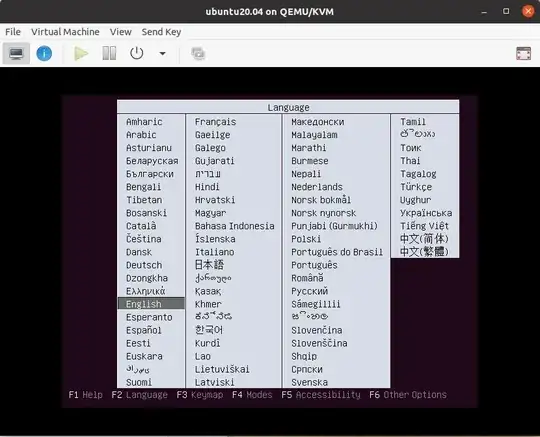
enter image description here

If you get a different screen you may have booted using the UEFI mode. Next you will get a screen that says Try Ubuntu without installing:

enter image description here

Select the Try Ubuntu option. This will let you do the changes we need after the installation. You will see the familiar Ubuntu Desktop with the icon for Install Ubuntu.
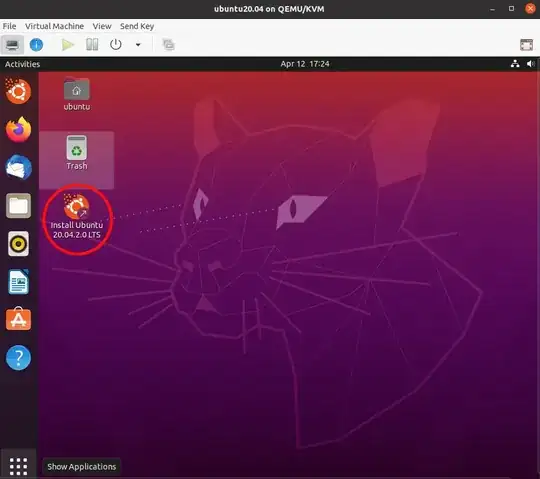
enter image description here

Select Language, Keyboard, Normal Installation, Install third Party... .

At Installation type Tag "Erase disk and install Ubuntu" and then select "Advanced features". Click "Use LVM with the new Ubuntu installation" and then "Encrypt the new Ubuntu installation for security".

enter image description here

Choose a security key. Overwrite empty disk space if inclined.

Select Country, then User name and Password.

When Installation completes, select Continue testing to make the changes to the USB so that it boots in both BIOS and UEFI modes.
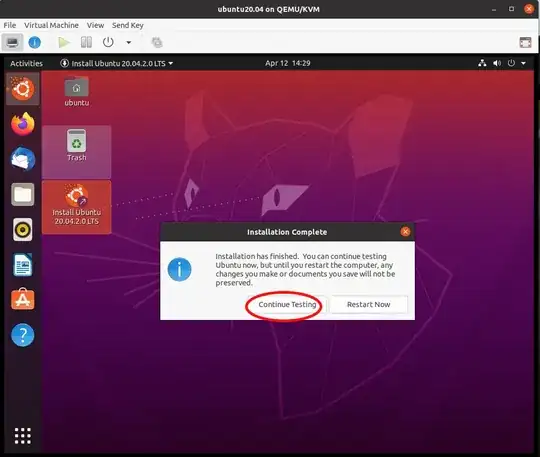
enter image description here

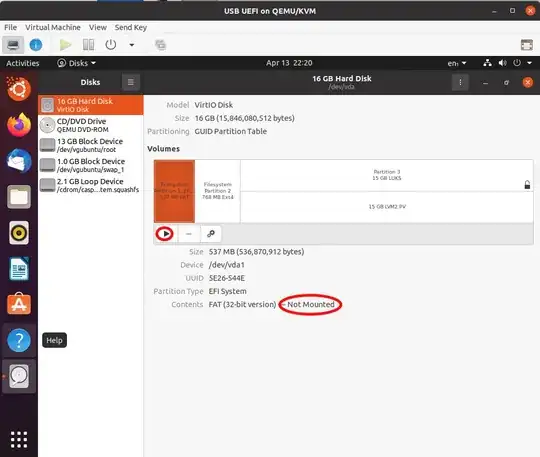
Within the the Ubuntu VM still running from the installation ISO open the app "disks" and select the USB drive from the left panel:

enter image description here

Note the device name, /dev/vda. This is different from the the /dev/sdc as now we are looking at the same USB from within the VM. Also note the size of Partition 1 and Partition 5, in this case 537 MB and 767 MB respectively. This will help us find these partitions later.

Mount these two partitions by clicking on the black triangles and turning them into squares.

Open the Files app (AKA Nautilus) in the VM, and navigate to +Other Locations > Computers > cdrom. This is the Ubuntu installation ISO we have booted from.

Open another instances of the Files app in the VM and and navigate to +Other Locations > 537 MB Volume. This is Partition 1.

Resise and move the two opened Files window so that you can see both as shown below.

Copy the folder boot and EFI from the cdrom to Partition 1:
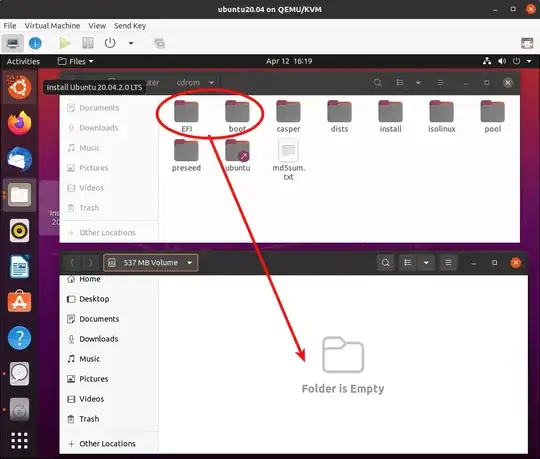
enter image description here

Now navigate to +Other Locations > 767 MB Volume > grub in the top Files window.

And to +Other Locations > 537 MB Volume > boot > grub in the bottom Files window as shown below:

enter image description here

Copy the grub.cfg file from /media/ubuntu/f31c1dbd-ea5c-487c-a14a-90b6edcea385/grub to /media/ubuntu/4281-A2FB/boot/grubas shown above.

Open the app disks again and unmount partition 1 and partition 5. close the disks app.

Open the terminal app within the VM and mount partition 1 in /mnt and install grub with the two commands:

sudo mount /dev/vda1 /mnt
sudo grub-install --boot-directory=/mnt/boot /dev/vda

Note here we refer to the USB drive as /dev/vda and the first partition as /dev/vda1.
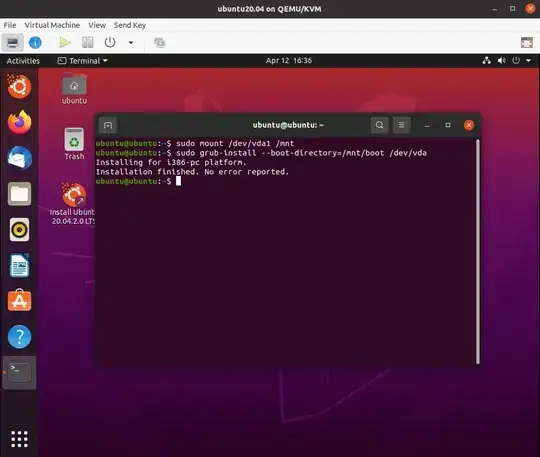
enter image description here

Note, you won't need any password for sudo in the Live install boot.

Close the terminal and power off the VM. Hit Enter when prompted.

Go to the VM's settings tab while the VM is not running, and then SATA CDROM in the left panel:

enter image description here

Remove the ISO image and Apply for the changes to take effect. Start the VM again so that it boots from the USB drive.

for some reason I get a black screen instead of the encryption pass-phrase prompt when I boot the USB using a VM. However, blindly typing the pass-phrase and hitting Enter works.

Postscript (PS)

If you keep updating the kernel using only either BIOS or the UEFI boot, sooner or later the USB will not boot in the other mode as the two grub.cfg files in two partitions will get out of sync. See How to Maintain BIOS/UEFI Flash Drive with Full Disk Encryption for a solution.

Hope this helps
user68186
  • 33,360
1

Encrypted 20.04 Full Install USB that boots UEFI and BIOS (UEFI First)

Introduction

The process described below can be done two ways:

  1. Either using a real computer where you can remove the internal drives or somehow disable them. This is not always possible or convenient.
  2. Or by using a VM like the QEMU-KVM virtual machine. If you already have the QEMU-KVM virtual machine setup on your Ubuntu desktop or if you have a computer running Ubuntu that is capable of running QEMU-KVM virtual machines, then this approach may be easier than unplugging hard drives from inside of your computer.

Prerequisites

  1. A real computer with at least two USB ports, with all internal drives disconnected or disabled that boots in UEFI mode. OR a virtual machine that boots in UEFI mode.
  2. An empty USB drive large enough for a full installation of Ubuntu and sufficient space to keep your data
  3. A Ubuntu 20.04 Live installation USB, OR The Ubuntu 20.04 ISO stored in the computer where the VM is running

Boot from the Installation USB/DVD or ISO

Irrespective of whether you are using a real machine or a virtual machine, make sure you boot the Ubuntu 20.04 Live Installation USB/DVD or ISO in the UEFI mode. You should see something like this:

enter image description here

If you see the purple page then you booted in the BIOS/Legacy mode. Select Ubuntu from the above menu and then Try Ubuntu as shown below:

enter image description here

Once again if you see a different Try Ubuntu without installing option, then you have booted in the BIOS mode.

This will let you do the changes we need after the installation. You will see the familiar Ubuntu Desktop with the icon for Install Ubuntu.

enter image description here

Select Language, Keyboard, Normal Installation, Install third Party... .

At Installation type Tag "Erase disk and install Ubuntu" and then select "Advanced features". Click "Use LVM with the new Ubuntu installation" and then "Encrypt the new Ubuntu installation for security".

enter image description here

Choose a security key. Overwrite empty disk space if inclined.

Select country, then User name and password.

When Installation completes, select Continue testing to make the changes to the USB so that it boots in both BIOS and UEFI modes.

enter image description here

While still in the Live Try Ubuntu mode, open the disks app:

enter image description here

Make sure the Partition 1 and 2 are not mounted.Note the device names. In my case, Partition 1 is /deb/vda1 and Partition 2 is /dev/vda2. Yours may be different.

Open a terminal and mount partitions 1 and 2 with the following commands:

sudo mkdir -p /mnt/efi
sudo mkdir -p /mnt/boot
sudo mount /dev/vda1 /mnt/efi
sudo mount /dev/vda2 /mnt/boot

Copy the boot folder from the /USB/DVD/ISO to partition 1:

sudo cp -R /cdrom/boot /mnt/efi/

Copy grub.cfg from partition 2 to partition 1:

sudo cp /mnt/boot/grub/grub.cfg /mnt/efi/boot/grub/

Install the grub-efi module not in the Live Ubuntu:

sudo apt install grub-efi-amd64-bin

This will temporarily install the module needed for the next step. Install grub in UEFI mode in partition 1:

sudo grub-install --efi-directory=/mnt/efi --boot-directory=/mnt/efi/boot --target x86_64-efi --removable /dev/vda

Install grub in BIOS mode in partition 2

sudo grub-install --boot-directory=/mnt/boot --target=i386-pc --removable --force /dev/vda

Close terminal and any other apps and power off the computer / VM. The full encrypted installation of Ubuntu on the USB is ready. It should boot both in UEFI and in BIOS mode.

Hope this helps

user68186
  • 33,360